Categories
Extras recipes

Homemade Pasta Sauce with Meatballs

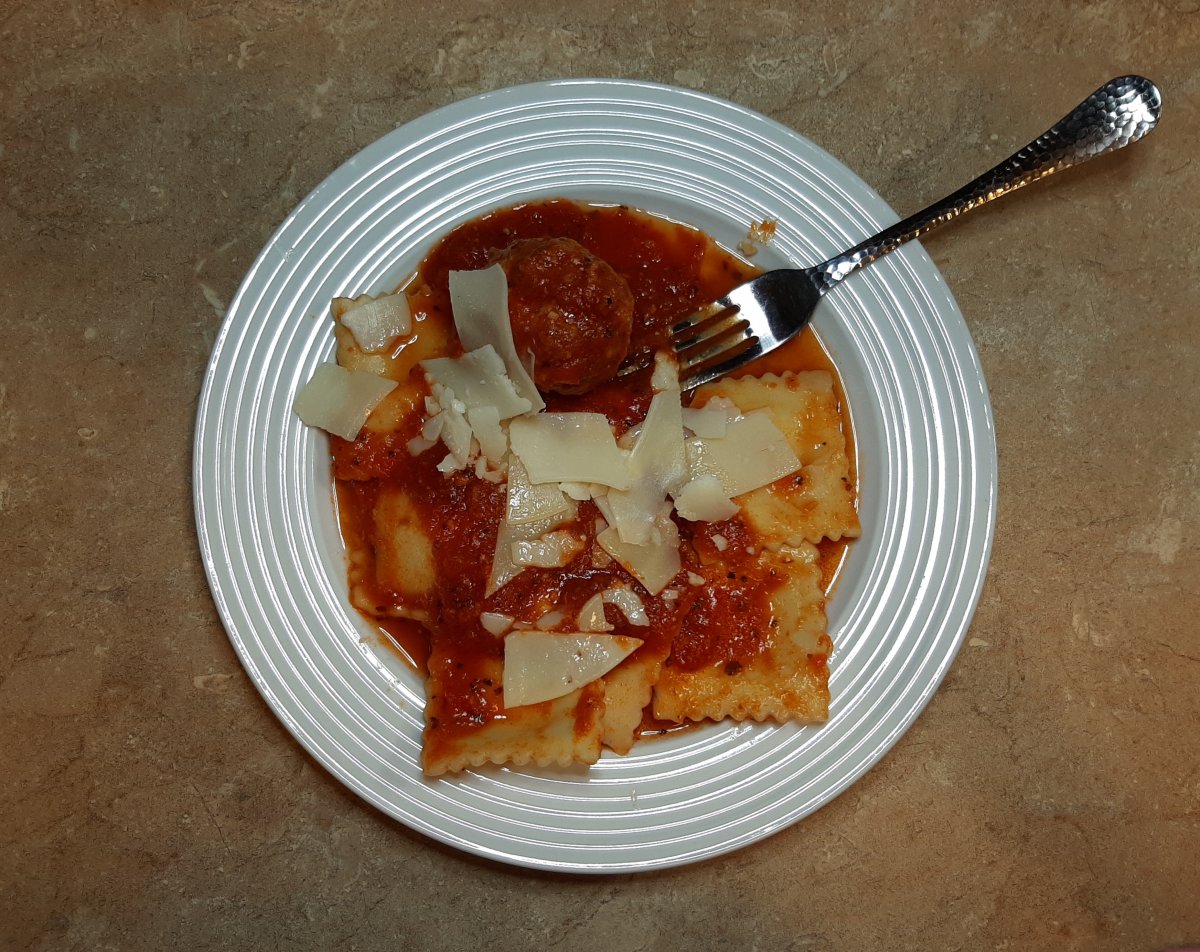
Today I’m sharing a recipe that I’ve been making and perfecting since my husband and I got married. And that was 20 years ago. It’s one of my family’s personal favorites. Therefore, they request it often. It’s a simple homemade pasta sauce with meatballs. Though, the meatballs are also homemade.

The base of this recipe is just a tomato sauce originally. Meaning that it contains no vegetables, other than tomatoes and garlic. However, garlic isn’t normally viewed as a vegetable. But, rather as an herb.

The Origin of My Homemade Pasta Sauce with Meatballs

This recipe is passed down from my mom’s side of the family. And I also got the basic meatball recipe from my mom, which includes pretty much all of the ingredients, except Italian sausage. But just like so many other recipes I’ve gotten over the years, I’ve tweaked this one as well. Additionally I add fresh vegetables to the sauce. And instead of just beef meatballs, I add Italian sausage.

Ingredients for Homemade Pasta Sauce with Meatballs:

  • 1 (29 oz) canned tomato sauce
  • 1 (14.5) oz canned whole tomatoes, diced or crushed in food processor
  • 6 oz of tomato paste
  • 5 oz of water
  • 1 bell pepper, chopped
  • 1/2 onion, chopped
  • 1 tbsp or 3 garlic cloves, minced
  • 2 tbsp dried oregano
  • 1 1/2 tbsp dried basil
  • 1 tsp salt
  • 1 tsp marjoram
  • 1/4 tsp black pepper
homemade pasta sauce with meatballs

Instructions for Homemade Pasta Sauce with Meatballs:

In a pot, add all of your ingredients and stir together on med to med-low heat.

Ingredients for Meatballs:

  • 1 lb lean ground beef
  • 1 lb ground mild or sweet Italian sausage
  • 1/4 cup of Italian bread crumbs
  • 1/4 shredded Parmesan cheese
  • 1 egg
  • 1/8 tsp dried mint

Instructions for Meatballs:

  • In a large bowl, add your ingredients together.
  • Then, using your hands, mix the ingredients together thoroughly.
  • Next, shape the mixture into balls. Also, you can make big meatballs or small ones, depending on what you prefer.
  • When you’ve used all of the meat mixture, add the meatballs to the sauce.
  • Get sauce to a boil. Then lower the temp to med low or low, till it’s simmering. And cover the pot with a lid. Furthermore, cooking times may vary. So cook until the meatballs are at 165 degrees at least.
homemade pasta sauce with meatballs

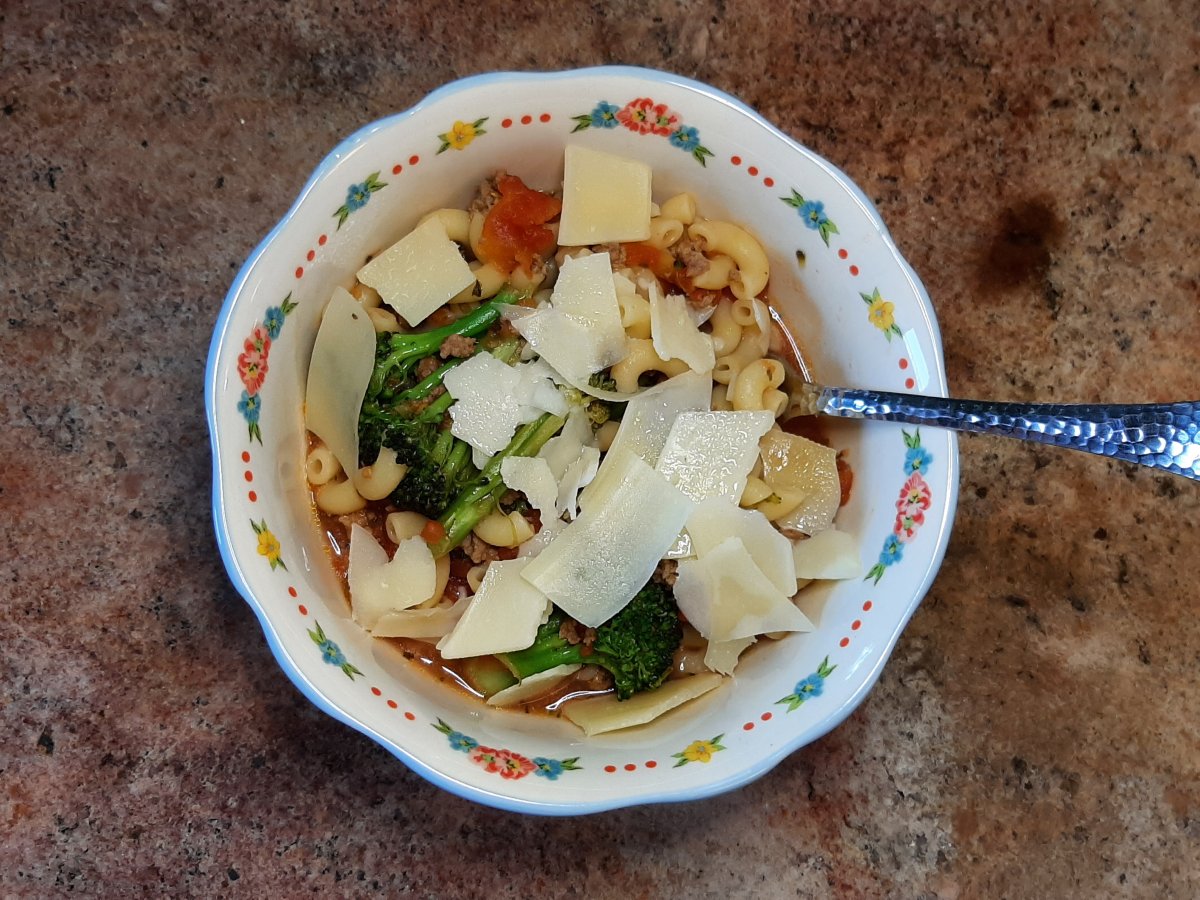
When the meatballs are cooked, serve with your favorite pasta and a salad. And top with grated parmesan cheese. Then enjoy! Thanks for reading this post.

Categories
Extras recipes

Beef and Pork Meatloaf Recipe

Today I’m going to share the best beef and pork meatloaf recipe. So, I know what you might be thinking. But, I promise you, it’s delicious.

When I was younger and had to eat meatloaf, it wasn’t one of my favorite foods. And, as I grew older, it started to conjure up images of everyone’s least favorite food. Although, it probably had a lot to do with the way they said it. “We’re having meatlooaaff.” And then they would look up to the sky for salvation.

However, all of that changed after I got married and tasted my mother-in-law’s meatloaf for the first time. Plus, I know it had everything to do with the way she prepared it. Therefore, majority of this recipe is thanks to her. Though, the only thing I changed is adding ground mild Italian sausage.

Ingredients for beef and pork meatloaf recipe:

  • 1 lb each of ground beef and ground mild Italian sausage
  • 1 chopped each bell pepper and yellow onion
  • 14 oz can whole tomatoes (drained and pulsed)
  • 1 egg
  • 3/4 c oats
  • 8 oz can tomato sauce, divided
  • and 4 oz of ketchup
beef and pork meatloaf recipe

Instructions for beef and pork meatloaf:

  • Heat oven to 350 degrees.
  • Grease a 12 cup muffin tin/pan and (1) 8-1/2 x 4-1/2 x 2-1/2 inch loaf pan.
  • In a large bowl, mix the first 7 ingredients together.
  • Mix 4 oz of the tomato sauce with the other ingredients.
  • Take remaining tomato sauce and mix with ketchup.
  • Fill the muffin tins and then the loaf pan with the meatloaf mixture.
  • Top the muffin cups and loaf pan with the remainder of the sauce/ketchup mix.
  • Bake at 350 degrees, covered with aluminum foil, for 30 mins. Then take aluminum foil off of the muffin tins for 10 more mins. And check temperature for muffin tins. They should be at least 165 degrees.
  • Re-cover the loaf pan with the aluminum foil, and keep in the oven for 20 more mins. Then take cover off for 10 mins. Check the temperature, which should be 165 degrees.
beef and pork meatloaf muffins with homemade macaroni and cheese

Serve with a side of your favorite vegetables and a grain, like rice, or a starch, like macaroni and cheese or potatoes.

Categories
Extras recipes

Oven Roasted Broccoli with Cheese

This oven roasted broccoli with cheese recipe is another one of my favorites to make and eat. But I love fresh vegetables. So this is somewhat of a staple at our house, especially starting in the spring. And going all summer long.

There are many different varieties of this recipe out there. However, this is a pretty simple one. Though I use a lot of cheese. So, you might find that you’d prefer using less.

Oven roasted broccoli with cheese
This is the broccoli after it’s come out of the oven, and I’ve sprinkled the shredded cheese on top.

Ingredients for oven roasted broccoli with cheese:

  • 1 1/2 lbs of fresh broccoli florets
  • 1-2 garlic cloves, minced
  • 1/2 c shredded fresh Mozzarella cheese
  • 1/4 c shredded Parmesan cheese
  • 4-5 TBSP Extra Virgin Olive Oil
  • Salt and pepper to taste
Oven roasted broccoli with cheese

Instructions for oven roasted broccoli with cheese:

  • Heat oven to 450 degrees
  • Line a jelly roll pan (big enough to fit the broccoli in 1 layer) with aluminum foil; and spray with non-stick cooking spray
  • Spread broccoli florets onto pan
  • Pour olive oil evenly onto broccoli
  • Sprinkle minced garlic over broccoli
  • And add salt and pepper to taste
  • Then put the pan in the oven; and cook ~15 mins, or until broccoli starts to brown
  • Turn off the oven; and take the pan of broccoli out of the oven
  • Sprinkle the shredded cheeses on top of the broccoli
  • Place the pan of broccoli back in the oven for ~ 3-5 mins for the cheese to melt
  • Finally, serve the oven roasted broccoli with cheese

You can serve this with chicken, beef, and pork.

Categories
Extras recipes

Sweet and Sour Chicken Legs Recipe

This sweet and sour chicken legs recipe is a favorite at our house. My mom used to make it when we were little. However I continue to make it for my own family. And it easily feeds a family of four. But It can readily accommodate a large crowd if you’re having a party. Or going to a potluck. You just have to double the recipe. Or triple it, depending on the number of guests.

Ingredients for sweet and sour chicken legs recipe:

picture of baked chicken legs on foil lined pan

  • 3 – 4 lbs chicken legs
  • 1 c sugar
  • 3/4 c soy sauce
  • 1/2 c white vinegar
  • 1/4 c water
  • 2 cloves garlic
  • 2 tbsp each corn starch and cold water
  • 1/2 tsp each ginger and pepper

Instructions for sweet and sour chicken legs recipe:

picture of sweet and sour sauce in saucepan on stovetop
  • First, heat oven to 425°.
  • Next, line a jelly roll pan with aluminum foil. And spray with non-stick cooking spray.
  • Then place the chicken legs onto the foil lined pan.
  • After that, put the pan into the oven for ~1 hour. But after 30 mins, flip the chicken legs over. Since cooking times vary, make sure the internal temp is at least 165° And that the juices are clear.
  • While the chicken is cooking, add all of the other ingredients to a small saucepan on medium heat. Next, stir and continue stirring till the mixture gets thick and bubbles.

After the chicken legs are cooked, turn off the oven. Furthermore, take the legs out of the oven. When your sauce is thick and bubbly, remove it from the heat. And brush the sauce evenly onto the legs.

Serve with white rice and a side of steamed vegetables.

Categories
Extras recipes

Homemade Macaroni and Cheese with Penne Pasta

This is a great homestyle recipe, using penne pasta instead of traditional elbow noodles. I used to make the box brands. And then I switched to some I found in cookbooks. But some of those were time consuming. Eventually, as I learned more about cooking and my own style, I came up with this easy, homemade macaroni and cheese with penne pasta.

Ingredients for Homemade Macaroni and Cheese with Penne Pasta:

  • 12 oz of penne pasta
  • 1 c whipping cream
  • 1 1/2 c shredded Mexican blend cheese or sharp cheddar cheese, divided
  • cracked pepper to taste
prepping homemade macaroni and cheese with penne pasta

Instructions for making Homemade Macaroni and Cheese with Penne Pasta:

  • Cook penne pasta according to package instructions.
  • While noodles are cooking, heat 1 c whipping cream in a small saucepan over med heat.
  • Add 1/2- 3/4 c shredded cheese to saucepan.
  • Add cracked pepper to taste to saucepan.
  • Stir cheese mixture constantly until it is thickened.
  • Drain the water from the penne pasta when it’s finished cooking.
  • Stir the cheese sauce into the noodles.
  • Put the penne noodle mixture into a greased 9 1/2 x 7 1/2 inch baking dish.
  • Sprinkle the remaining shredded cheese on top of the macaroni.
  • Top with more cracked black pepper to taste.
  • And bake in a 350 degree oven until cheese is melted on top ~ 5 mins.
beef and pork meatloaf muffins with homemade macaroni and cheese

This pairs well with so many foods. However it certainly has a Southern charm. So I pair mine with pork or meatloaf.

I hope you enjoyed this post. And if you make it, please let me know what you think. How do you cook macaroni and cheese? Let me know in the comments.

Categories
Extras recipes

Berries with Pound Cake

I got this pound cake recipe from my mother-in-law. However it was originally her mother’s. But, because my husband’s Aunt Ruth was the one able to get the recipe from his grandmother, it was referred to by her name. She also was the one who predominantly made it. So I hope you enjoy this recipe of berries with pound cake.

Ingredients for Berries with Pound Cake: the pound cake

  • 3 c sugar
  • 1/2 c butter
  • 1/2 Crisco
  • 6 eggs, separated
  • 1 tsp vanilla or lemon extract
  • 3 c flour
  • 1/2 tsp salt
  • 1/2 tsp baking soda
  • 1 c buttermilk

Instructions for Berries with Pound Cake: the pound cake

  • First, grease an 8 1/2 x 4 1/2 x 2 1/2 standard loaf pan with either butter or non-stick cooking spray.
  • And pre-heat your oven to 350 degrees.
  • With a beater, cream the butter, Crisco, sugar, and egg yolks until light and fluffy.
  • Next, add the vanilla or lemon extract.
  • In a separate bowl, mix your dry ingredients. And then add them alternately into your sugar mixture with the buttermilk.
  • Beat the remaining egg whites till stiff white peaks form. After that, fold them into the batter.
  • Pour the batter into the prepared loaf pan. And bake for 1 hour – 1 hour and 15 minutes or until a toothpick inserted comes out clean.
sliced pound cake on a brown plate
This is what your pound cake will look like once it’s cooled.

While your pound cake is baking, you can prepare the berries and whipped cream. For the berries, I typically go with strawberries and blueberries. But if you prefer, you can use raspberries and blackberries.

Ingredients for Berries with Pound Cake: the berries

  • 2 lbs fresh strawberries, washed, de-stemmed, and cut into bite size pieces
  • 18 oz fresh blueberries, washed
  • 1/2 tbsp white sugar
  • 1 tsp lemon juice

Instructions for Berries with Pound Cake: the berries

bowl of fresh blueberries and strawberries
  • In a medium size bowl, mix your fruit together.
  • Next, add the sugar and the lemon juice to the fruit, stirring it all together.
  • Finally, cover and refrigerate.

At this point, you’re almost finished making the berries with pound cake recipe, even though the pound cake is still in the oven. However all that remains to prepare is the whipped cream. You could use Cool Whip or Reddi Whip if you’re going for convenience. Before I started making my own whipped cream, I would use either of those other options. But then I started noticing that if I left my dessert (that had either Reddi Whip or Cool Whip) out for any length of time, then the topping would just fall apart. Or be watery. Maybe you’ve witnessed this yourself.

So then I found some recipes for diy whipped cream. And I experimented. Additionally, over time I came up with my own recipe that contains just 2 ingredients. Thus, I learned how easy it was to just make my own whipped cream. And it never falls apart when I take it out of the refrigerator. I can’t claim that homemade or diy whipped cream is healthy, because it’s fattening. Since it’s straight cream and sugar. But it doesn’t have anything else in it, unless you add something else to it. And the benefit of that is you know exactly what you’re putting into your body.

Ingredients for the whipped cream:

  • 2 cups of whipping cream
  • 4 tbsp of either white sugar or powdered sugar

Instructions for the whipped cream:

homemade whipping cream in an orange bowl
  • Using a hand mixer, beat the whipping cream on medium-high to high until it’s thick.
  • And then mix in the sugar.
  • Cover and refrigerate until ready to use.

When the pound cake is finished cooking, turn off the oven. And remove the loaf pan from the oven, allowing it to cool on a wire rack for 10 minutes. Then, run a sharp knife around the edges of the pan, to make sure the cake is loose. If it is, then flip the pan over onto a serving platter to cool completely.

Once your pound cake is cooled thoroughly, slice and serve with the berries. And top with your diy whipped cream.

Categories
Extras recipes

Sicilian Pasta and Broccoli

This Sicilian pasta and broccoli recipe is one my mom made a lot when I was a kid. She’d tell us how, when she was growing up, her family was poor. So, they ate this meal weekly, because it was inexpensive. Also, it’s typically a meatless dish. However, the first time I prepared this for my own family, my husband complained about the evident lack of protein. Therefore, I have since added ground beef. And although it changes the original somewhat, it makes for an excellent meal.

There are a number of other Sicilian pasta and broccoli recipes to be found on the internet. But most of them are missing the tomatoes that are in this one. Or they add pine nuts. Though a lot of them are also meatless. However, whichever way you prefer, I hope you try this recipe and let me know what you think;.

Ingredients for Sicilian Pasta and Broccoli:

  • 1 lb ground beef
  • 12 oz broccoli florets, washed
  • 2 (14.5 oz) cans whole tomatoes, pulsed or diced in food processor with 2 cans of water
  • 12 oz elbow macaroni
  • 4 tbsp olive oil, divided (you can use extra virgin olive oil, butter, or any kind of oil you choose)
  • 1 tbsp minced fresh garlic
  • 1 tbsp each basil and oregano, divided
  • 2 1/2 tsp salt, divided
  • 1 tbsp garlic powder
  • 1/4 tsp pepper, divided
  • Shredded Parmesan or mozzarella cheese

Instructions for Pasta and Broccoli:

  • First, put 2 tbsp olive oil in 4.5 quart saucepan, heat over medium heat, and add ground beef, breaking up with a non-stick cooking spoon.
  • Next, while the ground beef is cooking, add 1 tbsp minced fresh garlic, 1/2 tbsp basil and 1/2 tbsp oregano, 1 tsp salt, and 1/8 tsp pepper, and stir till combined. And then stir occasionally.
  • Then cook 12 oz of elbow macaroni according to directions. But don’t drain water completely, because you might need to add some of it to broccoli and beef mixture.
  • When ground beef is browned, drain fat and set aside. In the same saucepan, on medium heat, add last 2 tbsp of olive oil, broccoli florets, remaining basil, oregano, 1 tbsp garlic powder, remaining 1 tsp salt, and 1/8 tsp pepper, tomatoes, 2 cans of water, and stir till combined, cooking ~ 6-8 minutes.
  • And add the ground beef to the broccoli mixture and stir till well combined.
  • With a slotted spoon, add the elbow macaroni to the mixture, adding some pasta water if needed. And stir till all combined.
  • Finally, serve and top with your favorite Italian cheese. Enjoy!
Sicilian pasta and broccoli

Thanks for stopping by! If you made this recipe, please let me know in the comments.

Categories
Extras recipes

Italian Sausage Sandwiches with Peppers and Onions

The first time I tasted Italian sausage sandwiches with peppers and onions was at Grapevine Mills mall in Texas. It was at this really cool eatery. And it featured all my favorite flavors: garlic, tomato, and onions on a crispy roll. But it was many years until I decided to try my hand at making the recipe.

These sandwiches are great for when you have company like a tailgating party.  And they contain delicious Italian sausage and sautéed vegetables. They are also really easy to make.  So, please enjoy this recipe.

Ingredients for Italian Sausage Sandwiches with Peppers and Onions:

Italian sausage cooking in a saucepan on the stove
  • ~1-1/2 lb of Mild or Sweet Italian Sausage links
  • 6 Ciabatta Rolls
  • 1 Bell Pepper, Seeded and Sliced
  • 1 Onion, Peeled and Thinly Sliced
  • 1/8 C Butter
  • 1/2 tsp Salt
  • 1/4 tsp Pepper

You’re probably familiar with cooking sausage. Maybe you grill it or broil it. You possibly even cook it on the stove in some oil.

However, the way I’m going to cover it might seem a little strange. Although, this way is better for cooking the sausages completely through. And also browning them evenly.

Instructions for Cooking Italian Sausage Sandwiches with Peppers and Onions:

  • First, put Italian sausage links in a saucepan. And fill pan with cold water until the sausages are covered.
  • Next, put the saucepan on the stove on med to med-hi heat.
  • Then, in another saucepan, melt the butter on med heat. And add your vegetables, salt, and pepper. Next, cover, cooking on med to med-low until vegetables are tender.
  • When the water begins to simmer in the sausage saucepan, cook ~6‐8 mins.
  • The internal temperature of the sausages should be at least 165 degrees; so, if they’ve reached that, then remove the pan from the burner.
  • Finally, turn off the heat source.
sliced red bell pepper, sliced white onion, and sliced tomato sautéing in pan

Now the sausage links are fully cooked. But they appear to be washed out. Though they won’t be for long.

Final Instructions:

  • Line a jelly roll pan with aluminum foil. And spray foil with non-stick cooking spray.
  • Next, place Italian sausage links on aluminum foil.
  • Then, turn the oven broiler on hi heat.
  • Finally, put the jelly roll pan under the broiler for 3-5 mins. Then flip sausages over to the other side. And broiler another 3-4 mins.

When the sausages are browned the way you like, take them out of the oven, and turn off the broiler.

We slice our Italian sausages in order for them to fit the Ciabatta rolls better. Though you can do it however you want. Then add your sautéed vegetables. And that’s it. A lot of times I’ll add sliced and seeded tomatoes as well. But you could also add Mozzarella cheese if you wanted.

Serve with your favorite side like roasted vegetables.

Categories
Extras recipes

Banana Pineapple Cream Cheese Dessert

When I was very young, I remember my mom made this banana pineapple cream cheese dessert.  But I don’t recall exactly where she got the recipe, except it was through a friend of hers. I also know that I loved it.  And then I started making it when I was old enough. 

Furthermore, there are several ways to make this recipe, as well as different fillings. And it’s a deceptively rich dessert with all of the layers: bananas, pineapple cream cheese, and chocolate, topped with whipped cream.  So, if you have a sweet tooth, this is a very satisfying dessert.

Ingredients for Banana Pineapple Cream Cheese Dessert:

  • 1 box of Nilla wafers
  • 1/2 stick of melted butter
  • 3-4 bananas
  • 8 oz package of cream cheese, room temperature
  • 1 stick of butter (1/2 cup), room temperature
  • 1/4 c white sugar; 4 TBSP white sugar
  • 1 can crushed pineapple (drained), reserving 1/3 of the can
  • ~5.9 oz package (or family size) of instant chocolate pudding
  • 2 c whipping cream
  • 1/2 c chopped pecans or almonds
  • 1 small jar maraschino cherries, drained
layer of bananas on a Nilla wafer crust

Instructions for crust:

  • First, crush Nilla wafers and combine with 1/2 stick melted butter
  • Then press wafer mixture firmly in bottom of 9X13 pan and chill in refrigerator for 10-15 mins

Instructions for banana layer:

  • Slice bananas and add to crust layer
  • Then refrigerate pan with crust and bananas while preparing fillings
cream cheese and pineapple blended in a mixing bowl with a spatula
This is the pineapple layer with drained crushed pineapple, cream cheese, butter, and sugar or Truvia.

Instructions for pineapple cream cheese layer:

  • First, mix cream cheese, remaining 1/2 c of butter, and remainder of sugar together with blender
  • Next, add drained, crushed pineapple, and blend in thoroughly
  • And then spread onto banana layer and refrigerate

Instructions for pudding layer:

  • Prepare instant chocolate pudding according to directions
  • Moreover, when it’s set-up, spread it onto pineapple layer and refrigerate
chocolate pudding layered in 9x13 glass pan
The next level is the chocolate pudding.

Instructions for final layer of banana pineapple dessert:

  • With mixer, beat whipping cream and 4 TBSP white sugar until stiff peaks form
  • Next, spread liberally onto chocolate pudding layer
  • Then, top with chopped nuts, maraschino cherries, and remaining crushed pineapple
  • And refrigerate 8 hours or overnight before serving
  • Finally, serve and enjoy!
banana pineapple cream cheese dessert with layers of whipping cream, cherries, pineapple, chopped nuts

Have you ever made this dessert or one of its variations? What do you think of it? Your comments are appreciated.

If you enjoyed this post, please like, share, and please don’t forget to follow!

Categories
Extras recipes

Chicken Tortilla Soup

I started making this recipe many years ago when we lived in Dallas. This chicken tortilla soup is very easy to make. And I usually prepare it with chicken quesadillas after the chicken is cooked and shredded. But you can have it either way, because it’s delicious.

Ingredients:

  • 1 1/2 -2 lbs Chicken Breasts
  • 2 cans Cream of Chicken Soup
  • 3 cans Water
  • 1/2 can Rotel, drained (I use Mild, but you can use whichever you want)
  • 1/4 tsp each Salt, Garlic Powder, and Cumin
  • 1/8 tsp Pepper
  • 1 pkg of Tri-color Tortilla Strips
  • 1 Avocado
  • and 1 cup Mexican Blend Shredded Cheese

Instructions:

  • First, put the first 6 ingredients in a pot over medium-hi, and heat till the liquid starts to boil.
  • Next, once boiling, put burner on low, cover, and simmer till chicken is cooked.
  • Then, shred chicken and put back into the pot.
  • And serve over sliced avocado, tortilla strips, and shredded cheese.

If you want to make chicken quesadillas, you’ll need flour tortillas and shredded Mexican blend cheese. I usually use soft taco size tortillas. However, you can use whatever you prefer.

Place one tortilla on a plate, add some shredded chicken, and sprinkle with plenty of shredded cheese. And finally you’ll top it with another tortilla before placing the quesadilla in a pan on low heat. Heat through, till bottom is browned. Then flip over with a spatula, heating that side till it is browned as well.

chicken quesadillas

If you made this recipe, what did you think of it? Do you have your own for chicken tortilla soup or quesadillas? Your comments are appreciated.