Categories
Extras recipes

Best Recipe for Beef Fajitas

My family and I love Mexican and Tex-Mex food. In fact, when I’m the one cooking, either of those are predominantly what I cook. The food is easy to make, yummy, and satisfying. So, one day I was looking for a beef fajita recipe online. Thus, I stumbled upon one via The Pioneer Woman site, circa 10 years ago. However, being me, I’ve made some tweaks. And I’ve been making it my way since. Please enjoy this best recipe for beef fajitas.

Ingredients for Beef Fajitas:

cut up stew meat on a turquoise plate
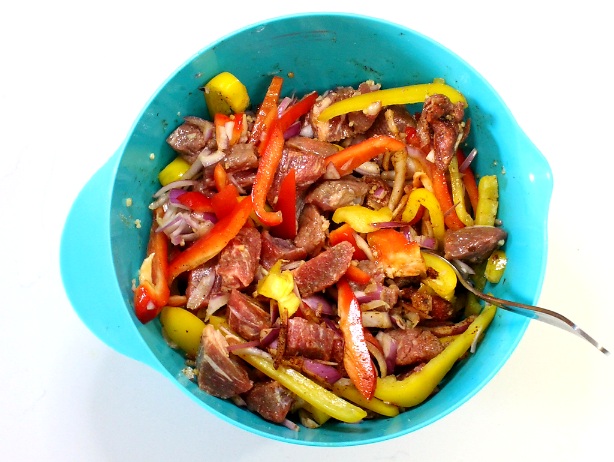
  • 1 1/2 lbs of stew meat, cut up into bite size pieces
  • 1/4 c olive oil
  • 1/6 c lime juice
  • 2 tbsp Worcestershire sauce
  • 1 tbsp minced fresh garlic
  • 1/2 tbsp each, cumin and chili powder
  • 1/4 tsp each, red pepper flakes and black pepper
  • 1/2 tsp salt
  • 2 tsp Truvia or 1/2 tbsp of sugar
  • 1 each of onion, red and yellow bell peppers, sliced
  • warmed flour tortillas
  • crumbled quest for topping
  • and guacamole
cut up beef, bell peppers, and onions marinating in a turquoise bowl

When I first made this, I adhered to most of the original ingredients, except the meat. Rather than stew meat, the foundational ingredient for the beef was flank steak. In addition, I followed the measurement sizes for the ingredient list. Though, I discovered that there was entirely too much liquid, making it almost greasy. Consequently, I halved the majority of the measurements for the ingredients. Here’s the original recipe, if you’re interested.

Recipe for Beef Fajitas Instructions:

cut up beef, and bell peppers cooking on the stove in a square copper pan
  • First, combine the first 10 ingredients in a medium size mixing bowl. And refrigerate for at least 2 hours.
  • Next, after 2 hours, add mixture to a 4 quart stove top cook pan. Then cook on medium heat, stirring occasionally.
  • Put lid on, and lower temperature to medium low, and cook for ~ 17 – 20 minutes.
  • Finally, remove from heat. And with a slotted spoon, serve on warm flour tortillas, and top with cheese and guacamole.
top down view of fajitas filled with cut up beef, bell peppers, cheese, and guacamole on a white plate

Thank you so much for reading this. Please comment and share. If you don’t follow already, please do so now.

Advertisement
Categories
Extras recipes Uncategorized

Recipe for Sautéed Brussel Sprouts with Garlic

There are many tricks to making Brussel sprouts palatable. But I haven’t tried them all. However, once I tried the one below, it’s been my go-to for difficult flavored veggies. Thus, this recipe for sautéed Brussel sprouts with garlic is a great base for many vegetables. Plus, it’s easy to make. And you could also incorporate it with different additions, if you want. Try it and see if you don’t like it.

Ingredients for Sautéed Brussel Sprouts with Garlic:

clear casserole dish of halved Brussel sprouts
  • 2 lb package of pre-washed Brussel sprouts
  • 1 tbsp fresh minced garlic
  • ~ 2 tbsp each avocado oil and salted butter
  • and ~ 1/2 – 1 tsp garlic salt

Recipe for Sautéed Brussel Sprouts with Garlic Instructions:

square copper pan of sautéed Brussel sprouts
  • First, cut the Brussel sprouts in half lengthwise before placing in a microwave safe casserole dish.
  • Next, add 2 tbsp of water to Brussel sprouts, cover with plastic wrap, and steam in microwave for 5 – 6 minutes.
  • Then, before turning stove on medium heat, add avocado oil and butter in the pan. After draining water from Brussel sprouts, place those in pan as well.
  • At that point, sprinkle fresh minced garlic and garlic salt over Brussel sprouts. And stir.
  • Continue stirring occasionally. Further, cook for only 5-10 minutes, depending on how firm or soft you want them to be.
  • Finally, remove from heat, and serve with your favorite meal.
top down view of chicken and Brussel sprouts on a white plate

So, you might be wondering where I got this particular recipe. Well, as it happens, a friend Hannah’s (20 year old daughter), made a different vegetable, and seasoned it in this way. Therefore, I thought, why not Brussel sprouts? And the rest is history…

Many thanks for reading this. Please comment and share. And if you don’t already follow me, please do so.

Categories
Extras recipes

Doctored Up Carrot Cake Mix

We celebrated Hannah’s birthday recently. Plus, she moved out, since she’ll be attending college in the Fall. So I wanted to try a doctored up carrot cake mix. And it was the best cake mix with add-ins so far.

I used carrots, of course. And I added in flaked coconut, raisins, chopped nuts, crushed pineapple and spices. Please enjoy.

Doctored Up Carrot Cake Mix Ingredients:

dry ingredients in a light blue mixing bowl
  • 2 boxes Carrot Cake mix (I used Duncan Hines)
  • 1 1/2 c buttermilk
  • 1/2 c flour
  • 6 large eggs
  • 2 egg yolks
  • 2/3 c melted butter
  • 2 tsp cinnamon
  • 1 tsp ginger
  • 1/2 tsp salt
  • 1 c grated carrots
  • 1 1/2 c shredded coconut
  • 8 oz crushed pineapple, drained
  • 3/4 c raisins
  • 1 1/2 c chopped nuts (I used almonds)
  • and 1 pkg of vanilla pudding

Carrot Cake Mix Instructions:

cake batter with shredded carrots in a light blue mixing bowl

Preheat oven to 350°, and spray your pans with nonstick cooking spray. Alternatively you could grease and flour them.

  • First, combine your dry ingredients (cake mixes, flour, salt, and spices) in a mixing bowl.
  • Next, add eggs, buttermilk, melted butter. And mix on medium speed for ~ 1 minute, scraping the sides of the bowl.
  • Then fold in shredded carrots, coconut, nuts, and drained pineapple.
  • This makes ~ 8 cups of batter, which you’ll then pour into your prepared pans. And bake at 350° for 45-55 minutes. Check at 50 minutes, and a toothpick inserted in the center of the cake should come out clean.
  • Let the cakes cool completely before turning out and frosting with either cream cheese frosting, cream cheese whipping cream frosting, or even a buttercream frosting.
  • And finally, serve and enjoy.
white frosted two layer cake on a cake stand

This is a great cake to have really any time. But with all of the extra ingredients to the cake mix, it’s almost like homemade. If you made this, what did you think? Your comments are appreciated.

If you enjoyed this post, please like, share, and please don’t forget to follow!

Categories
Extras recipes

How to Cook Black Beans from Scratch

Since we love Mexican and Tex-Mex food at my house, (probably more so than eating Italian), I came up with this recipe. While both are easy to make, it seems that the former two are our go-to foods. Also, some foods are just staples. Like black beans. You can use them in soups or salads. And of course, they’re great simply as a side. Granted there are many brands of canned black beans, including refried. But DIY tastes so much better. So for today’s post I’m going to go over how to cook black beans from scratch.

I used 2 lbs of dry black beans this time. And that’s because I wanted to have leftovers. Because the last time I cooked black beans from scratch I only used 1 lb of dry beans. So it wasn’t enough for my family of 4. But you might want to split the recipe. Or you can freeze half of it. Here’s how you do that.

black beans in a blue strainer

Ingredients for Black Beans from Scratch:

  • 2 lbs dry black beans
  • ~2 – 2 1/2 qts water
  • 1/4 cup fresh cilantro or 1/8 cup dry cilantro
  • 1 Tbsp fresh minced garlic
  • 1 Tbsp cumin
  • ~2 1/2 – 3 tsp salt
  • 1/2 tsp pepper

How to Cook Black Beans from Scratch:

  • If you didn’t rinse and soak the beans overnight, then you can rinse and quick soak them now. Plan on at least an extra hour to your cooking time.

There’s a lot of disagreement on this point: to soak or not to soak? Well, I personally soak our beans. There have been times when I didn’t. And those times I noticed a significant difference in my comfort level. So now I do. Every time.

  • After soaking the beans, rinse them in a colander.

You can either reserve the soaking liquid, or dump it, and start with fresh.

  • Put the drained and rinsed beans back into the dutch oven. And cover with water. Or cover with the soaking liquid, adding enough water to be sure to cover the beans. But don’t add as much water as when soaking them.
  • Place the dutch oven on the stove. And turn the burner on med-hi.
  • Stir in your seasonings.
  • Lower the burner setting to a simmer when the water starts to boil. Then cover, cooking till the beans are soft, ~ 1 1/2 hrs to 2 hrs.
Cooked black beans in a pot

Be sure to check the water level, so the beans don’t get burned. And add more water if needed.

The beans are finished when they’re soft. You might have more liquid in it than you want. I typically cook our beans until most of the liquid is gone, but not till the beans are dry. Also, add more salt and pepper to taste.

You can serve these black beans from scratch as a side or as the main course, adding a different side. Like Mexican rice.

Thanks for stopping by!

Categories
Extras recipes

Easy Recipe for Chicken Tacos

Most of us know that it’s healthier to make our own food than to eat out, order in, or buy pre-made. However it isn’t always feasible due to demands on our busy schedules. And sometimes it’s just nice to go out to for a bite to eat. But there are options available if you don’t want to spend a lot of time in the kitchen or sacrifice nutrition. Like this easy recipe for chicken tacos.

I first started making these chicken tacos within the past ~6 years. Because I wanted a simple recipe. And this is what I came up with. So I hope you enjoy them as much as we do.

Ingredients for Easy Chicken Tacos

  • 2 lbs chicken breast halves
  • 1 can mild Rotel, drained
  • 1/4 tsp cumin
  • 6-8 soft flour tortillas for tacos
  • 1 cups shredded cheddar cheese
shredded chicken with Rotel

Instructions for Easy Chicken Tacos

  • Put chicken breast halves in a pot and cover with water. Once the water boils, lower to a simmer, and cover the pot with a lid.
  • Cooking times vary, so when chicken is cooked (at 165 degrees), then turn off the burner, and remove the pot from heat source.
  • Drain off most of the water, leaving ~2 to 3 tablespoons of broth, and shred the chicken, using two forks.
  • Stir in drained Rotel and cumin. * I use only 1/2 can of Rotel, because I don’t want it too spicy.*
  • Then place the pot with shredded chicken, Rotel, and cumin back on the burner on med-low heat until the liquid evaporates.
  • Heat the tortillas in a tortilla warmer for 30 secs in the microwave. Or, if you don’t have one, you don’t need a tortilla warmer to heat them up. Here are some other options.
  • Top with shredded cheese and your other favorite toppings and a side.

I hope you try this recipe, and thanks for stopping by!

Categories
Extras recipes

Homemade Macaroni and Cheese with Penne Pasta

This is a great homestyle recipe, using penne pasta instead of traditional elbow noodles. I used to make the box brands. And then I switched to some I found in cookbooks. But some of those were time consuming. Eventually, as I learned more about cooking and my own style, I came up with this easy, homemade macaroni and cheese with penne pasta.

Ingredients for Homemade Macaroni and Cheese with Penne Pasta:

  • 12 oz of penne pasta
  • 1 c whipping cream
  • 1 1/2 c shredded Mexican blend cheese or sharp cheddar cheese, divided
  • cracked pepper to taste
prepping homemade macaroni and cheese with penne pasta

Instructions for making Homemade Macaroni and Cheese with Penne Pasta:

  • Cook penne pasta according to package instructions.
  • While noodles are cooking, heat 1 c whipping cream in a small saucepan over med heat.
  • Add 1/2- 3/4 c shredded cheese to saucepan.
  • Add cracked pepper to taste to saucepan.
  • Stir cheese mixture constantly until it is thickened.
  • Drain the water from the penne pasta when it’s finished cooking.
  • Stir the cheese sauce into the noodles.
  • Put the penne noodle mixture into a greased 9 1/2 x 7 1/2 inch baking dish.
  • Sprinkle the remaining shredded cheese on top of the macaroni.
  • Top with more cracked black pepper to taste.
  • And bake in a 350 degree oven until cheese is melted on top ~ 5 mins.
beef and pork meatloaf muffins with homemade macaroni and cheese

This pairs well with so many foods. However it certainly has a Southern charm. So I pair mine with pork or meatloaf.

I hope you enjoyed this post. And if you make it, please let me know what you think. How do you cook macaroni and cheese? Let me know in the comments.

Categories
Extras recipes

Easy Sheet Pan Chicken Nachos

When my husband worked as a fireman, he came up with this easy sheet pan chicken nachos recipe for his shift, which he then shared with me. I make it frequently, because it’s tasty and very simple. Especially for nights when I don’t really want to cook or time is an issue. It combines canned chicken meat, refried beans, tortilla chips, seasoning, and some garnishes for a yummy snack or meal, whatever one prefers.

Ingredients for Easy Sheet Pan Chicken Nachos:

  • 1 Tbsp Olive Oil
  • 12.5 oz Can of Drained Chicken Breast
  • 15 oz Can of Refried Beans
  • 1/2 oz Guacamole Seasoning Packet
  • 16 oz Bag of Tortilla Chips
  • Shredded Mexican Blend Cheese

Instructions for Sheet Pan Chicken Nachos:

white nachos topped with cheese and guacamole on a floral plate
  • First, grease jellyroll pan with cooking spray and set aside.
  • Next, put 1 Tbsp olive oil in medium to large pan.
  • Then, drain canned chicken breast and put chicken in pan over medium to medium high heat.
  • Add refried beans and 1/2 oz of guacamole seasoning; stir till well combined and warmed through. Remove from heat.
  • Next, spread tortilla chips on greased jellyroll pan.
  • Then drop chicken/bean mix by spoonfuls onto chips, careful to get the dip on most of the chips.
  • Add desired amount of shredded Mexican blend cheese to nachos when finished adding chicken/bean mix.
  • And broil for 2-3 minutes or until cheese is melted.
  • Finally, serve immediately.

I hope you and yours enjoy this as much as we do. Let me know what you think!