Categories
Extras recipes

One Pan Baked Chicken Legs and Potatoes

This recipe has been in my family since I was little. In fact, I never knew it, but it’s also a generational recipe that goes back (at least) to my great grandmother on my mom’s side of the family. However, once again, I’ve done some tweaking over the years. Sometimes I add garlic, and other times I don’t. Though you can find a lot of different ways to prepare it. And most of them sound tasty. Also, this is a one-dish meal, which makes clean-up a breeze. Additionally baked chicken legs and potatoes are perfect any time of the year. So just keep reading to get the recipe.

The preparation time for this recipe is about 15-20 minutes. And even though cooking times vary, it took me 1 hour and 20 minutes. So plan on an hour at least, possibly longer. Also, the meal will serve 4 people. But you’ll have leftover drumsticks.

Baked Chicken Legs and Potatoes Ingredients:

  • ~ 6 lbs of chicken drumsticks
  • 2 lbs of Honey Sensation and Ruby Gold bite size potatoes (but if you don’t have those or would prefer a different kind, then get what you like)
  • 1 can of peas
  • ~ 2 tsps of salt
  • 1/2 tsp black pepper
  • 1 tsp thyme
Pan with Raw Chicken Legs, Potatoes, and Pease
This is what your chicken, potatoes, and peas will look like prior to putting it into the oven.

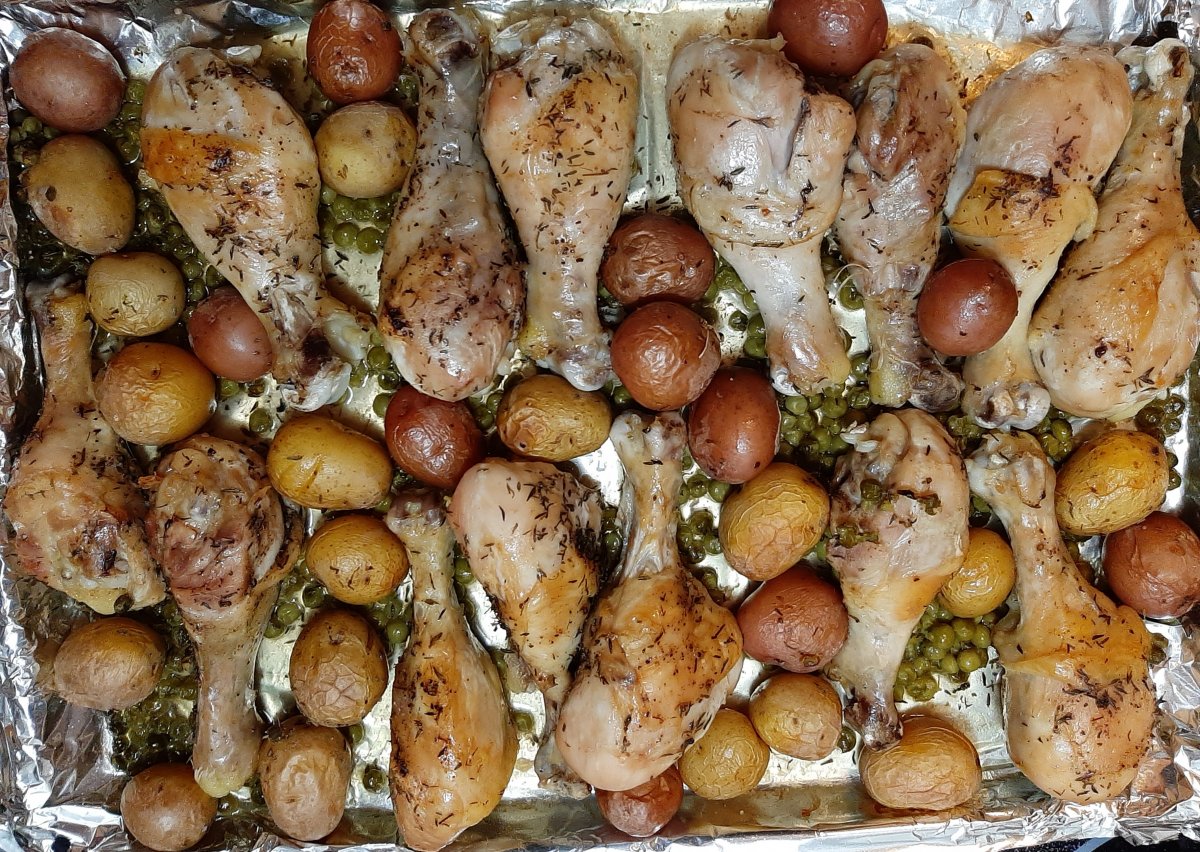
Baked Chicken Legs and Potatoes Instructions:

  • Preheat oven to 425 degrees.
  • Line a large jellyroll pan with foil. And then spray the foil with non-stick cooking spray.
  • Next, arrange the drumsticks onto the pan.
  • With ~ 3/4 – 1 tsp of the salt, 1/4 tsp of pepper, and 1/2 tsp of thyme, season one side of the chicken legs.
  • Then flip the legs over, and add the potatoes and peas.
  • And season everything evenly with the remainder of the spices.
  • Then put the pan into the oven, and cook for 45 minutes. Flip the legs over and cook until the internal temperature of the chicken reaches 165 degrees. And make sure the juices run clear.

Since baked chicken legs and potatoes are a one pan meal, you don’t need to come up with any sides. Unless you want to. And if you make this recipe, you’ll notice that there doesn’t appear to be many peas. I think it’s because they shrivel from cooking so long. Although they taste amazing from basting in the chicken juices all that time. But, if you want, you can add the peas during the last 15 minutes of cooking time.

Baked Chicken Legs and Potatoes on a White Plate
Categories
Extras recipes

Easy Recipe for Chicken Tacos

Most of us know that it’s healthier to make our own food than to eat out, order in, or buy pre-made. However it isn’t always feasible due to demands on our busy schedules. And sometimes it’s just nice to go out to for a bite to eat. But there are options available if you don’t want to spend a lot of time in the kitchen or sacrifice nutrition. Like this easy recipe for chicken tacos.

I first started making these chicken tacos within the past ~6 years. Because I wanted a simple recipe. And this is what I came up with. So I hope you enjoy them as much as we do.

Ingredients for Easy Chicken Tacos

  • 2 lbs chicken breast halves
  • 1 can mild Rotel, drained
  • 1/4 tsp cumin
  • 6-8 soft flour tortillas for tacos
  • 1 cups shredded cheddar cheese
shredded chicken with Rotel

Instructions for Easy Chicken Tacos

  • Put chicken breast halves in a pot and cover with water. Once the water boils, lower to a simmer, and cover the pot with a lid.
  • Cooking times vary, so when chicken is cooked (at 165 degrees), then turn off the burner, and remove the pot from heat source.
  • Drain off most of the water, leaving ~2 to 3 tablespoons of broth, and shred the chicken, using two forks.
  • Stir in drained Rotel and cumin. * I use only 1/2 can of Rotel, because I don’t want it too spicy.*
  • Then place the pot with shredded chicken, Rotel, and cumin back on the burner on med-low heat until the liquid evaporates.
  • Heat the tortillas in a tortilla warmer for 30 secs in the microwave. Or, if you don’t have one, you don’t need a tortilla warmer to heat them up. Here are some other options.
  • Top with shredded cheese and your other favorite toppings and a side.

I hope you try this recipe, and thanks for stopping by!

Categories
Extras recipes

Homemade Pasta Sauce with Meatballs

Today I’m sharing a recipe that I’ve been making and perfecting since my husband and I got married. And that was 20 years ago. It’s one of my family’s personal favorites. Therefore, they request it often. It’s a simple homemade pasta sauce with meatballs. Though, the meatballs are also homemade.

The base of this recipe is just a tomato sauce originally. Meaning that it contains no vegetables, other than tomatoes and garlic. However, garlic isn’t normally viewed as a vegetable. But, rather as an herb.

The Origin of My Homemade Pasta Sauce with Meatballs

This recipe is passed down from my mom’s side of the family. And I also got the basic meatball recipe from my mom, which includes pretty much all of the ingredients, except Italian sausage. But just like so many other recipes I’ve gotten over the years, I’ve tweaked this one as well. Additionally I add fresh vegetables to the sauce. And instead of just beef meatballs, I add Italian sausage.

Ingredients for Homemade Pasta Sauce with Meatballs:

  • 1 (29 oz) canned tomato sauce
  • 1 (14.5) oz canned whole tomatoes, diced or crushed in food processor
  • 6 oz of tomato paste
  • 5 oz of water
  • 1 bell pepper, chopped
  • 1/2 onion, chopped
  • 1 tbsp or 3 garlic cloves, minced
  • 2 tbsp dried oregano
  • 1 1/2 tbsp dried basil
  • 1 tsp salt
  • 1 tsp marjoram
  • 1/4 tsp black pepper
homemade pasta sauce with meatballs

Instructions for Homemade Pasta Sauce with Meatballs:

In a pot, add all of your ingredients and stir together on med to med-low heat.

Ingredients for Meatballs:

  • 1 lb lean ground beef
  • 1 lb ground mild or sweet Italian sausage
  • 1/4 cup of Italian bread crumbs
  • 1/4 shredded Parmesan cheese
  • 1 egg
  • 1/8 tsp dried mint

Instructions for Meatballs:

  • In a large bowl, add your ingredients together.
  • Then, using your hands, mix the ingredients together thoroughly.
  • Next, shape the mixture into balls. Also, you can make big meatballs or small ones, depending on what you prefer.
  • When you’ve used all of the meat mixture, add the meatballs to the sauce.
  • Get sauce to a boil. Then lower the temp to med low or low, till it’s simmering. And cover the pot with a lid. Furthermore, cooking times may vary. So cook until the meatballs are at 165 degrees at least.
homemade pasta sauce with meatballs

When the meatballs are cooked, serve with your favorite pasta and a salad. And top with grated parmesan cheese. Then enjoy! Thanks for reading this post.

Categories
Extras recipes

Oven Roasted Broccoli with Cheese

This oven roasted broccoli with cheese recipe is another one of my favorites to make and eat. But I love fresh vegetables. So this is somewhat of a staple at our house, especially starting in the spring. And going all summer long.

There are many different varieties of this recipe out there. However, this is a pretty simple one. Though I use a lot of cheese. So, you might find that you’d prefer using less.

Oven roasted broccoli with cheese
This is the broccoli after it’s come out of the oven, and I’ve sprinkled the shredded cheese on top.

Ingredients for oven roasted broccoli with cheese:

  • 1 1/2 lbs of fresh broccoli florets
  • 1-2 garlic cloves, minced
  • 1/2 c shredded fresh Mozzarella cheese
  • 1/4 c shredded Parmesan cheese
  • 4-5 TBSP Extra Virgin Olive Oil
  • Salt and pepper to taste
Oven roasted broccoli with cheese

Instructions for oven roasted broccoli with cheese:

  • Heat oven to 450 degrees
  • Line a jelly roll pan (big enough to fit the broccoli in 1 layer) with aluminum foil; and spray with non-stick cooking spray
  • Spread broccoli florets onto pan
  • Pour olive oil evenly onto broccoli
  • Sprinkle minced garlic over broccoli
  • And add salt and pepper to taste
  • Then put the pan in the oven; and cook ~15 mins, or until broccoli starts to brown
  • Turn off the oven; and take the pan of broccoli out of the oven
  • Sprinkle the shredded cheeses on top of the broccoli
  • Place the pan of broccoli back in the oven for ~ 3-5 mins for the cheese to melt
  • Finally, serve the oven roasted broccoli with cheese

You can serve this with chicken, beef, and pork.

Categories
Extras recipes

Homemade Macaroni and Cheese with Penne Pasta

This is a great homestyle recipe, using penne pasta instead of traditional elbow noodles. I used to make the box brands. And then I switched to some I found in cookbooks. But some of those were time consuming. Eventually, as I learned more about cooking and my own style, I came up with this easy, homemade macaroni and cheese with penne pasta.

Ingredients for Homemade Macaroni and Cheese with Penne Pasta:

  • 12 oz of penne pasta
  • 1 c whipping cream
  • 1 1/2 c shredded Mexican blend cheese or sharp cheddar cheese, divided
  • cracked pepper to taste
prepping homemade macaroni and cheese with penne pasta

Instructions for making Homemade Macaroni and Cheese with Penne Pasta:

  • Cook penne pasta according to package instructions.
  • While noodles are cooking, heat 1 c whipping cream in a small saucepan over med heat.
  • Add 1/2- 3/4 c shredded cheese to saucepan.
  • Add cracked pepper to taste to saucepan.
  • Stir cheese mixture constantly until it is thickened.
  • Drain the water from the penne pasta when it’s finished cooking.
  • Stir the cheese sauce into the noodles.
  • Put the penne noodle mixture into a greased 9 1/2 x 7 1/2 inch baking dish.
  • Sprinkle the remaining shredded cheese on top of the macaroni.
  • Top with more cracked black pepper to taste.
  • And bake in a 350 degree oven until cheese is melted on top ~ 5 mins.
beef and pork meatloaf muffins with homemade macaroni and cheese

This pairs well with so many foods. However it certainly has a Southern charm. So I pair mine with pork or meatloaf.

I hope you enjoyed this post. And if you make it, please let me know what you think. How do you cook macaroni and cheese? Let me know in the comments.

Categories
Extras recipes

Berries with Pound Cake

I got this pound cake recipe from my mother-in-law. However it was originally her mother’s. But, because my husband’s Aunt Ruth was the one able to get the recipe from his grandmother, it was referred to by her name. She also was the one who predominantly made it. So I hope you enjoy this recipe of berries with pound cake.

Ingredients for Berries with Pound Cake: the pound cake

  • 3 c sugar
  • 1/2 c butter
  • 1/2 Crisco
  • 6 eggs, separated
  • 1 tsp vanilla or lemon extract
  • 3 c flour
  • 1/2 tsp salt
  • 1/2 tsp baking soda
  • 1 c buttermilk

Instructions for Berries with Pound Cake: the pound cake

  • First, grease an 8 1/2 x 4 1/2 x 2 1/2 standard loaf pan with either butter or non-stick cooking spray.
  • And pre-heat your oven to 350 degrees.
  • With a beater, cream the butter, Crisco, sugar, and egg yolks until light and fluffy.
  • Next, add the vanilla or lemon extract.
  • In a separate bowl, mix your dry ingredients. And then add them alternately into your sugar mixture with the buttermilk.
  • Beat the remaining egg whites till stiff white peaks form. After that, fold them into the batter.
  • Pour the batter into the prepared loaf pan. And bake for 1 hour – 1 hour and 15 minutes or until a toothpick inserted comes out clean.
sliced pound cake on a brown plate
This is what your pound cake will look like once it’s cooled.

While your pound cake is baking, you can prepare the berries and whipped cream. For the berries, I typically go with strawberries and blueberries. But if you prefer, you can use raspberries and blackberries.

Ingredients for Berries with Pound Cake: the berries

  • 2 lbs fresh strawberries, washed, de-stemmed, and cut into bite size pieces
  • 18 oz fresh blueberries, washed
  • 1/2 tbsp white sugar
  • 1 tsp lemon juice

Instructions for Berries with Pound Cake: the berries

bowl of fresh blueberries and strawberries
  • In a medium size bowl, mix your fruit together.
  • Next, add the sugar and the lemon juice to the fruit, stirring it all together.
  • Finally, cover and refrigerate.

At this point, you’re almost finished making the berries with pound cake recipe, even though the pound cake is still in the oven. However all that remains to prepare is the whipped cream. You could use Cool Whip or Reddi Whip if you’re going for convenience. Before I started making my own whipped cream, I would use either of those other options. But then I started noticing that if I left my dessert (that had either Reddi Whip or Cool Whip) out for any length of time, then the topping would just fall apart. Or be watery. Maybe you’ve witnessed this yourself.

So then I found some recipes for diy whipped cream. And I experimented. Additionally, over time I came up with my own recipe that contains just 2 ingredients. Thus, I learned how easy it was to just make my own whipped cream. And it never falls apart when I take it out of the refrigerator. I can’t claim that homemade or diy whipped cream is healthy, because it’s fattening. Since it’s straight cream and sugar. But it doesn’t have anything else in it, unless you add something else to it. And the benefit of that is you know exactly what you’re putting into your body.

Ingredients for the whipped cream:

  • 2 cups of whipping cream
  • 4 tbsp of either white sugar or powdered sugar

Instructions for the whipped cream:

homemade whipping cream in an orange bowl
  • Using a hand mixer, beat the whipping cream on medium-high to high until it’s thick.
  • And then mix in the sugar.
  • Cover and refrigerate until ready to use.

When the pound cake is finished cooking, turn off the oven. And remove the loaf pan from the oven, allowing it to cool on a wire rack for 10 minutes. Then, run a sharp knife around the edges of the pan, to make sure the cake is loose. If it is, then flip the pan over onto a serving platter to cool completely.

Once your pound cake is cooled thoroughly, slice and serve with the berries. And top with your diy whipped cream.

Categories
Extras recipes

Italian Sausage Sandwiches with Peppers and Onions

The first time I tasted Italian sausage sandwiches with peppers and onions was at Grapevine Mills mall in Texas. It was at this really cool eatery. And it featured all my favorite flavors: garlic, tomato, and onions on a crispy roll. But it was many years until I decided to try my hand at making the recipe.

These sandwiches are great for when you have company like a tailgating party.  And they contain delicious Italian sausage and sautéed vegetables. They are also really easy to make.  So, please enjoy this recipe.

Ingredients for Italian Sausage Sandwiches with Peppers and Onions:

Italian sausage cooking in a saucepan on the stove
  • ~1-1/2 lb of Mild or Sweet Italian Sausage links
  • 6 Ciabatta Rolls
  • 1 Bell Pepper, Seeded and Sliced
  • 1 Onion, Peeled and Thinly Sliced
  • 1/8 C Butter
  • 1/2 tsp Salt
  • 1/4 tsp Pepper

You’re probably familiar with cooking sausage. Maybe you grill it or broil it. You possibly even cook it on the stove in some oil.

However, the way I’m going to cover it might seem a little strange. Although, this way is better for cooking the sausages completely through. And also browning them evenly.

Instructions for Cooking Italian Sausage Sandwiches with Peppers and Onions:

  • First, put Italian sausage links in a saucepan. And fill pan with cold water until the sausages are covered.
  • Next, put the saucepan on the stove on med to med-hi heat.
  • Then, in another saucepan, melt the butter on med heat. And add your vegetables, salt, and pepper. Next, cover, cooking on med to med-low until vegetables are tender.
  • When the water begins to simmer in the sausage saucepan, cook ~6‐8 mins.
  • The internal temperature of the sausages should be at least 165 degrees; so, if they’ve reached that, then remove the pan from the burner.
  • Finally, turn off the heat source.
sliced red bell pepper, sliced white onion, and sliced tomato sautéing in pan

Now the sausage links are fully cooked. But they appear to be washed out. Though they won’t be for long.

Final Instructions:

  • Line a jelly roll pan with aluminum foil. And spray foil with non-stick cooking spray.
  • Next, place Italian sausage links on aluminum foil.
  • Then, turn the oven broiler on hi heat.
  • Finally, put the jelly roll pan under the broiler for 3-5 mins. Then flip sausages over to the other side. And broiler another 3-4 mins.

When the sausages are browned the way you like, take them out of the oven, and turn off the broiler.

We slice our Italian sausages in order for them to fit the Ciabatta rolls better. Though you can do it however you want. Then add your sautéed vegetables. And that’s it. A lot of times I’ll add sliced and seeded tomatoes as well. But you could also add Mozzarella cheese if you wanted.

Serve with your favorite side like roasted vegetables.

Categories
Extras recipes

Chicken Tortilla Soup

I started making this recipe many years ago when we lived in Dallas. This chicken tortilla soup is very easy to make. And I usually prepare it with chicken quesadillas after the chicken is cooked and shredded. But you can have it either way, because it’s delicious.

Ingredients:

  • 1 1/2 -2 lbs Chicken Breasts
  • 2 cans Cream of Chicken Soup
  • 3 cans Water
  • 1/2 can Rotel, drained (I use Mild, but you can use whichever you want)
  • 1/4 tsp each Salt, Garlic Powder, and Cumin
  • 1/8 tsp Pepper
  • 1 pkg of Tri-color Tortilla Strips
  • 1 Avocado
  • and 1 cup Mexican Blend Shredded Cheese

Instructions:

  • First, put the first 6 ingredients in a pot over medium-hi, and heat till the liquid starts to boil.
  • Next, once boiling, put burner on low, cover, and simmer till chicken is cooked.
  • Then, shred chicken and put back into the pot.
  • And serve over sliced avocado, tortilla strips, and shredded cheese.

If you want to make chicken quesadillas, you’ll need flour tortillas and shredded Mexican blend cheese. I usually use soft taco size tortillas. However, you can use whatever you prefer.

Place one tortilla on a plate, add some shredded chicken, and sprinkle with plenty of shredded cheese. And finally you’ll top it with another tortilla before placing the quesadilla in a pan on low heat. Heat through, till bottom is browned. Then flip over with a spatula, heating that side till it is browned as well.

chicken quesadillas

If you made this recipe, what did you think of it? Do you have your own for chicken tortilla soup or quesadillas? Your comments are appreciated.

Categories
Extras recipes

The Best Homemade Taco Salad

This is one of my own recipes that I just threw together one day, several years ago. And I’ve been making it ever since. I like it, because it’s easy, and I’m all about easy when it comes to preparing food. But it also tastes great. Tell me what you think after you’ve made the best homemade taco salad.

Ingredients for Homemade Taco Salad:

  • 16 oz of ground beef
  • 1 pkg of taco seasoning mix
  • 24 oz pkg of salad kit (I use the ones with shredded carrots, cabbage, and/or different types of lettuce)
  • 1 large tomato or 2 small tomatoes, diced
  • 1/4 c-1/2 c shredded Mexican blend cheese
  • Tortilla chips
  • Optional–garnish with avocado or guacamole

Instructions Taco Salad:

  • First, cook the ground beef in a skillet till beef is all browned; drain and put beef back in skillet.
  • Next, add taco seasoning mix according to the instructions and simmer, covered ~ 15 minutes
  • Then, while the beef is simmering, pour the salad mix into a large bowl and add the diced tomato.
  • When the beef is ready, make sure there isn’t a lot of liquid in the pan, and add the meat to the salad.
  • Next, add in the Mexican blend cheese and toss the salad.
  • Then mix in the tortilla chips last; toss once or twice.
  • And garnish with guacamole or avocado.
  • Finally, serve immediately and enjoy.
Taco Salad

When I make this salad, the taco seasoning blend is usually flavor enough that I don’t add any dressing. However, if you prefer, there are plenty of recipes out there to choose from. Or you can pick up something from the store.