Providing helpful information regarding our feathered, feline, and canine friends while also sharing fun stories. And locally we provide pet sitting services.
Here’s a healthy salad with chicken recipe to serve for lunch or dinner. Eating chicken has long been regarded as healthier than eating beef. And it contains no carbohydrates and lower saturated fat than red meat. Further, the vegetables give the salad the right amount of crunch.
Isn’t technology awesome? We have the Instant Pot and Air Fryer to whip up our favorite foods. And to make new ones. In addition, as the weather gets warmer, it’s nice to have cooking options that don’t involve standing over a hot stove. But if we want to eat healthy, while still using minimal electricity, we can make a salad, add some fresh vegetables, a protein, and sprinkle on a favorite dressing. Further, we can cook the protein in the Air Fryer to make things easier.
Healthy Salad with Chicken Ingredients
16 oz chicken breasts
11-14 oz of spring mix
1 cucumber, washed and sliced
4 oz of grape or medley tomatoes
3 oz fresh broccoli florets, washed
Less fat dressing
Healthy Salad with Chicken Instructions
Cook the chicken till tender enough to shred; my go-to method is boiling on the stove.
Next, put the chicken and the remaining ingredients, excluding the dressing, in a bowl big enough to hold everything.
Then add a little bit of dressing, tossing to coat, so you don’t overwhelm the salad.
And serve immediately.
Thanks for stopping by! If you enjoyed this, please like, post a comment, share, and please don’t forget to follow!
It’s probable that you’ve tried compote, which can be incorporated with diverse foods. You can eat it over ice cream, yogurt, and oatmeal. Likewise, spread it on other breakfast items, such as pancakes, waffles, and French toast. Or mix it as a filling for desserts, including cakes, or as a topping for cheesecakes. But I’m getting ahead of myself. I need to first tell you how to make a fruit compote.
With fruit compote you can use really any fruit: frozen, fresh, or dried. However, you might find that berries seem to work best. They’re bite size, easy to clean, and you don’t have to cut them up. My personal favorites are blueberries and blackberries. And I have used both fresh and frozen, whichever I have on hand. Though, for this particular recipe, I bought fresh blueberries.
Also, with fruit compote, you need a sweetener, like sugar, Truvia, or something similar. I used Truvia, so I adjusted the amount needed. And you need a thickening agent, like corn starch, added with water. Those are the basic ingredients. But now we’re going to add them all together.
Fruit Compote Ingredients
4 cups of blueberries
1/4 c of Truvia or 1/2 c sugar
4 tsp of corn starch and 4 tsp of water
pinch of allspice, cinnamon, and salt
Fruit Compote Instructions
In a medium saucepan, combine the ingredients, and bring to a boil over medium heat. Simmer, covered 3 minutes or until thick.
If you want to take the pan off the heat at this point, you can; I don’t. I let it stay on low heat with the lid off, to get more syrupy for ~ 10 more minutes. Stir occasionally; then remove from heat.
Serve as an accompaniment to breakfast, like pancakes, waffles, or French toast. Or add to yogurt, shakes, oatmeal, or even on top of ice cream.
Whatever you put this fruit compote on will taste amazing. I can promise you that! Just give it a try. Plus, it’s so easy to make.
Thanks for stopping by! If you enjoyed this post, please like, post a comment, share, and please don’t forget to follow!
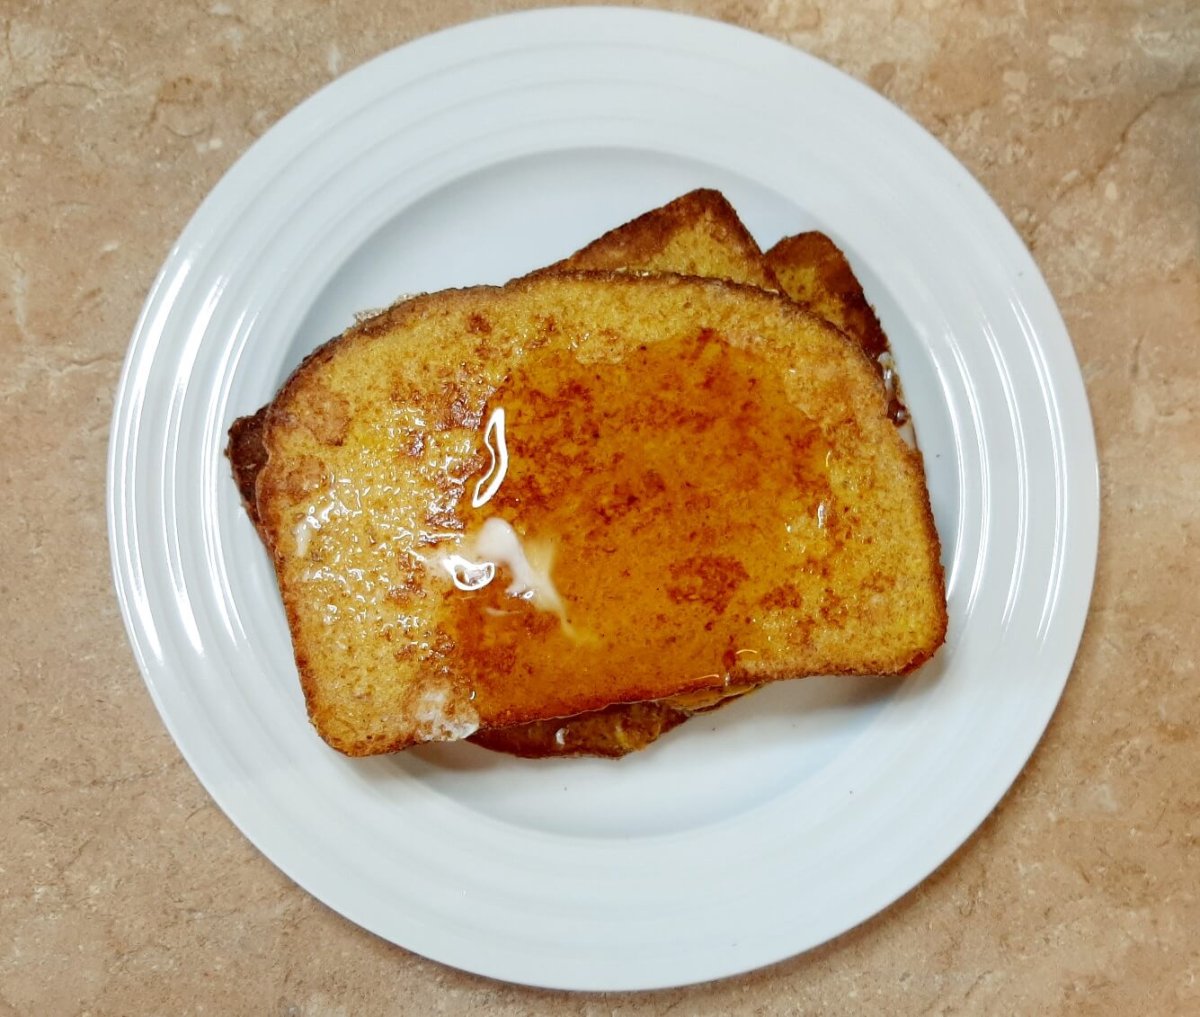
There are a number of different breads you can choose from when making French toast. I’ve used French bread, Ezekiel bread, and raisin bread. And I’ve even had it prepared with Challah bread. But for an easy homemade French toast recipe, you can just use the loaf you have at home.
Furthermore, you can make French toast in the oven, in a casserole, on a griddle, or in a frying pan. However, for this recipe, I used a griddle. In addition, it’s non-stick, so you don’t have to use cooking spray, butter, or oil. Thus, if you’re wanting to get crisp French toast, use an electric griddle; or invest in one and try it out, without the butter, non-stick spray, or oil.
Ingredients for Easy Homemade French Toast Recipe:
1 Loaf of bread (I used Oroweat 100% wheat bread)
8 eggs
1/4 – 1/2 c of Half n half or heavy whipping cream (I used heavy cream)
1 tsp Vanilla
1/8 tsp Allspice
3/4 tsp Cinnamon
1/4 tsp Salt
Instructions for Easy Homemade French Toast:
In a medium bowl, whisk all of the ingredients, except the bread, together.
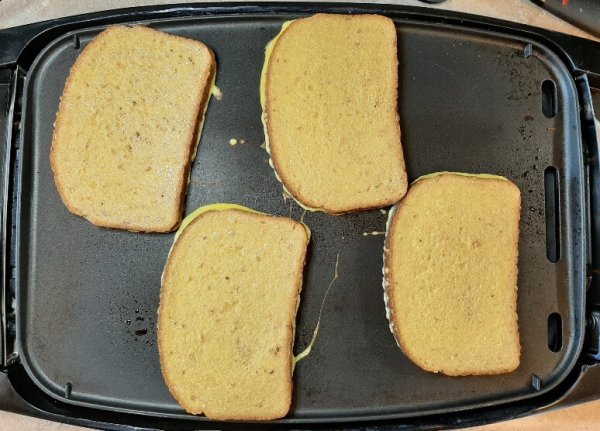
Heat a griddle to 350°; after about 15 mins, water droplets on it should sizzle, but not dissolve. So, if that’s what happens, then your griddle is ready. If water dissolves, then turn the temperature down.
Dip slices of bread, one at a time, into the batter; don’t let the bread sit in the batter for long, just make sure both sides have batter, then put dipped slices onto heated griddle.
Cook the battered slices of bread for a couple of minutes; then flip. They should be golden brown. Cook for another couple of minutes before transferring to a plate.
This recipe is ideal if you don’t have sourdough or white bread at home, as it just uses what you have on hand. Since it’s essential that you don’t soak the slices in the batter, that’s the secret to coming up with this quick and easy recipe for French toast.
Thanks for stopping by! If you enjoyed this, please like, post a comment, share, and please don’t forget to follow!
My parents were both realtors when I was growing up in Dallas. And each year the Collin County Association of Realtors had a chili cook-off in the spring, which my parents participated in. But most of the entries, if not all of them, were classic chili. However, now that I cook, I know there are so many more choices out there. Although, the first time I made this easy white chicken chili was just a couple of years ago.
I think the main difference with this and classic chili is obviously one is white, while the other is red. But the other main difference is in this recipe, the meat, or chicken, has to be pre-cooked. And you can cook it pretty much any way you want to; including buying a roasted chicken and shredding the meat.
Ingredients for Easy White Chicken Chili:
1 tbsp extra virgin olive oil
1 tbsp minced garlic
6 cups chicken broth
1 chopped onion
1 tbsp dried cilantro
2 tbsp lime juice
1 tsp ground cumin
1/2 tsp dried oregano
1/4 tsp each red pepper sauce and salt
11 oz white shoepeg or whole kernel corn, drained
1 can each (15 or 16oz) great northern beans and butter or lima beans, drained
2 cups shredded cooked chicken breasts
crushed tortilla chips
1 fresh diced tomato
chopped green onion
shredded Mexican blend cheese
sour cream or Greek non-fat plain yogurt
Instructions for White Chili:
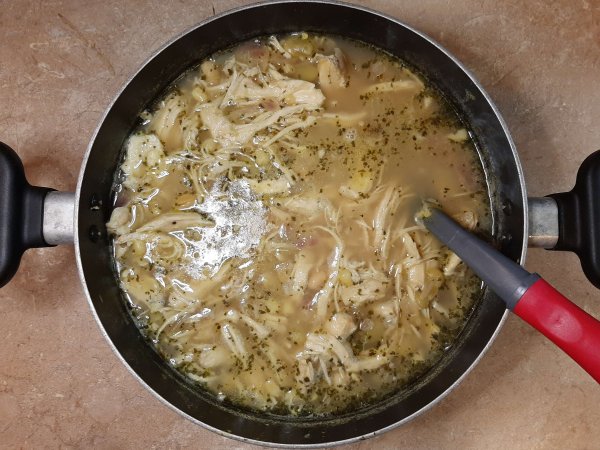
First, heat olive oil in 4 quart Dutch oven over medium heat. Then cook onion and garlic in oil. And stir intermittently, until onions are cooked through.
Next, add the rest of the ingredients, aside from the chicken. Stir and heat to boiling.
Then reduce heat, and simmer uncovered ~ 20 minutes.
After that, stir in the chicken, still simmering until hot.
At this point the white chicken chili is finished. However, no chili is complete without toppings. Thus, add some shredded cheese, crushed tortilla chips, chopped green onions, fresh diced tomatoes, and sour cream.
Similarly with my Cincinnati-style chili, I found this originally in Betty Crocker’s Cookbook, 9th edition, which was printed in 2000. And again there isn’t a link online, but if you’re interested, you could probably find it at Etsy, Ebay, or something similar.
Thanks for stopping by! If you enjoyed this post, please like, comment, share, and please don’t forget to follow!
Asparagus is great to eat any time, really. But sometimes it just makes a meal special. And it complements so many dishes. However, just thinking about it, some people might think it’s difficult to cook. Especially if you’ve never tried to. But I want to share an easy way to cook asparagus, that tastes like you worked all day in the kitchen for it.
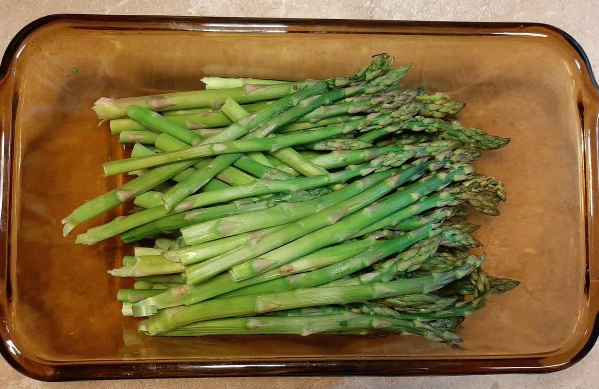
The first thing you want to do is have some asparagus. Choose smooth, round, tender, medium size green spears with closed tips. Then when you’re ready to cook them, break off the tough ends as far down as the stalks snap easily. Even if you buy a package that claims the ends have already been snapped, nevertheless snap the ends. Trust me, this will make them more palatable. When that’s done, wash the asparagus. If necessary, use a vegetable brush to remove debris. Below you’ll find the rest of the recipe.
Ingredients for an easy way to cook asparagus:
1 1/2 lbs asparagus, cleaned and with ends snapped off
2 tbsp water
1/4 c butter
1 clove minced garlic
1/4- 1/2 tsp garlic salt
Salt and pepper to taste
Instructions for easy asparagus:
Put asparagus spears in 8×4 microwavable loaf pan with 2 tbsp of water. Cover with vented plastic wrap, and microwave 4-6 minutes or until crisp tender. Drain the water.
In a non-stick pan, start melting the butter on medium heat. Then add the asparagus and remaining ingredients. Stir and cover with a lid. Cook for ~ 5-10 minutes or until fork tender.
Lastly, serve with steak or chicken breasts.
I hope you enjoyed this post. And as always, thank you for stopping by. Do you have a favorite asparagus recipe? How do you prepare it? Please share, and if you don’t already follow me, you can do so now.
Making Sicilian dishes on Christmas Eve is a family tradition on my mom’s side of the family: Pizzas, cannolis, cream puffs, cookies. You name it, we had it. But what my mom is used to making is not the same thing that I make. Her cannoli recipe is a little more complicated and involves the stove. That’s because my great grandma didn’t like the easy cannoli recipe that’s out there. However, below is what I typically make for my own family.
Ingredients for Easy Cannoli Recipe:
30 oz ricotta cheese
1/4 c Truvia or 1/2 c regular sugar; adjust if needed
1 tsp vanilla
4 oz of miniature chocolate chips
1 tsp lemon zest
~ 15-18 cannoli shells
Instructions for Easy Cannolis:
Drain the ricotta.
Then, by hand, mix with sugar, vanilla, and lemon zest.
Next, fold in chocolate chips.
And fill the cannoli shells.
Put your remaining mini chocolate chips in a shallow bowl and dip the ends of your cannolis into the bowl of chocolate chips.
This fills ~ 15-18 cannolis. Also, you can make your own cannoli shells. But I don’t; I never have. Though, at some point I may have to, because finding shells was an issue. Consequently I ordered them for $49. Although I did get 70 of them. Thus, I can make them again.
Furthermore, I never found a recipe similar to my mom’s when searching the web. The only thing that came close was one on the box of cannoli shells I ordered. And I would’ve included the one from my mom’s if she could’ve found hers. It tastes more liken a custard than the ricotta cheese filling in most cannolis. Very similar to cream puffs.
Thanks for stopping by! If you liked this post, please like, post a comment, share, and don’t forget to follow!
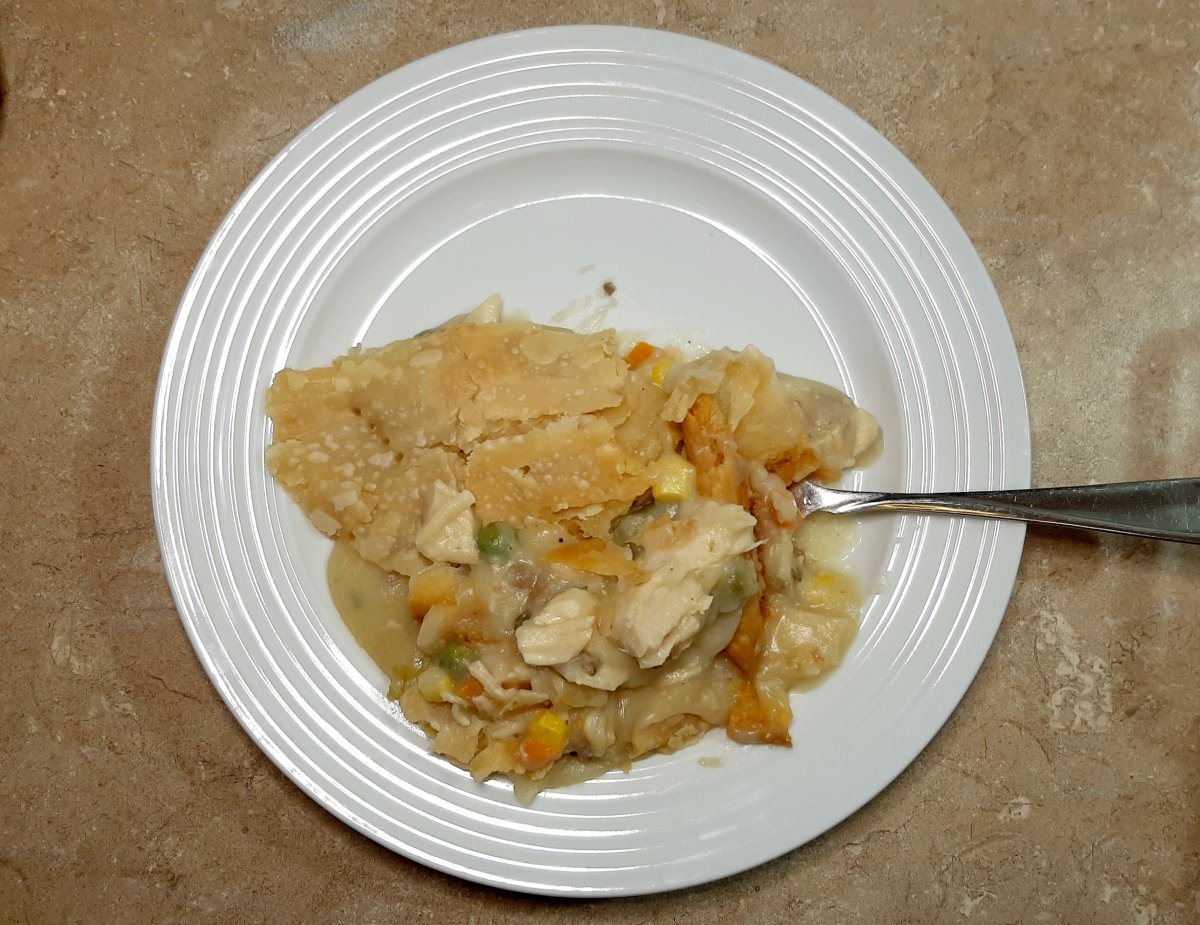
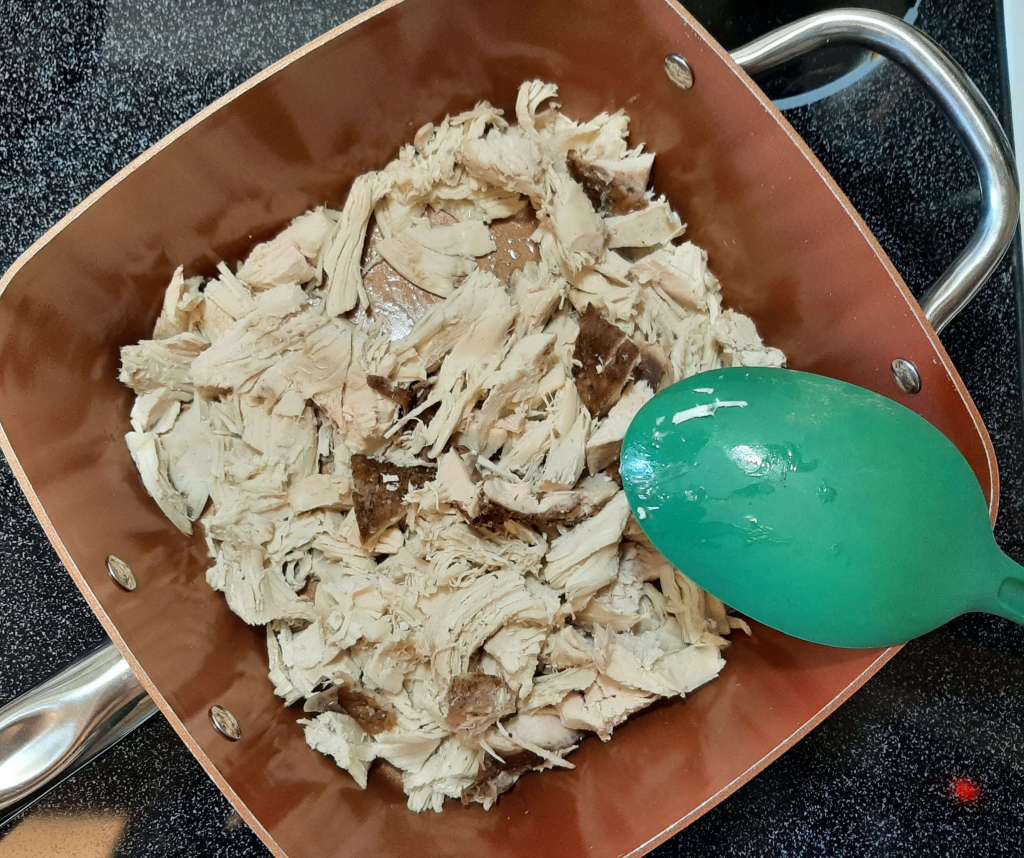
After Thanksgiving many of us are tired of turkey and stuffing, especially if we’ve had it for a few days. I know when I was younger there was little variation with Thanksgiving leftovers. However, as I got older, and started having holidays at my own home, I didn’t want to waste the food. So I experimented. Below will be a recipe for easy turkey pot pie with Thanksgiving leftovers.
Maybe you had a big turkey this year too. Perhaps every Thanksgiving you get a big turkey. But I try to plan accordingly, so I don’t end up with a lot of leftovers, because I don’t like the waste. Sometimes I feel like I was raised during the Great Depression. Between my dad and my maternal grandparents, being frugal is ingrained in me.
I know I could give what’s left to my chickens, (before it’s spoiled) though, that still seems wasteful. And this year when we bought our bird, we had to go to 3 different stores. Not by choice, by necessity, unfortunately. But we couldn’t find anything smaller than 19 lbs, which means a lot of leftovers.
Anyway, this really is an easy recipe. Mostly because the turkey is already cooked. I based it off of chicken pot pie, but I just substituted turkey for chicken and added mashed potatoes.
Ingredients for Turkey Pot Pie using Thanksgiving leftovers:
3 c shredded or cubed cooked leftover Thanksgiving turkey
3 c leftover Thanksgiving mashed potatoes or fresh mashed potatoes
1 1/2 c cooked green beans or mixed vegetables
10.5 oz can cream of mushroom soup
10.5 oz can cream of chicken soup
2 refrigerated pie crusts
Instructions for easy Turkey Pot Pie with Thanksgiving leftovers:
Preheat oven to 425 and grease 13″x9″ pan with non-stick cooking spray.
Then melt some butter in a dutch oven or 4 1/2 quarts size pan before adding the turkey. Stir and add the potatoes, veggie, and condensed soups.
Also, you can add salt and pepper to taste at this point, if you want. But I feel like it already has enough, since it’s leftovers, and plus the condensed soups. However, it’s up to you.
Next, pour or spoon the mixture into your prepared pan.
And unroll the refrigerated pie crusts, one at a time, and cover the mixture.
One crust will cover ~ half of the pan; the other will cover the other half. Though, it won’t look perfect. But if you want it to be perfect, you can make a crust.
One of my refrigerated pie crusts wasn’t cooperating at first, as you can see in the center.
Using a fork, prick the pie crusts thoroughly to allow steam to escape, and put the pot pie into the oven.
Bake at 425 for 15 mins; then lower the temperature to 350 for ~40 mins.
Add foil to the edges of the crust when it gets golden brown to prevent it from burning. The pot pie is done when the top is golden brown and the filling is bubbling around the edges.
There are other ways to make new meals out of your Thanksgiving leftovers. I still had plenty of turkey even after making the pot pie. So I bagged up the rest and put it in the freezer. And one of these days I’ll make soup. Or maybe chili. Check this out for more ideas.
And thanks for stopping by! Please like, post a comment, and share if you enjoyed this post.
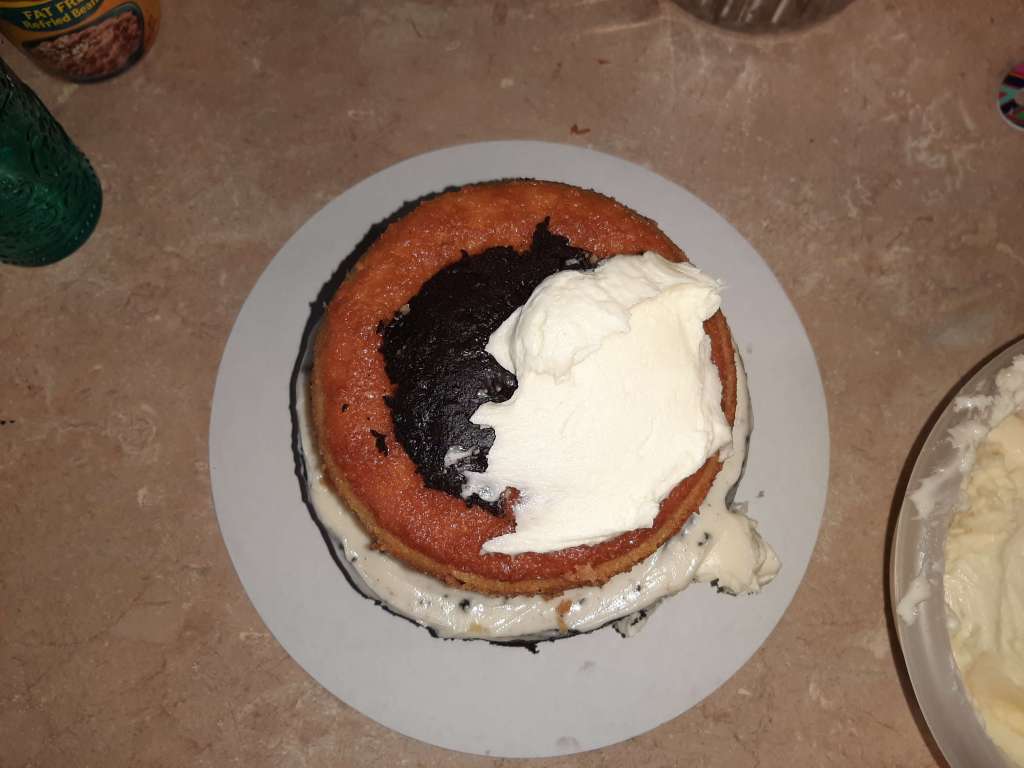
Recently I posted a recipe for making a bakery style cake, but I didn’t include the recipe for the frosting. Most of the time my go-to frosting is made from whipping cream and Truvia. However, when my daughter and I made the baby shower cake, we needed a frosting that was going to hold up to decorating as well as taste good. And buttercream was the best option. So here is an easy homemade buttercream frosting.
Ingredients for Homemade Vanilla Buttercream Frosting
2 cups of softened butter
~ 4 cups of powdered sugar
3 tsps of vanilla
4 – 6 tbsps of heavy cream
Instructions for Homemade Vanilla Buttercream Frosting
First, put the softened butter into a mixing bowl, and with a mixer, beat it until smooth.
Next, mix in the powdered sugar, blending in about 1/2 cup at a time into the butter.
Then add the salt and vanilla until well mixed.
Finally, combine in the heavy cream until the frosting is the perfect consistency.
When I was looking up information on buttercream recipes, most, if not all, of them called for a lot of powdered sugar. But when I made, first the chocolate buttercream and then the vanilla buttercream frosting, I realized I didn’t really need as much as all of the recipes were calling for.
Also, if your frosting is too thin, that’s the primary method of thickening it. But that’s not the only way, if you don’t want a sickly sweet frosting, and your icing needs more weight.
Although, if you don’t mind your cake being very sweet, then by all means, add as much powdered sugar as you want. But be sure your frosting is spreadable.
Thanks for stopping by! And if you enjoyed what you read, please like, post a comment, and share this with others.
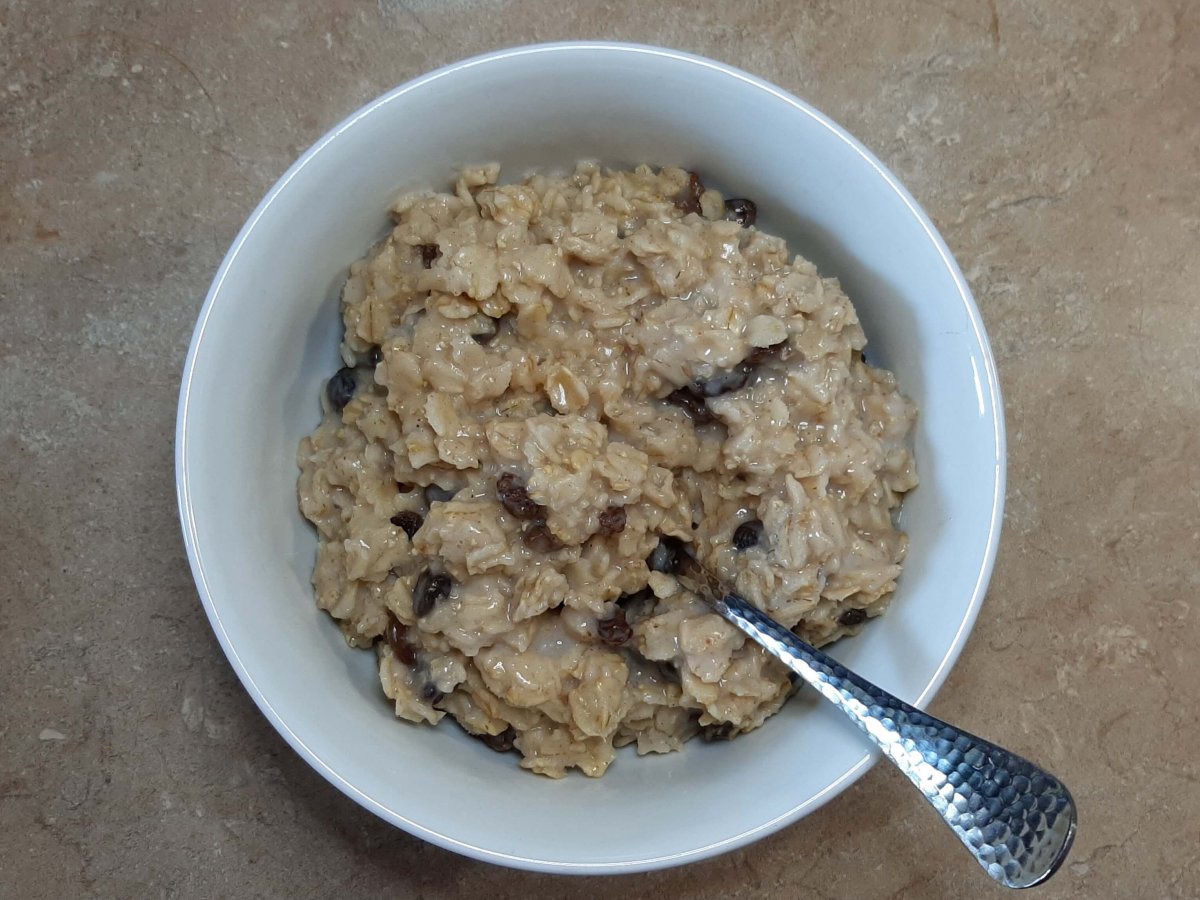
Oatmeal is a staple breakfast food at our house. But we don’t do instant… anything, really. However don’t quote me on that, because I’d have to think about it. Anyway, there are tons of ways to spruce up your oatmeal, so I’m going to show you what to put on top of oatmeal to make it the best you’ve ever had.
About 11-12 years ago we moved to Arizona for a job offer for my husband. Well, they rescinded the offer ~ 2 weeks after we got there. We were thousands of miles from family with no jobs. And the economy there was not good. We ended up homeless for 2 1/2 months, but we didn’t live on the streets, thankfully.
In the background, our ‘stove’ of sorts.
We even had a ‘shower.’
And, we were there long enough, we ended up with 2 tents.
Our homeless experience that produced ‘campfire oatmeal.’
Instead we stayed in a state park. And it was there, amidst campfire living, that I learned to add different things to our oatmeal. To make the most out of a most unpleasant situation. And to this day our two oldest daughters reflect on that time period with nostalgia. I reflect on it with relief, that we didn’t have to stay there indefinitely. But I was thankful that we had a ‘place’ to stay.
Ingredients for basic oatmeal
5 cups of old fashioned oatmeal
7 cups of water
5 tsps Truvia
1/2 tsp cinnamon
1/2 tsp salt
1/8 tsp nutmeg
pinch of allspice
Instructions for basic oatmeal
Add your water to a saucepan and turn the burner on.
When the water begins to boil, add your oats.
Then stir in the remaining ingredients.
Lower the temperature of the burner to low.
Continue stirring from time to time to prevent over cooking.
The oatmeal will be cooked when it’s light and fluffy.
At this point, the oatmeal isn’t bland and flavorless, because you’ve added Truvia. Which is a blend of sugar and Stevia, and it’s what I normally use as a sweetener, unless I have to use white or brown sugar. And there are some spices in the oatmeal as well.
So now it’s time for some toppings. You could add raisins, which are always great, unless you don’t like them.
Other toppings you could try, which are favorites in my house, are sliced bananas and drained pineapple.
If you like dried fruit, you could also try dried apple slices, but cut them up, or put them in a food processor so they’re in smaller pieces.
Pumpkin, chopped almonds or other nuts, and coconut flakes are also great, because not only do they taste amazing, but they’re very healthy.
Fresh fruits, chia seeds, yogurt, and granola are more options that not only taste awesome, but are also good for you.
Honey, maple syrup, and butter. These last three are what my husband and children add to their oatmeal, no matter what kind I make. You might say they have “sweet teeth”?
Some people even top their oatmeal with vegetables. Or eggs and it looks more like ramen than oatmeal. Though I’ve never tried it, so it might be delicious.
This list is certainly not exhaustive, so if you want more decadent and/or healthy ideas, then check this out.
And don’t forget to add milk. I put almond milk in mine, and that’s to make it creamier and to cool it off. But you can add whatever kind of milk you prefer.
Thanks for stopping by! Please feel free to ask a question or leave a comment!
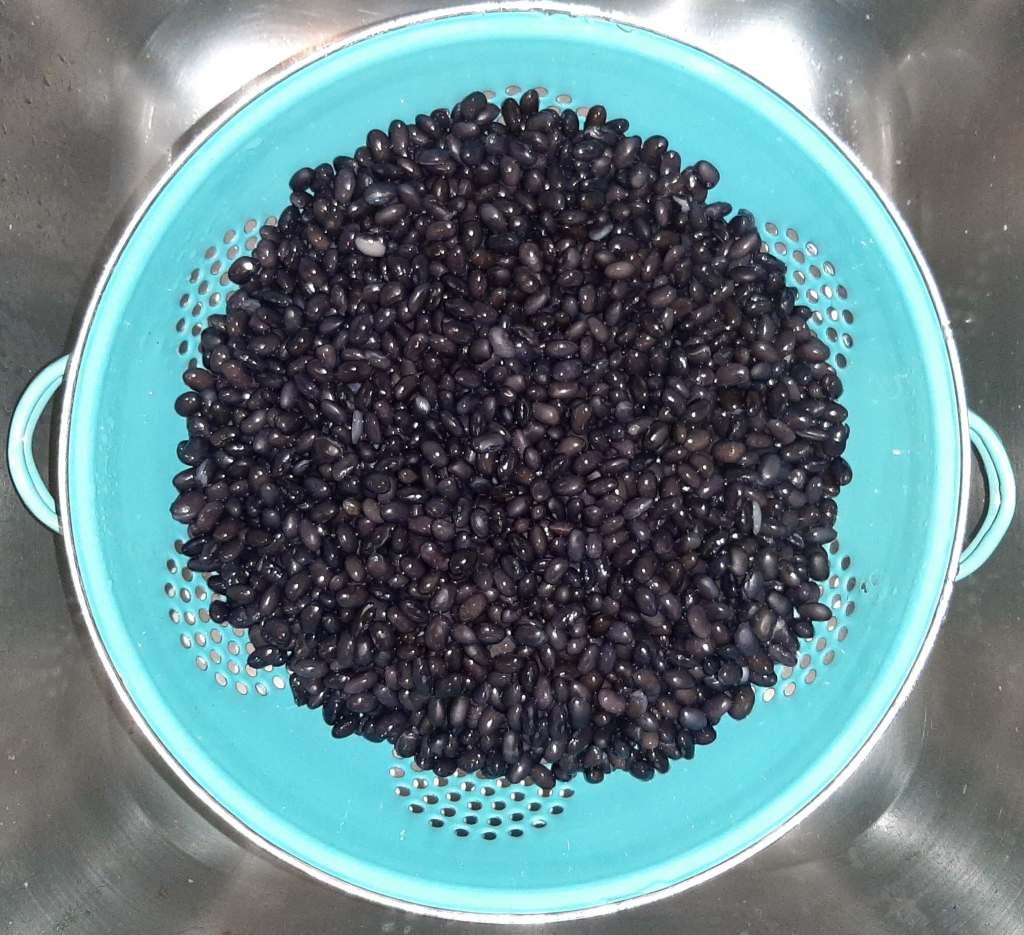
Since we love Mexican and Tex-Mex food at my house, (probably more so than eating Italian), I came up with this recipe. While both are easy to make, it seems that the former two are our go-to foods. Also, some foods are just staples. Like black beans. You can use them in soups or salads. And of course, they’re great simply as a side. Granted there are many brands of canned black beans, including refried. But DIY tastes so much better. So for today’s post I’m going to go over how to cook black beans from scratch.
I used 2 lbs of dry black beans this time. And that’s because I wanted to have leftovers. Because the last time I cooked black beans from scratch I only used 1 lb of dry beans. So it wasn’t enough for my family of 4. But you might want to split the recipe. Or you can freeze half of it. Here’s how you do that.
Ingredients for Black Beans from Scratch:
2 lbs dry black beans
~2 – 2 1/2 qts water
1/4 cup fresh cilantro or 1/8 cup dry cilantro
1 Tbsp fresh minced garlic
1 Tbsp cumin
~2 1/2 – 3 tsp salt
1/2 tsp pepper
How to Cook Black Beans from Scratch:
If you didn’t rinse and soak the beans overnight, then you can rinse and quick soak them now. Plan on at least an extra hour to your cooking time.
There’s a lot of disagreement on this point: to soak or not to soak? Well, I personally soak our beans. There have been times when I didn’t. And those times I noticed a significant difference in my comfort level. So now I do. Every time.
After soaking the beans, rinse them in a colander.
You can either reserve the soaking liquid, or dump it, and start with fresh.
Put the drained and rinsed beans back into the dutch oven. And cover with water. Or cover with the soaking liquid, adding enough water to be sure to cover the beans. But don’t add as much water as when soaking them.
Place the dutch oven on the stove. And turn the burner on med-hi.
Stir in your seasonings.
Lower the burner setting to a simmer when the water starts to boil. Then cover, cooking till the beans are soft, ~ 1 1/2 hrs to 2 hrs.
Be sure to check the water level, so the beans don’t get burned. And add more water if needed.
The beans are finished when they’re soft. You might have more liquid in it than you want. I typically cook our beans until most of the liquid is gone, but not till the beans are dry. Also, add more salt and pepper to taste.
You can serve these black beans from scratch as a side or as the main course, adding a different side. Like Mexican rice.