Categories
Extras recipes

How to Make a Red Velvet Cake Mix Better

Recently I mentioned ways to make a bakery style cake when making box cake mixes. And usually those tips work great for most, if not all, cake mixes. However I also noted that October is Smith family birthday month, and at the end of the month we celebrated my youngest’s birthday. She wanted a red velvet cake, therefore I needed to know how to make a red velvet cake mix better.

I could have made her cake from scratch, but I’m busier than I think I’ve ever been before. Thus time was and is precious. So as long as the cake tasted good, I was fine with using a box cake. Consequently I did a little research, knowing ahead of time the add-ins and switches I was already planning on making and then discovering a couple of new things. The following is the recipe I used for my daughter’s birthday cake.

Ingredients for a better red velvet cake mix

red velvet cake batter in a mixing bowl
  • 2 boxes of red velvet cake mix
  • 1 cup of melted butter
  • 6 large eggs
  • 1 c of plain Greek yogurt or sour cream
  • 1 1/2 tbsp apple cider vinegar
  • 2 1/2 c buttermilk
  • 2 egg yolks
  • 1 large package of instant chocolate pudding
  • 1 tsp vanilla extract
  • handful of lightly floured chocolate chips

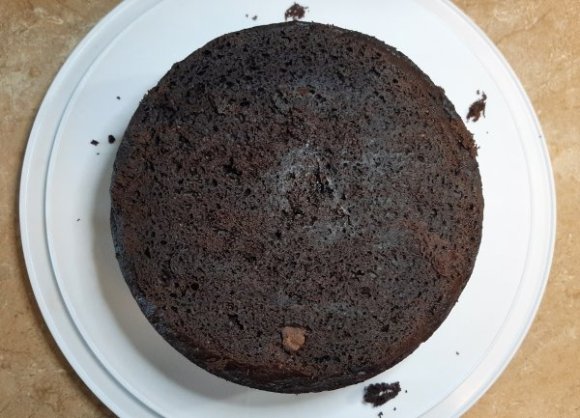
Originally, when I was in the planning phase of this birthday cake, I wanted to make it a 2 tier cake like the last cake. However, when I went to the grocery store, there were only 2 red velvet box cakes left. So I bought those and 1 box of Duncan Hines dark chocolate fudge. With this recipe you can either make a standard double layer round cake, a 13 x 9 inch single layer cake, or cupcakes.

Instructions for a better red velvet cake mix

red velvet and chocolate cupcake batter in muffin tins
  • Preheat the oven to 350
  • Grease your pans with non-stick cooking spray
  • In a large bowl or stand mixer, blend your first 9 ingredients together, starting on low speed
  • Increase your speed to medium, scraping the sides of the bowl
  • And beat on medium speed a minute more, a little bit longer if using a hand mixer
  • Next, stir the lightly floured chocolate chips into the batter
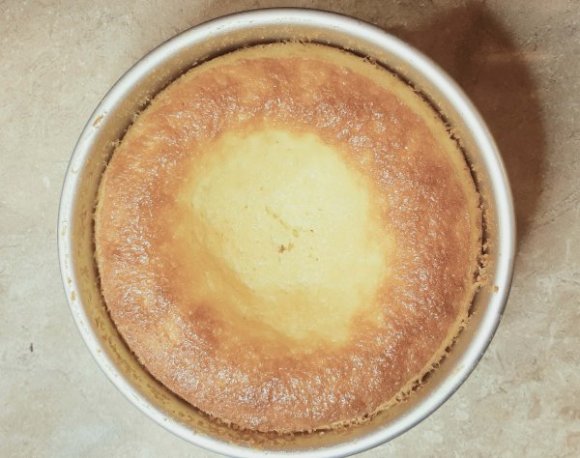
  • Then pour 5 1/3 cups each of the batter into your prepared pans

Remember, it’s important to measure the batter of your hacked cake mix, because if you don’t, your cake might overflow!

  • Bake 30-35 mins or until a toothpick inserted comes out clean
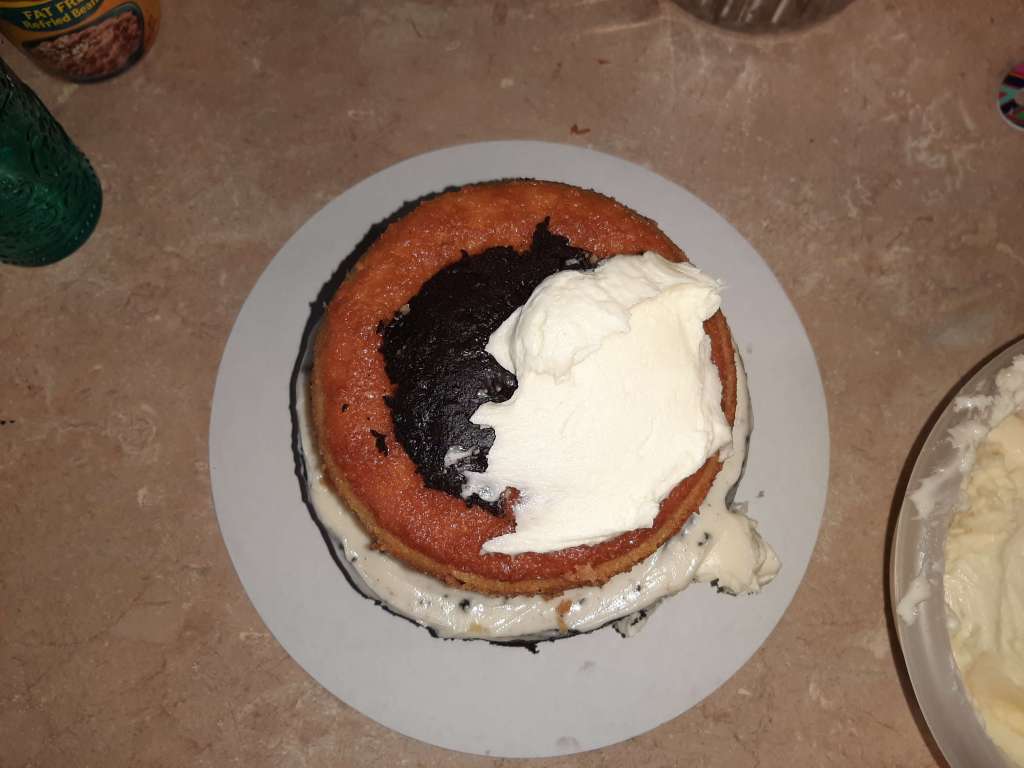
  • Allow the cake(s) to cool ~10 minutes before turning it out, and a further 2-3 hours or overnight to completely cool before frosting
round double layer frosted and decorated cake

Furthermore, I made the cream cheese frosting, while Hannah decorated the cake and cupcakes.

red and white frosted cupcakes

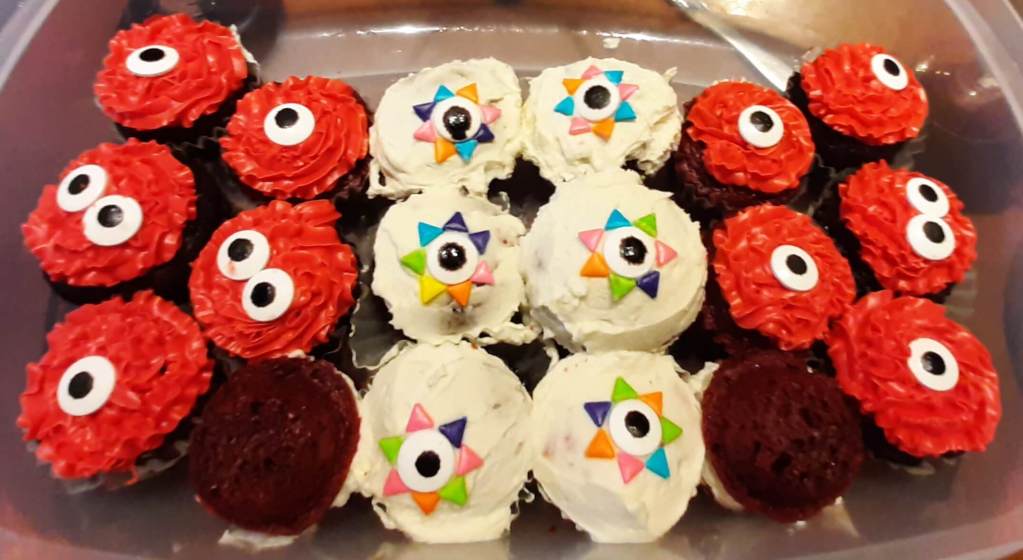
It’s interesting to note that a lot of people, when doctoring their red velvet cakes, choose instead to make yellow cakes and add food coloring. There are many tasty ways to hack a box cake. I hope you’ve enjoyed this post.

Thanks for stopping by! And if you like what you read, please like, post a comment, and/or share.

Categories
Extras recipes

Easy Homemade Buttercream Frosting

Recently I posted a recipe for making a bakery style cake, but I didn’t include the recipe for the frosting. Most of the time my go-to frosting is made from whipping cream and Truvia. However, when my daughter and I made the baby shower cake, we needed a frosting that was going to hold up to decorating as well as taste good. And buttercream was the best option. So here is an easy homemade buttercream frosting.

vanilla, powdered sugar, butter, and whipping cream-ingredients for buttercream frosting

Ingredients for Homemade Vanilla Buttercream Frosting

  • 2 cups of softened butter
  • ~ 4 cups of powdered sugar
  • 3 tsps of vanilla
  • 4 – 6 tbsps of heavy cream
homemade vanilla buttercream frosting in an orange bowl

Instructions for Homemade Vanilla Buttercream Frosting

  • First, put the softened butter into a mixing bowl, and with a mixer, beat it until smooth.
  • Next, mix in the powdered sugar, blending in about 1/2 cup at a time into the butter.
  • Then add the salt and vanilla until well mixed.
  • Finally, combine in the heavy cream until the frosting is the perfect consistency.

When I was looking up information on buttercream recipes, most, if not all, of them called for a lot of powdered sugar. But when I made, first the chocolate buttercream and then the vanilla buttercream frosting, I realized I didn’t really need as much as all of the recipes were calling for.

Also, if your frosting is too thin, that’s the primary method of thickening it. But that’s not the only way, if you don’t want a sickly sweet frosting, and your icing needs more weight.

frosting a 2 layer round cake

Although, if you don’t mind your cake being very sweet, then by all means, add as much powdered sugar as you want. But be sure your frosting is spreadable.

Thanks for stopping by! And if you enjoyed what you read, please like, post a comment, and share this with others.

Categories
Extras recipes

How to Make a Bakery Style Cake

Not only is October full of family birthdays, but then there’s Halloween. And this year I also had the pleasure of baking a baby shower cake for friend at work. I volunteered to do it, and although I planned on a box cake the whole time, I wanted it to taste better than boxed. So I practiced with my ingredients. Thus this is one way how to make a bakery style cake.

round yellow cake on a counter

My daughter Hannah helped me by decorating the cake. Since we both work during the week, I baked the actual cake and made the frosting. That way she could just decorate and not stress about it.

She wanted to get new pans for the project, so we got 8×3 in and 6×3 in pans for a tiered cake. And while we were getting pans, we bought all of the other items we would need for the cake: fondant, stencil shapes, food coloring, 3 box cakes, etc.

chocolate cake in a round pan on a counter

Suggestions for Making a Bakery Style Cake

Since the cake I ended up preparing was a baby shower cake, that’s the recipe I’m going to use. But there are a lot of good sources out there on how to make bakery style cakes. Or on what you can add to your cakes. Also, because the cake was two tiered, I made the smaller layer a yellow cake, and the bottom layer was chocolate.

Ingredients for a bakery style yellow cake

  • 1 box of yellow cake mix
  • 3/4 c of water
  • 3 eggs
  • 1 egg yolk
  • 7 tbsp of melted butter
  • 1 small pkg of instant vanilla pudding mix
  • 1 tsp of vanilla extract
  • 1/4 tsp of salt

Instructions for a bakery style yellow cake

  • Heat oven to 350 degrees.
  • Spray your pan with non-stick cooking spray.
  • Mix all of your ingredients together with a mixer until mixed. But don’t overmix.
  • With a 1-cup measuring cup, pour 3 cups of cake batter into the 6×3 in pan.
  • And cook 40-45 mins or until a toothpick inserted in the center comes out clean.

Now we’ll move onto the chocolate layer.

round chocolate cake on a white platter

Ingredients for a bakery style chocolate cake

  • 2 boxes of chocolate cake mix
  • 2 cups of coffee
  • 6 eggs
  • 1 egg yolk
  • 2/3 c melted butter
  • 1 small pkg of instant chocolate pudding mix
  • a handful of chocolate chips

Instructions for a bakery style chocolate cake

  • Your oven should be heated.
  • Spray your pan with non-stick cooking spray.
  • Mix all of the ingredients, except for the chocolate chips, with a beater until combined.
  • Then, when you’re ready, lightly dust the chocolate chips with flour before adding them to your batter.
  • And measure 5 cups of chocolate cake batter into the 8×3 in pan.
  • Finally, bake for 55-60 mins or until a toothpick inserted comes out clean.

Let the cakes cool completely before putting them together. And then frost with your favorite buttercream frosting.

top view of bakery style safari themed baby shower cake
This is the top of the cake when it was finally put together and decorated.

I found a great chart to help if you ever need to know how much batter to add to your cake pans. Normally you have 9×13 or standard round cake pans. And regular box cakes will fill those just fine with no issues. However if you upgrade your cake, you might discover that you have more batter, and thus they’ll overflow if you don’t measure the batter out.

bakery style, safari themed baby shower cake
This is the front view of the baby shower cake.

How to Make a Bakery Style Cake Every Time

So I just gave you 2 recipes or suggestions on how to upgrade the box cake. But now I’ll give you more tips so your cake will taste great and be fluffy.

  • Always switch out melted butter for oil
  • Add 1 or 2 extra egg yolks
  • If you have a chocolate cake, use coffee instead of water
  • If using another brand, other than Duncan Hines, add 1 cup of sour cream
  • Add a small pkg of instant pudding mix to the batter; the flavor of the pudding to match the cake
  • And you can also add nuts, coconut, chocolate chips, and even fruit to your batter
  • But one of the best things you can do, to make your cake taste awesome, is to frost it with homemade frosting

Thanks for stopping by! And if you enjoyed this post, please like, post a comment, and share it with others.

Categories
Extras recipes

Best Ways to Cook a Cockerel

The first time I prepared chicken straight from our backyard, that was of non-broiler breed, I made it in one of the ways I usually do. Which means, in that case, I roasted it. But oh, was that a mistake. And because of that experience, I want to save you the trouble by sharing the best ways to cook a cockerel.

roasted chicken on a white plate
Photo by Maksim Goncharenok on Pexels.com

You may be asking, what is a cockerel? Well, a cockerel is basically a young rooster. The main difference between a regular rooster and a young one, being their age difference. But for our purposes, you don’t want to cook a regular old rooster. Or even one that’s a year old. And that’s due to the inherent toughness of roosters and layers in general.

young Black Ameraucana rooster

At this point you might be wondering if any of this applies to you. And if so, why would you want to slaughter any of your birds? Well, if you have layers with a mixed flock, there’s a high likelihood that you have a dual purpose breed. And supposing you have more than one rooster, or don’t want the one you have, then you have all of the elements needed to produce some of your own food.

To answer the question why though: because you would know what was going into your food, from the very beginning. There’s no doubt if the rooster was healthy, taken care of, and fed good, quality feed, that whatever meal you made of him would be healthier than the broilers from the grocery store. However you might have to get used to the flavor.

How to Cook a Cockerel

So what are the best ways to cook a young rooster? I already mentioned one way not to prepare it. And now I’ll go over the most preferable ways to prepare a cockerel.

The best ways to cook a cockerel, young rooster, or a laying hen that’s been put out to pasture, so to speak, is in a soup or stew. Or prepare it in something that has a sauce or is full of flavor, like a casserole. For instance

  • Chicken Soup
Sicilian chicken soup with Acini di Pepe

My first choice, for cooking your own backyard rooster, is some kind of chicken soup. The second time I prepared one of our own cockerels I made one of my mom’s chicken soup recipes. And it tasted like a typical grocery store chicken. My family and I couldn’t tell the difference at all, except we knew where the bird came from.

  • King Ranch Chicken
casserole of food
Photo by Ilaria on Pexels.com

Next, my second option is something like Southern Living’s King Ranch Chicken. It too is slow cooked and is full of flavor, which is essential to hide the gamey flavor of backyard bird.

You don’t want to try roasting your backyard birds, unless you have broilers. And that’s because they won’t taste good. You’ll definitely notice the strong taste and tough meat on the bird. Which will dissuade you from ever wanting to try it again.

Have you ever tried eating or cooking backyard chicken? If so, what did you think? Thanks for stopping by, and please don’t hesitate to leave a comment!

Categories
Extras recipes

Marinated Duck Breast Recipe

This is the first time I’ve prepared duck, though I’ve tasted it before. Duck is one of those meats that is scientifically regarded as ‘white’ meat, while in cooking circles it’s more of a ‘red’ meat, due to its darker color. Also, it’s very fatty, but the taste is amazing. And it isn’t difficult to cook. Below is the marinated duck breast recipe I came up with.

Ingredients for the marinade:

Raw meat in a stainless steel bowl
  • Duck breast from 1 full size duck
  • Juice from one orange
  • Zest from one orange
  • 2 tbsp honey
  • 2 tbsp soy sauce
  • 2 tbsp rice vinegar
  • 1 tbsp minced garlic
  • 2 tbsp extra virgin olive oil
raw meat and seasonings in a freezer bag

Instructions for the marinade:

Add all of the ingredients to a large ziplock bag, and put in the refrigerator to marinate overnight.

After your duck has marinated all night, then you’re ready to cook.

Instructions for cooking marinated duck breast:

Meat cooking in a pan
  • Put 1-2 tbsp butter in non-stick pan on med heat.
  • Next, score the fat side of your duck breasts, and place the breasts in the pan, fat side down.
  • Then cook ~6-9 mins on each side; put a lid on the pan, to prevent the breasts from burning. They’re finished when the internal temp reaches 165 degrees.
Plate of cut up meat and broccoli

Serve with your favorite side, like broccoli or greens.

**My thoughts on duck: I really enjoyed it. The marinade was awesome, and even though this particular duck was over 1 year old, it wasn’t tough or gamey. And when talking to my mom about this recipe, she shared with me that she made duck one time, but she tried cooking it like turkey. However both she and my dad couldn’t eat it, because apparently it was awful. But I don’t recall this episode, because I wasn’t even around yet. I’m not sure I was even a thought at that moment.

Thanks for stopping by, and as always, feel free to ask a question or leave a comment!

Categories
Extras recipes

What to Put on Top of Oatmeal

Oatmeal is a staple breakfast food at our house. But we don’t do instant… anything, really. However don’t quote me on that, because I’d have to think about it. Anyway, there are tons of ways to spruce up your oatmeal, so I’m going to show you what to put on top of oatmeal to make it the best you’ve ever had.

round white ceramic bowl
Photo by Daria Shevtsova on Pexels.com

About 11-12 years ago we moved to Arizona for a job offer for my husband. Well, they rescinded the offer ~ 2 weeks after we got there. We were thousands of miles from family with no jobs. And the economy there was not good. We ended up homeless for 2 1/2 months, but we didn’t live on the streets, thankfully.

Instead we stayed in a state park. And it was there, amidst campfire living, that I learned to add different things to our oatmeal. To make the most out of a most unpleasant situation. And to this day our two oldest daughters reflect on that time period with nostalgia. I reflect on it with relief, that we didn’t have to stay there indefinitely. But I was thankful that we had a ‘place’ to stay.

Ingredients for basic oatmeal

  • 5 cups of old fashioned oatmeal
  • 7 cups of water
  • 5 tsps Truvia
  • 1/2 tsp cinnamon
  • 1/2 tsp salt
  • 1/8 tsp nutmeg
  • pinch of allspice

Instructions for basic oatmeal

  • Add your water to a saucepan and turn the burner on.
  • When the water begins to boil, add your oats.
  • Then stir in the remaining ingredients.
  • Lower the temperature of the burner to low.
  • Continue stirring from time to time to prevent over cooking.
  • The oatmeal will be cooked when it’s light and fluffy.
  • Then turn off the burner.

What to Put on top of Oatmeal

oatmeal with blueberries in bowl on table
Photo by MART PRODUCTION on Pexels.com

At this point, the oatmeal isn’t bland and flavorless, because you’ve added Truvia. Which is a blend of sugar and Stevia, and it’s what I normally use as a sweetener, unless I have to use white or brown sugar. And there are some spices in the oatmeal as well.

So now it’s time for some toppings. You could add raisins, which are always great, unless you don’t like them.

Other toppings you could try, which are favorites in my house, are sliced bananas and drained pineapple.

If you like dried fruit, you could also try dried apple slices, but cut them up, or put them in a food processor so they’re in smaller pieces.

sliced strawberries banana and blackberries
Photo by Suzy Hazelwood on Pexels.com

Pumpkin, chopped almonds or other nuts, and coconut flakes are also great, because not only do they taste amazing, but they’re very healthy.

Fresh fruits, chia seeds, yogurt, and granola are more options that not only taste awesome, but are also good for you.

Honey, maple syrup, and butter. These last three are what my husband and children add to their oatmeal, no matter what kind I make. You might say they have “sweet teeth”?

Some people even top their oatmeal with vegetables. Or eggs and it looks more like ramen than oatmeal. Though I’ve never tried it, so it might be delicious.

This list is certainly not exhaustive, so if you want more decadent and/or healthy ideas, then check this out.

And don’t forget to add milk. I put almond milk in mine, and that’s to make it creamier and to cool it off. But you can add whatever kind of milk you prefer.

Thanks for stopping by! Please feel free to ask a question or leave a comment!

Categories
Extras recipes

How to Cook Black Beans from Scratch

Since we love Mexican and Tex-Mex food at my house, (probably more so than eating Italian), I came up with this recipe. While both are easy to make, it seems that the former two are our go-to foods. Also, some foods are just staples. Like black beans. You can use them in soups or salads. And of course, they’re great simply as a side. Granted there are many brands of canned black beans, including refried. But DIY tastes so much better. So for today’s post I’m going to go over how to cook black beans from scratch.

I used 2 lbs of dry black beans this time. And that’s because I wanted to have leftovers. Because the last time I cooked black beans from scratch I only used 1 lb of dry beans. So it wasn’t enough for my family of 4. But you might want to split the recipe. Or you can freeze half of it. Here’s how you do that.

black beans in a blue strainer

Ingredients for Black Beans from Scratch:

  • 2 lbs dry black beans
  • ~2 – 2 1/2 qts water
  • 1/4 cup fresh cilantro or 1/8 cup dry cilantro
  • 1 Tbsp fresh minced garlic
  • 1 Tbsp cumin
  • ~2 1/2 – 3 tsp salt
  • 1/2 tsp pepper

How to Cook Black Beans from Scratch:

  • If you didn’t rinse and soak the beans overnight, then you can rinse and quick soak them now. Plan on at least an extra hour to your cooking time.

There’s a lot of disagreement on this point: to soak or not to soak? Well, I personally soak our beans. There have been times when I didn’t. And those times I noticed a significant difference in my comfort level. So now I do. Every time.

  • After soaking the beans, rinse them in a colander.

You can either reserve the soaking liquid, or dump it, and start with fresh.

  • Put the drained and rinsed beans back into the dutch oven. And cover with water. Or cover with the soaking liquid, adding enough water to be sure to cover the beans. But don’t add as much water as when soaking them.
  • Place the dutch oven on the stove. And turn the burner on med-hi.
  • Stir in your seasonings.
  • Lower the burner setting to a simmer when the water starts to boil. Then cover, cooking till the beans are soft, ~ 1 1/2 hrs to 2 hrs.
Cooked black beans in a pot

Be sure to check the water level, so the beans don’t get burned. And add more water if needed.

The beans are finished when they’re soft. You might have more liquid in it than you want. I typically cook our beans until most of the liquid is gone, but not till the beans are dry. Also, add more salt and pepper to taste.

You can serve these black beans from scratch as a side or as the main course, adding a different side. Like Mexican rice.

Thanks for stopping by!

Categories
Extras recipes

Granny Smith Apple Tree

One of the first things we planted, when we bought our home, was trees. And they were all fruit trees. One peach tree, one Gala, and one Granny Smith Apple Tree. We got them with the intention of offering shade for our chickens. But additionally, we eat a lot of fruit, particularly apples. So we wanted to eat our own food too. We waited 3 years to get fruit. The first year they flowered, the apple trees had a lot of Granny Smith and Gala apples, and the chickens stole a bunch! But we still had enough to make homemade apple pie.

Gala and Granny Smith apple trees
The Granny Smith apple tree on the left; the Gala on the right, about 2-3 years ago.

Each successive year my husband picks the apples, filling a ~5 gallon bucket for our daughter Hannah. Then (sometimes) all 4 of us will help peel and cut the apples, so she can make ~ 10 apple pies. We give some (pies) to neighbors and bring some to work. While we enjoy the rest.

Since those first 3 trees, my husband has successfully cloned some. And we’ve also added Honeycrisp and McIntosh apple trees. Even though they’re both still small, we’ll have had them 3 years by next Spring. We got one apple from the McIntosh this year, which are my personal favorite apples. And it tasted heavenly. I claimed that tree for myself. But so far we. haven’t gotten any from the Honeycrisp. So we’ll just have to see what kind of apples it brings. In addition to those, we have 2 kinds of cherry trees. They should be ready next year since we got those the same time as the Honeycrisp. Though I’m told cherry trees don’t do so great here in Oklahoma.

cut-up apples in a green bucket

This is our 2nd or 3rd year of harvesting apples, but we didn’t even think we were going to have one this year. And that’s because the Granny Smith apple tree is the pollinator for all of the apple trees. Way back in October of last year, when we had our first ice storm, we lost 2 trees. Our peach tree and the Granny Smith.

At first it didn’t look like the peach tree was in too bad shape. At least it didn’t look like the Granny Smith, which was totally cut in half. But over the following weeks it became clear that the peach tree wasn’t going to make it. So my husband cut it down. On the other hand, like I said, the Granny Smith tree was in pretty bad shape from the get-go. It was already cut down. What could we do? And it was the pollinator! We’d have to buy another one, then wait another 3 years till we got apples again.

Very short Granny Smith apple tree
This is our Granny Smith apple tree about 2-3 weeks ago.

However that’s not what happened, thankfully. It was too late to try to salvage the apple tree, by the time my husband thought to. But the tree didn’t die. This past spring, miraculously it was green, and it’s still green. So we ended up having a harvest of apples after all. No, we didn’t have any Granny Smith apples, but we did have Galas, and we had the one McIntosh. And I think we’ll continue to have apples as long as we have the Granny Smith apple tree.

The middle of August is typically when we pick our apples. And they aren’t big like you find at the supermarket. But that’s because they’re organic, and they taste amazing. We just have to get to them before our chickens do!

Granny Smith and Gala apple trees
This is a comparison of the Granny Smith and Gala apple trees.

Thanks for reading, and I hope you enjoyed it! Did you lose any trees in any of the storms we had this past year or last year?

Categories
Extras recipes

One Pan Baked Chicken Legs and Potatoes

This recipe has been in my family since I was little. In fact, I never knew it, but it’s also a generational recipe that goes back (at least) to my great grandmother on my mom’s side of the family. However, once again, I’ve done some tweaking over the years. Sometimes I add garlic, and other times I don’t. Though you can find a lot of different ways to prepare it. And most of them sound tasty. Also, this is a one-dish meal, which makes clean-up a breeze. Additionally baked chicken legs and potatoes are perfect any time of the year. So just keep reading to get the recipe.

The preparation time for this recipe is about 15-20 minutes. And even though cooking times vary, it took me 1 hour and 20 minutes. So plan on an hour at least, possibly longer. Also, the meal will serve 4 people. But you’ll have leftover drumsticks.

Baked Chicken Legs and Potatoes Ingredients:

  • ~ 6 lbs of chicken drumsticks
  • 2 lbs of Honey Sensation and Ruby Gold bite size potatoes (but if you don’t have those or would prefer a different kind, then get what you like)
  • 1 can of peas
  • ~ 2 tsps of salt
  • 1/2 tsp black pepper
  • 1 tsp thyme
Pan with Raw Chicken Legs, Potatoes, and Pease
This is what your chicken, potatoes, and peas will look like prior to putting it into the oven.

Baked Chicken Legs and Potatoes Instructions:

  • Preheat oven to 425 degrees.
  • Line a large jellyroll pan with foil. And then spray the foil with non-stick cooking spray.
  • Next, arrange the drumsticks onto the pan.
  • With ~ 3/4 – 1 tsp of the salt, 1/4 tsp of pepper, and 1/2 tsp of thyme, season one side of the chicken legs.
  • Then flip the legs over, and add the potatoes and peas.
  • And season everything evenly with the remainder of the spices.
  • Then put the pan into the oven, and cook for 45 minutes. Flip the legs over and cook until the internal temperature of the chicken reaches 165 degrees. And make sure the juices run clear.

Since baked chicken legs and potatoes are a one pan meal, you don’t need to come up with any sides. Unless you want to. And if you make this recipe, you’ll notice that there doesn’t appear to be many peas. I think it’s because they shrivel from cooking so long. Although they taste amazing from basting in the chicken juices all that time. But, if you want, you can add the peas during the last 15 minutes of cooking time.

Baked Chicken Legs and Potatoes on a White Plate
Categories
Extras recipes

Easy Recipe for Chicken Tacos

Most of us know that it’s healthier to make our own food than to eat out, order in, or buy pre-made. However it isn’t always feasible due to demands on our busy schedules. And sometimes it’s just nice to go out to for a bite to eat. But there are options available if you don’t want to spend a lot of time in the kitchen or sacrifice nutrition. Like this easy recipe for chicken tacos.

I first started making these chicken tacos within the past ~6 years. Because I wanted a simple recipe. And this is what I came up with. So I hope you enjoy them as much as we do.

Ingredients for Easy Chicken Tacos

  • 2 lbs chicken breast halves
  • 1 can mild Rotel, drained
  • 1/4 tsp cumin
  • 6-8 soft flour tortillas for tacos
  • 1 cups shredded cheddar cheese
shredded chicken with Rotel

Instructions for Easy Chicken Tacos

  • Put chicken breast halves in a pot and cover with water. Once the water boils, lower to a simmer, and cover the pot with a lid.
  • Cooking times vary, so when chicken is cooked (at 165 degrees), then turn off the burner, and remove the pot from heat source.
  • Drain off most of the water, leaving ~2 to 3 tablespoons of broth, and shred the chicken, using two forks.
  • Stir in drained Rotel and cumin. * I use only 1/2 can of Rotel, because I don’t want it too spicy.*
  • Then place the pot with shredded chicken, Rotel, and cumin back on the burner on med-low heat until the liquid evaporates.
  • Heat the tortillas in a tortilla warmer for 30 secs in the microwave. Or, if you don’t have one, you don’t need a tortilla warmer to heat them up. Here are some other options.
  • Top with shredded cheese and your other favorite toppings and a side.

I hope you try this recipe, and thanks for stopping by!