Providing helpful information regarding our feathered, feline, and canine friends while also sharing fun stories. And locally we provide pet sitting services.
Not only is October full of family birthdays, but then there’s Halloween. And this year I also had the pleasure of baking a baby shower cake for friend at work. I volunteered to do it, and although I planned on a box cake the whole time, I wanted it to taste better than boxed. So I practiced with my ingredients. Thus this is one way how to make a bakery style cake.
My daughter Hannah helped me by decorating the cake. Since we both work during the week, I baked the actual cake and made the frosting. That way she could just decorate and not stress about it.
She wanted to get new pans for the project, so we got 8×3 in and 6×3 in pans for a tiered cake. And while we were getting pans, we bought all of the other items we would need for the cake: fondant, stencil shapes, food coloring, 3 box cakes, etc.
Suggestions for Making a Bakery Style Cake
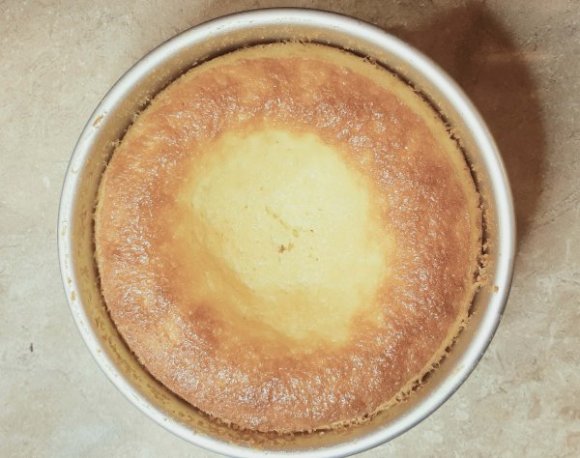
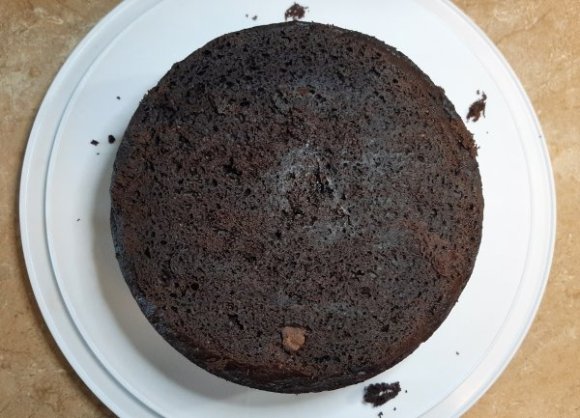
Since the cake I ended up preparing was a baby shower cake, that’s the recipe I’m going to use. But there are a lot of good sources out there on how to make bakery style cakes. Or on what you can add to your cakes. Also, because the cake was two tiered, I made the smaller layer a yellow cake, and the bottom layer was chocolate.
Ingredients for a bakery style yellow cake
1 box of yellow cake mix
3/4 c of water
3 eggs
1 egg yolk
7 tbsp of melted butter
1 small pkg of instant vanilla pudding mix
1 tsp of vanilla extract
1/4 tsp of salt
Instructions for a bakery style yellow cake
Heat oven to 350 degrees.
Spray your pan with non-stick cooking spray.
Mix all of your ingredients together with a mixer until mixed. But don’t overmix.
With a 1-cup measuring cup, pour 3 cups of cake batter into the 6×3 in pan.
And cook 40-45 mins or until a toothpick inserted in the center comes out clean.
Now we’ll move onto the chocolate layer.
Ingredients for a bakery style chocolate cake
2 boxes of chocolate cake mix
2 cups of coffee
6 eggs
1 egg yolk
2/3 c melted butter
1 small pkg of instant chocolate pudding mix
a handful of chocolate chips
Instructions for a bakery style chocolate cake
Your oven should be heated.
Spray your pan with non-stick cooking spray.
Mix all of the ingredients, except for the chocolate chips, with a beater until combined.
Then, when you’re ready, lightly dust the chocolate chips with flour before adding them to your batter.
And measure 5 cups of chocolate cake batter into the 8×3 in pan.
Finally, bake for 55-60 mins or until a toothpick inserted comes out clean.
Let the cakes cool completely before putting them together. And then frost with your favorite buttercream frosting.
This is the top of the cake when it was finally put together and decorated.
I found a great chart to help if you ever need to know how much batter to add to your cake pans. Normally you have 9×13 or standard round cake pans. And regular box cakes will fill those just fine with no issues. However if you upgrade your cake, you might discover that you have more batter, and thus they’ll overflow if you don’t measure the batter out.
This is the front view of the baby shower cake.
How to Make a Bakery Style Cake Every Time
So I just gave you 2 recipes or suggestions on how to upgrade the box cake. But now I’ll give you more tips so your cake will taste great and be fluffy.
Always switch out melted butter for oil
Add 1 or 2 extra egg yolks
If you have a chocolate cake, use coffee instead of water
If using another brand, other than Duncan Hines, add 1 cup of sour cream
Add a small pkg of instant pudding mix to the batter; the flavor of the pudding to match the cake
And you can also add nuts, coconut, chocolate chips, and even fruit to your batter
But one of the best things you can do, to make your cake taste awesome, is to frost it with homemade frosting
Thanks for stopping by! And if you enjoyed this post, please like, post a comment, and share it with others.
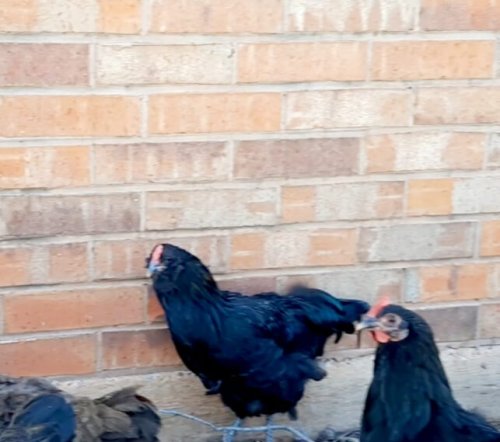
The first time I prepared chicken straight from our backyard, that was of non-broiler breed, I made it in one of the ways I usually do. Which means, in that case, I roasted it. But oh, was that a mistake. And because of that experience, I want to save you the trouble by sharing the best ways to cook a cockerel.
You may be asking, what is a cockerel? Well, a cockerel is basically a young rooster. The main difference between a regular rooster and a young one, being their age difference. But for our purposes, you don’t want to cook a regular old rooster. Or even one that’s a year old. And that’s due to the inherent toughness of roosters and layers in general.
At this point you might be wondering if any of this applies to you. And if so, why would you want to slaughter any of your birds? Well, if you have layers with a mixed flock, there’s a high likelihood that you have a dual purpose breed. And supposing you have more than one rooster, or don’t want the one you have, then you have all of the elements needed to produce some of your own food.
To answer the question why though: because you would know what was going into your food, from the very beginning. There’s no doubt if the rooster was healthy, taken care of, and fed good, quality feed, that whatever meal you made of him would be healthier than the broilers from the grocery store. However you might have to get used to the flavor.
How to Cook a Cockerel
So what are the best ways to cook a young rooster? I already mentioned one way not to prepare it. And now I’ll go over the most preferable ways to prepare a cockerel.
The best ways to cook a cockerel, young rooster, or a laying hen that’s been put out to pasture, so to speak, is in a soup or stew. Or prepare it in something that has a sauce or is full of flavor, like a casserole. For instance
Chicken Soup
My first choice, for cooking your own backyard rooster, is some kind of chicken soup. The second time I prepared one of our own cockerels I made one of my mom’s chicken soup recipes. And it tasted like a typical grocery store chicken. My family and I couldn’t tell the difference at all, except we knew where the bird came from.
Next, my second option is something like Southern Living’s King Ranch Chicken. It too is slow cooked and is full of flavor, which is essential to hide the gamey flavor of backyard bird.
You don’t want to try roasting your backyard birds, unless you have broilers. And that’s because they won’t taste good. You’ll definitely notice the strong taste and tough meat on the bird. Which will dissuade you from ever wanting to try it again.
Have you ever tried eating or cooking backyard chicken? If so, what did you think? Thanks for stopping by, and please don’t hesitate to leave a comment!
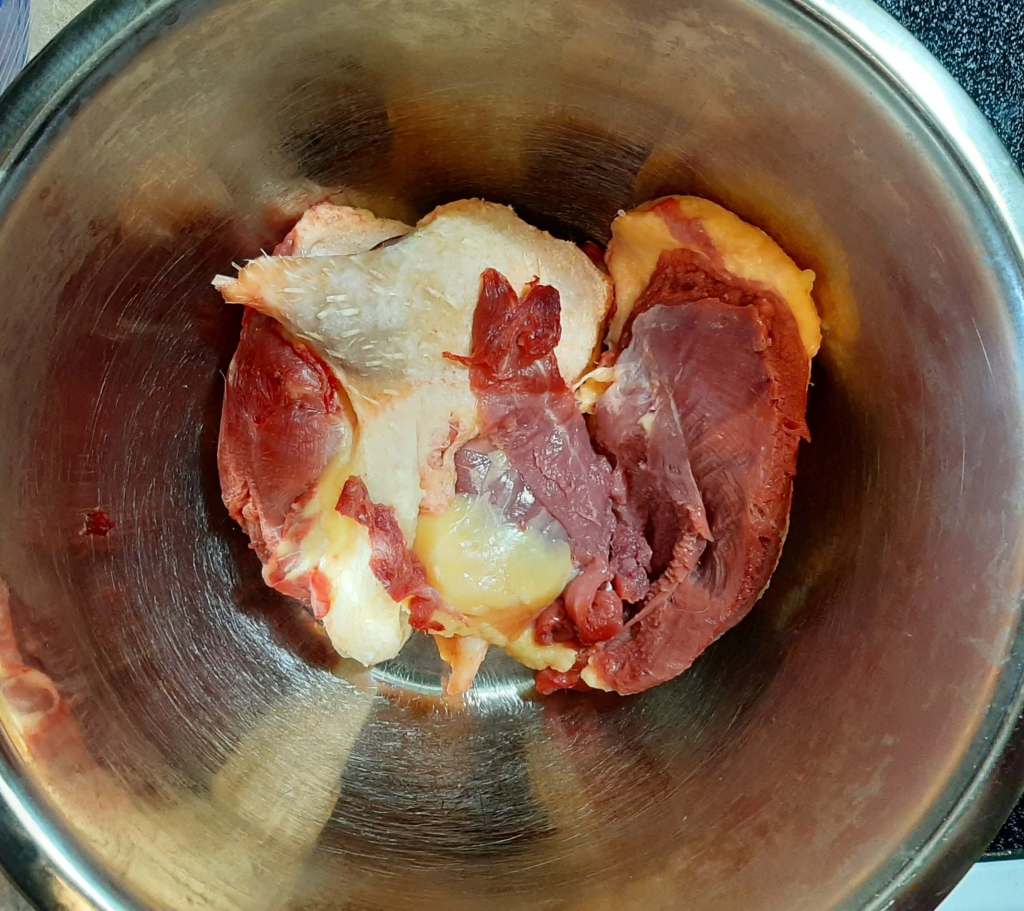
This is the first time I’ve prepared duck, though I’ve tasted it before. Duck is one of those meats that is scientifically regarded as ‘white’ meat, while in cooking circles it’s more of a ‘red’ meat, due to its darker color. Also, it’s very fatty, but the taste is amazing. And it isn’t difficult to cook. Below is the marinated duck breast recipe I came up with.
Ingredients for the marinade:
Duck breast from 1 full size duck
Juice from one orange
Zest from one orange
2 tbsp honey
2 tbsp soy sauce
2 tbsp rice vinegar
1 tbsp minced garlic
2 tbsp extra virgin olive oil
Instructions for the marinade:
Add all of the ingredients to a large ziplock bag, and put in the refrigerator to marinate overnight.
After your duck has marinated all night, then you’re ready to cook.
Instructions for cooking marinated duck breast:
Put 1-2 tbsp butter in non-stick pan on med heat.
Next, score the fat side of your duck breasts, and place the breasts in the pan, fat side down.
Then cook ~6-9 mins on each side; put a lid on the pan, to prevent the breasts from burning. They’re finished when the internal temp reaches 165 degrees.
Serve with your favorite side, like broccoli or greens.
**My thoughts on duck: I really enjoyed it. The marinade was awesome, and even though this particular duck was over 1 year old, it wasn’t tough or gamey. And when talking to my mom about this recipe, she shared with me that she made duck one time, but she tried cooking it like turkey. However both she and my dad couldn’t eat it, because apparently it was awful. But I don’t recall this episode, because I wasn’t even around yet. I’m not sure I was even a thought at that moment.
Thanks for stopping by, and as always, feel free to ask a question or leave a comment!
Oatmeal is a staple breakfast food at our house. But we don’t do instant… anything, really. However don’t quote me on that, because I’d have to think about it. Anyway, there are tons of ways to spruce up your oatmeal, so I’m going to show you what to put on top of oatmeal to make it the best you’ve ever had.
About 11-12 years ago we moved to Arizona for a job offer for my husband. Well, they rescinded the offer ~ 2 weeks after we got there. We were thousands of miles from family with no jobs. And the economy there was not good. We ended up homeless for 2 1/2 months, but we didn’t live on the streets, thankfully.
In the background, our ‘stove’ of sorts.
We even had a ‘shower.’
And, we were there long enough, we ended up with 2 tents.
Our homeless experience that produced ‘campfire oatmeal.’
Instead we stayed in a state park. And it was there, amidst campfire living, that I learned to add different things to our oatmeal. To make the most out of a most unpleasant situation. And to this day our two oldest daughters reflect on that time period with nostalgia. I reflect on it with relief, that we didn’t have to stay there indefinitely. But I was thankful that we had a ‘place’ to stay.
Ingredients for basic oatmeal
5 cups of old fashioned oatmeal
7 cups of water
5 tsps Truvia
1/2 tsp cinnamon
1/2 tsp salt
1/8 tsp nutmeg
pinch of allspice
Instructions for basic oatmeal
Add your water to a saucepan and turn the burner on.
When the water begins to boil, add your oats.
Then stir in the remaining ingredients.
Lower the temperature of the burner to low.
Continue stirring from time to time to prevent over cooking.
The oatmeal will be cooked when it’s light and fluffy.
At this point, the oatmeal isn’t bland and flavorless, because you’ve added Truvia. Which is a blend of sugar and Stevia, and it’s what I normally use as a sweetener, unless I have to use white or brown sugar. And there are some spices in the oatmeal as well.
So now it’s time for some toppings. You could add raisins, which are always great, unless you don’t like them.
Other toppings you could try, which are favorites in my house, are sliced bananas and drained pineapple.
If you like dried fruit, you could also try dried apple slices, but cut them up, or put them in a food processor so they’re in smaller pieces.
Pumpkin, chopped almonds or other nuts, and coconut flakes are also great, because not only do they taste amazing, but they’re very healthy.
Fresh fruits, chia seeds, yogurt, and granola are more options that not only taste awesome, but are also good for you.
Honey, maple syrup, and butter. These last three are what my husband and children add to their oatmeal, no matter what kind I make. You might say they have “sweet teeth”?
Some people even top their oatmeal with vegetables. Or eggs and it looks more like ramen than oatmeal. Though I’ve never tried it, so it might be delicious.
This list is certainly not exhaustive, so if you want more decadent and/or healthy ideas, then check this out.
And don’t forget to add milk. I put almond milk in mine, and that’s to make it creamier and to cool it off. But you can add whatever kind of milk you prefer.
Thanks for stopping by! Please feel free to ask a question or leave a comment!
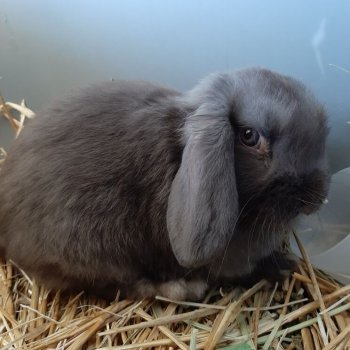
Today I’m not posting a recipe. Rather this is going to be about guilt and grief after pet loss. And if you follow my blog, you know the animals I have: chickens, ducks, cats, a guinea hen, and a dog. Also, I usually only post about issues and animals I’m familiar with. Or about issues I’ve witnessed personally. That being said, we lost Mabel, our dwarf lop eared rabbit on Monday.
I was absolutely not prepared for the amount of tears that I had initially, and that I still have. I thought I’d seen enough chickens die, since being a chicken owner, to have Mabel’s loss affect me so much. But inside animals are very different than outside animals. And they tug on our heart-strings much stronger. However, don’t get me wrong, we’ve had favorite birds that have passed. Davis recently did. I was almost tempted to cry, but again, I’ve seen too many chickens die. They either make it or they don’t. So we learned to get over it.
Our History with Mabel
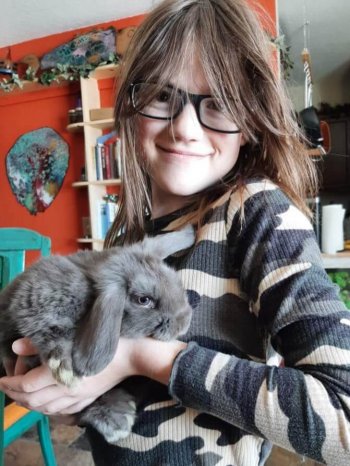
Hannah bought Mabel as a Christmas present (last year) for Sarah, our 10 year old. But we didn’t actually receive Mabel until February of this year (2021). When we brought him home, he was very shy at first. He was acutely aware of his status as prey. Although not long after, maybe a week later, he was letting us approach him, without running off.
Soon Mabel was doing binkies. Binkies are special hops bunnies will do when they’re especially happy. And he used to do them all the time, in addition to exploring the house. Then we got him a friend named Ricky. We thought about breeding them, but quickly rejected this idea. This was before we knew Mabel was a boy bunny.
Mabel humping Ricky.
Mabel was very aggressive toward Ricky; he would mount him continuously everyday, which is why we scheduled to have him fixed as soon as we did. Hence we discovered he was really a boy and not the girl we’d grown to love. Although we still loved him, even though we kept his name ‘Mabel’. We couldn’t change his name, because he knew it by then.
Well, post surgery, Mabel and Ricky started fighting. It was no longer just Mabel being dominant. Ricky started standing up for himself. Which sounded great at first, but then they both became miserable. I won’t post about all the details right now, but I promise I will later. So we instantly found a new home for Ricky, aware that Mabel was likely to be out of sorts for a while.
Poppy sleeping on Mabel.
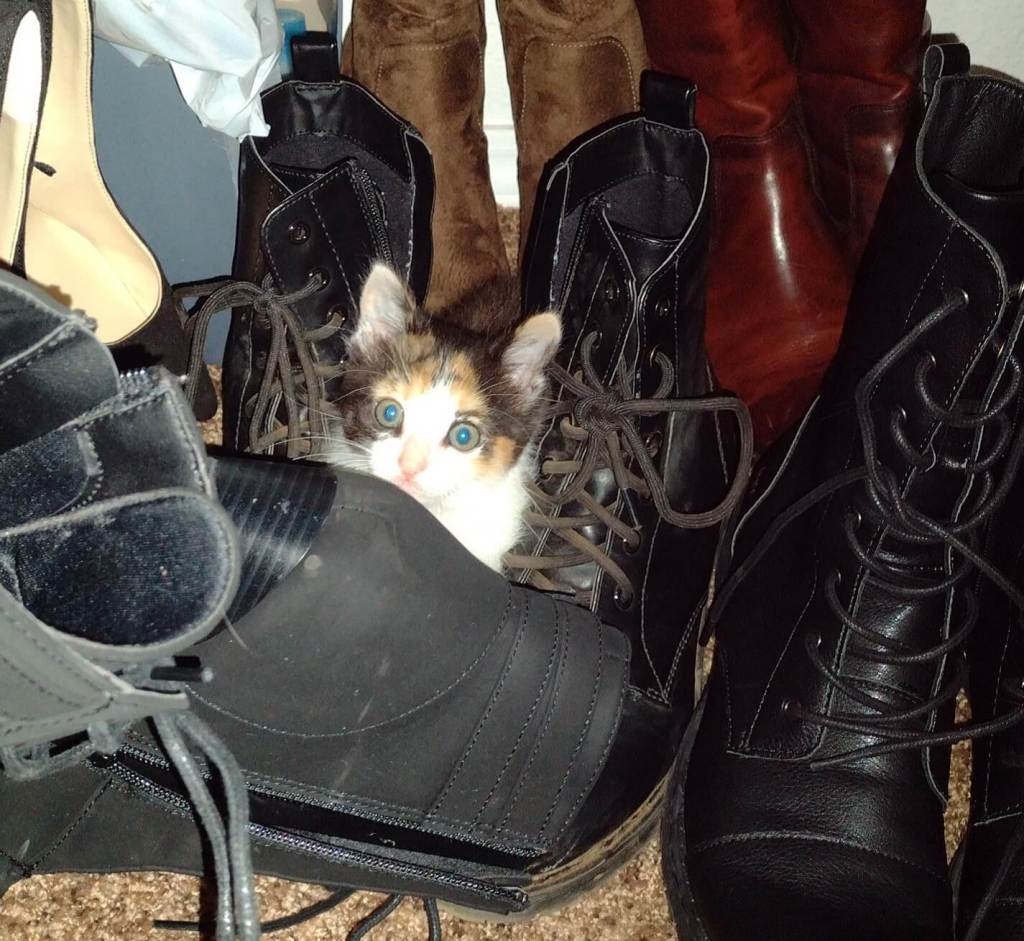
Well, enter Itty Bitty Kitty or Poppy. She’s the kitten one of our neighbor’s brought to us after finding her in the middle of the road. She was about 5-6 weeks old, not old enough to be on her own. Given that, we took her in and cared for her. Which was like caring for a baby. So, she was growing up around Mabel. And she would get in his cage with him and take naps in there. Also, as she’d get bigger, she’d chase him. Or they’d chase each other.
Faint Changes in Mabel
This is about the time I started noticing small changes in Mabel. He didn’t seem depressed, like he just lost his bonded partner. For which I was very thankful. And I owe that to Poppy. I think she kept him busy. So both her presence and Mabel being able to freely explore the house, like he did before Ricky arrived, kept him distracted from Ricky’s absence. However he didn’t approach us like he used to. Also, he no longer did binkies.
Sophie
And then Sophie arrived. Sophie is an Aussie or Australian Shepherd. I have not yet written anything about her. Not for lack of content, because there’s plenty. But because I have so many other things in line. And probably not enough time. So Sophie came into our lives. My husband and daughters have been trying, nearly endlessly since Moses died, to get another dog. We’ve been scammed at least once. So beware of buying dogs on Facebook especially. That’s where we got scammed out of $300.
Well, a different neighbor helped someone they knew give up their dog. They’re an older couple, while Sophie is 7 months old. And they kindly ‘offered’ Sophie to us. We joke all the time now that they were scared she might eat them. Because she constantly chews on . . . furniture, clothes, shoes, people.
Mabel hiding under my bed.
Anyway, moving on. Mabel wasn’t depressed when Ricky left. But as Poppy got bigger, he’d stay under my bed. I’d reason he’s a nocturnal animal. Besides I could always lure him out with a piece of fruit or a Fig Newton. Then when Sophie came to live with us, I attempted to get my family to slowly introduce the members of our animal family. They only listened so much. After all, slowly can be interpreted differently to different people.
Well, Mabel hung out only in the living room as long as Sophie was in the house, I began noticing. I was definitely getting worried about my bunny. I would watch him, paying attention to his posture. Was he relaxed or stressed? But then he would go into another room, and my anxiety would be for nothing. At least it seemed that way.
He’s lying in a relaxed position.
These little behavior changes in Mabel continued. Soon he was just eating, pooping, and sleeping. Sometimes I wondered if he was depressed by both Poppy and Sophie. I could point to both of their arrivals to when he started changing. But I consoled myself with the fact that he continued eating. As long as he was eating, I figured, everything must be fine.
So then I wondered if it had to do with getting him fixed. Most sites only list benefits to the changes brought about by sterilization. However I did come across one site where members had their rabbits fixed. And some members experienced similar issues, where their bunnies’ personalities changed from before they got sterilized. But maybe I was just grasping at straws.
The Day Mabel Died
I went to work Monday. And everything was as it always was before I left. I checked on Mabel, petted him, and talked to him. However when I went on lunch break, I checked my emails. And that’s when I knew Paul took an animal to the vet. Because I got a digital receipt. Therefore, I called him and asked about it.
I figured it would either be Poppy or Mabel, so I asked which of the 2 it was. He stalled, so I asked again. He told me it was Mabel. I asked him what happened to Mabel. And again, he stalled. Then I knew it had to be bad. I repeated my question. When someone starts out with an apology, there’s trouble. And that’s when he told me Mabel died.
Poppy
He proceeded to tell me that Mabel had sepsis. Mabel apparently got an infection from Poppy playing with his ears. However bunnies don’t let you know anything is wrong in the same way that other animals do. They’re silent sufferers. And he was the first rabbit I ever had, so I didn’t know what to look for with everything else going on. I didn’t know if the changes in his personality were due to him losing his genitalia, his friend Ricky, or Poppy and Sophie living with us.
Paul blames himself, I blame myself. We both feel like terrible parents. And I know truly, deep inside, that no one learns anything unless they make mistakes and fail. But I loved Mabel, and I hate that he suffered while I wasn’t even aware of it. Until it was too late.
After grieving for a couple of days, I looked up info on sepsis and rabbits. And I learned that it happens very quickly, 1 to 2 weeks from onset of infection. So it isn’t likely the behavior changes, that he had for the 2 months Sophie’s been with us, were from infection. Because he would’ve been dead way before now. However I’m still sad. And I still feel guilty.
Dealing with Guilt and Grief
I know these are normal feelings. They’re natural, expected emotions for grief. Whether you’re grieving for a human loved-one, who passed away, or a fur baby, grief isn’t just limited to humans. Therefore, if you have pets, at some point you’ll face this too: the loss of a loving pet.
Why do we carry guilt after someone close to us dies? It’s easy to understand grief; we’re sad, and grieving is a normal process. However guilt doesn’t make sense, but we still do it. And we can justify our guilt. At least to ourselves. Granted, there are people out there who shouldn’t have animals, because they don’t care for them. Either through neglect or abuse. Although I’m not thinking about those people, who’ve lost a pet, when I think of guilt and pets.
I’m referring to regular pet lovers who have lost a pet through no fault of their own. Yet they blame themselves, because hindsight is 20/20. We should have known …. Fill in the dots. If we could all go back in time, none of us would have lost anyone we loved.
Even if your pet died from an accident, you still blame yourself. One of my favorite dogs, Roxy, was hit by a car and died several years ago. I felt guilty, because something inside of me that morning told me to put her in my bedroom. Then at lunch I got a call that repairmen came to our place, and when they opened the door, Roxy ran out. But instead of trying to call her to them, they chased her. And we lived close to a busy intersection; she died instantly.
So naturally, I was guilty, because I didn’t listen to that inner prompting, telling me to lock her up. I didn’t know what was going to happen. And it wasn’t a strong feeling. But after she died, I could justify my feelings of guilt by how she died. And by the simple fact that she died that day. It was obviously my fault.
You can feel guilty and sad if your pet passed away from a long illness. And you can feel guilty about any of the myriad of things that come into your head about how you could have, should have, would have, etc, etc, etc. I have experienced those same thoughts and ideas with all of my pets that have died, including Davis, the chicken I didn’t cry over.
How to Survive Guilt and Grief After Pet Loss
One of the most common suggestions for surviving guilt and grief is to write a letterto your pet that passed away. It sounds extremely easy. And in the letter just explain your feelings: the sadness and guilt you carry. Furthermore, you can even write down why you have the guilt. Then when you’re done, you can burn it, releasing it all. Sure, you’ll still think of them. And you might still cry. But you won’t be shouldering the burden of guilt. Also, it doesn’t matter whether you believe your deceased fur baby can ‘hear’ you. All that matters is expressing your emotions instead of locking them up inside of you.
Most people who have lost pets don’t judge others who have lost their own furry friends. When we lose a loved one, we become our own judge and jury. I suppose that’s why we’re guilty in our own eyes. Even if there was nothing we could have done differently. Because there’s this need to explain the whys: Why did you die? Why couldn’t I say ‘goodbye’ one last time? Why wasn’t I home? Maybe he would still be here...
Also, there are pet loss support groups. Most of them are probably online now due to Covid. Though after reading a couple of entries, I’m not sure I’d be able to talk coherently in an in-person group anyway; the stories I read had me in blubbering tears. Of course, our rabbit did just pass away, so that’s fresh. But also, when you love animals, another person’s grief is contagious.
The most important thing you can do for yourself when you lose a pet, though, is to forgive yourself. I am in no way agreeing with you that you are guilty, because I can’t say that. I, too, am suffering the same thing; have gone through the same issue with each pet that has died throughout the past, at least, 27 years. But no one else except me is blaming me for Mabel’s death. And nobody else but you is blaming you for your pet’s death as well. Which is why we need to forgive ourselves for what we perceive are our failures–how we failed our loved ones.
Healing from guilt over death will not be instantaneous, because healing takes time. Like all wounds. However it will happen. I can say that just writing this blog has helped immensely. For instance, I have been able to write today without crying at all. Even thinking about Mabel, looking at pictures, and talking about him are all bittersweet now, rather than painful. And compared to Monday, when I heard the news, it’s like night and day.
So to sum up, when we lose loved ones, we tend to blame ourselves. But we can get locked in a cycle of guilt and grief after pet loss. That is unless we do some things. Like writing our pet a letter and/or joining a support group. And lastly, forgiving ourselves.
Monday, after Paul told me that Mabel passed, initially I thought I didn’t want another bunny. However I was hurting, and I felt terrible. But I no longer feel like I don’t want another rabbit. Having Mabel was fun, he was a great bunny. And it was a great experience, up until he died. So I don’t want to never have that again. Although we will wait until Poppy and Sophie are older.
Thank you for stopping by. Please feel free to ask questions or leave a comment.
If you have cats, or have had cats, you’re probably familiar with their behaviors. They typically don’t like big groups, unlike dogs. But that doesn’t make them loners. And they often get a bad rap as being nasty. Again, compared to dogs. However I have yet to meet an unfriendly feline. Also cats do some pretty amazing things. And some pretty strange things. For instance, have you ever asked, why is my cat eating my hair? Well, today I explore some possible reasons, while also suggesting ways to discourage this behavior.
We added a new cat to our household around the end of May. Yet at the time I didn’t know she was going to end up being ours. A neighbor found her in the road and brought her to us. And I even included her in one of my cute animal posts. Since raising this kitten, I’ve learned so much more about cats. Some I already knew about, but others I’m just sort of learning at each stage. For example, my newest feline nibbles my hair when I sleep.
Certainly a hair-eating cat was something I had not witnessed before. I have two other cats, one that is much older, so she moves around a lot less. And the other one is ~ 2 years old. Otherwise Cake and Meow Meow act pretty alike. But no hair eating habits between them.
This is Poppy, the hair eating, aka grooming, culprit.
Reasons Why My Cat is Eating My Hair
Stress
The first possible explanation that your kitty is chewing on your hair is due to stress. Especially if it just started, (it’s new), or the frequency has increased. Cats, like people, will try different methods to calm themselves down. And eating or chewing on your hair could be a coping strategy.
Oral fixations
Another possibility is that your cat is self-soothing, not unlike thumb sucking in infants. It’s believed that cats that were weaned early start this behavior. If it’s an oral fixation, then it begins as self-soothing until it becomes a habit.
This is especially true for kittens, who make playtime out of anything. And long hair is no exception. But your cat may also just want your attention.
Attraction
If your feline friend licks or chews your hair when you get out of the shower, then they might like your shampoo. Or whatever else you put on your hair. Like mousse or gel.
Medical condition
Additionally there are some medical conditions, like pica or thyroid issues, that could make cats eat or chew on human hair.
In most cases your cat will simply be grooming you, because he or she considers you special. They’re marking you in one more way to let others know you belong to them. In the wild cats groom each other; typically this is a close family group. So when your cat eats your hair, it’s a sign of affection.
How to Discourage Your Cat from Eating Your Hair
First, determine why your kitten is eating your hair.
Is stress the culprit? Did you recently move? Or possibly get a new pet? There are tons of reasons a cat could get stressed. Even though they’re considered predators, they’re small, and they know it. And they know there are threats out in the world to them. This is a great article to find out more about stress in cats if you’re not sure.
If you do find that stress is the factor, then depending on what’s causing the stress, will determine how you deal with it. So if you recently got a new animal, introduce them to each other slowly. Petsmart usually has great info on that. But if you moved recently, then make sure you have some toys from your old place. They need their familiar smells around them.
Now suppose your cat is attracted to the types of products you put in your hair, then switch to something citrus-y.
It’s believed that cats don’t like citrus, so you might try something with orange or lemon scent.
For self soothing, grooming, and play, you would pretty much do the same thing: either move away or redirect.
The only thing you can do in any of those 3 situations is move away from your kitty or re-direct or distract her. Self soothing is going to become a habit, so it needs to be stopped. And unless you want your cat playing or grooming your hair, you need to keep moving away from or getting a toy for your cat, until they get the idea. Which they will.
Another option, for if your cat is grooming your hair, (especially if it’s at night), is wearing a cap to sleep. I know, this doesn’t sound like a great idea! However it will save your hair while also allowing you to sleep. And in the long run, your kitten will learn he can’t get to your hair through the hair cap. Which means, he’ll eventually leave your hair alone. At least at night.
If, on the other hand, your cat eats your hair off the floor, this could indicate pica. Which is where cats eat non-food items. And it’s very dangerous. So if that’s what’s going on, or you’re not sure, then get an appointment with a veterinarian.
Most of the time cats will eat or chew hair out of affection. But there are definitely times they will get stressed, which could also trigger a hair eating episode. All that being said, I know my newest cat did it out of that pack mentality. She sleeps on my pillow. And after she grooms herself, she proceeds to eat my hair. AKA grooming.
My hair that came out when I started combing it.
Initially I thought she just wanted to play with my ponytail, because every time I wore it to bed, she would start chewing on it. Or my hair. However a few weeks ago, when I pulled the ponytail out in the morning, some hair fell out. I started combing my hair, and 2 inch chunks of hair came out. (Thankfully I don’t have any bald spots.) And then I thought she just wanted my hair down, like a hairdresser. But now I’m really honored that she loves me so much to groom me. Although what is proper cat etiquette? Does she expect me to return the favor?
In Summary
To sum up, there are a few reasons your cat would eat or chew on your hair. But the most common reason is he or she considers you one of them. (A cat.) So he/she is grooming you. Though if you’re not sure, you could always take your kitty to the vet for a check-up.
Thanks so much for stopping by! And please don’t hesitate to ask a question or leave a comment!
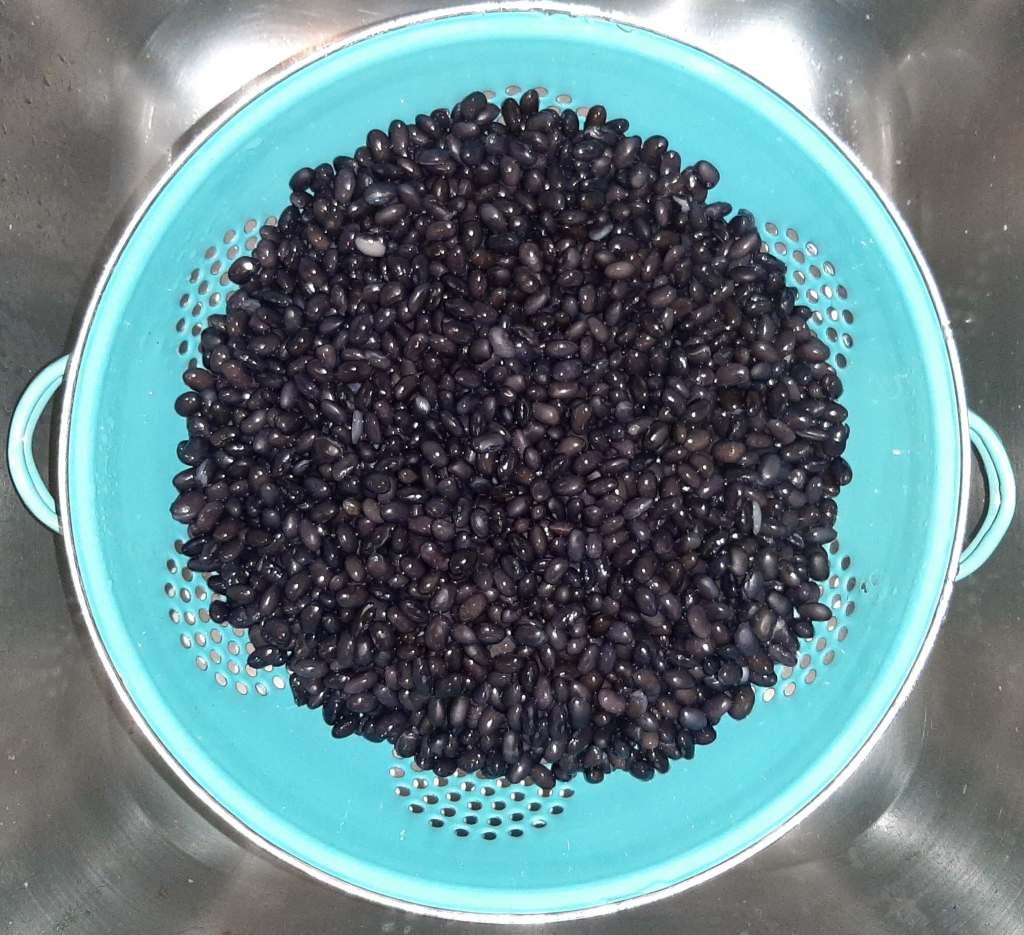
Since we love Mexican and Tex-Mex food at my house, (probably more so than eating Italian), I came up with this recipe. While both are easy to make, it seems that the former two are our go-to foods. Also, some foods are just staples. Like black beans. You can use them in soups or salads. And of course, they’re great simply as a side. Granted there are many brands of canned black beans, including refried. But DIY tastes so much better. So for today’s post I’m going to go over how to cook black beans from scratch.
I used 2 lbs of dry black beans this time. And that’s because I wanted to have leftovers. Because the last time I cooked black beans from scratch I only used 1 lb of dry beans. So it wasn’t enough for my family of 4. But you might want to split the recipe. Or you can freeze half of it. Here’s how you do that.
Ingredients for Black Beans from Scratch:
2 lbs dry black beans
~2 – 2 1/2 qts water
1/4 cup fresh cilantro or 1/8 cup dry cilantro
1 Tbsp fresh minced garlic
1 Tbsp cumin
~2 1/2 – 3 tsp salt
1/2 tsp pepper
How to Cook Black Beans from Scratch:
If you didn’t rinse and soak the beans overnight, then you can rinse and quick soak them now. Plan on at least an extra hour to your cooking time.
There’s a lot of disagreement on this point: to soak or not to soak? Well, I personally soak our beans. There have been times when I didn’t. And those times I noticed a significant difference in my comfort level. So now I do. Every time.
After soaking the beans, rinse them in a colander.
You can either reserve the soaking liquid, or dump it, and start with fresh.
Put the drained and rinsed beans back into the dutch oven. And cover with water. Or cover with the soaking liquid, adding enough water to be sure to cover the beans. But don’t add as much water as when soaking them.
Place the dutch oven on the stove. And turn the burner on med-hi.
Stir in your seasonings.
Lower the burner setting to a simmer when the water starts to boil. Then cover, cooking till the beans are soft, ~ 1 1/2 hrs to 2 hrs.
Be sure to check the water level, so the beans don’t get burned. And add more water if needed.
The beans are finished when they’re soft. You might have more liquid in it than you want. I typically cook our beans until most of the liquid is gone, but not till the beans are dry. Also, add more salt and pepper to taste.
You can serve these black beans from scratch as a side or as the main course, adding a different side. Like Mexican rice.
One of the first things we planted, when we bought our home, was trees. And they were all fruit trees. One peach tree, one Gala, and one Granny Smith Apple Tree. We got them with the intention of offering shade for our chickens. But additionally, we eat a lot of fruit, particularly apples. So we wanted to eat our own food too. We waited 3 years to get fruit. The first year they flowered, the apple trees had a lot of Granny Smith and Gala apples, and the chickens stole a bunch! But we still had enough to make homemade apple pie.
The Granny Smith apple tree on the left; the Gala on the right, about 2-3 years ago.
Each successive year my husband picks the apples, filling a ~5 gallon bucket for our daughter Hannah. Then (sometimes) all 4 of us will help peel and cut the apples, so she can make ~ 10 apple pies. We give some (pies) to neighbors and bring some to work. While we enjoy the rest.
Since those first 3 trees, my husband has successfully cloned some. And we’ve also added Honeycrisp and McIntosh apple trees. Even though they’re both still small, we’ll have had them 3 years by next Spring. We got one apple from the McIntosh this year, which are my personal favorite apples. And it tasted heavenly. I claimed that tree for myself. But so far we. haven’t gotten any from the Honeycrisp. So we’ll just have to see what kind of apples it brings. In addition to those, we have 2 kinds of cherry trees. They should be ready next year since we got those the same time as the Honeycrisp. Though I’m told cherry trees don’t do so great here in Oklahoma.
This is our 2nd or 3rd year of harvesting apples, but we didn’t even think we were going to have one this year. And that’s because the Granny Smith apple tree is the pollinator for all of the apple trees. Way back in October of last year, when we had our first ice storm, we lost 2 trees. Our peach tree and the Granny Smith.
At first it didn’t look like the peach tree was in too bad shape. At least it didn’t look like the Granny Smith, which was totally cut in half. But over the following weeks it became clear that the peach tree wasn’t going to make it. So my husband cut it down. On the other hand, like I said, the Granny Smith tree was in pretty bad shape from the get-go. It was already cut down. What could we do? And it was the pollinator! We’d have to buy another one, then wait another 3 years till we got apples again.
This is our Granny Smith apple tree about 2-3 weeks ago.
However that’s not what happened, thankfully. It was too late to try to salvage the apple tree, by the time my husband thought to. But the tree didn’t die. This past spring, miraculously it was green, and it’s still green. So we ended up having a harvest of apples after all. No, we didn’t have any Granny Smith apples, but we did have Galas, and we had the one McIntosh. And I think we’ll continue to have apples as long as we have the Granny Smith apple tree.
The middle of August is typically when we pick our apples. And they aren’t big like you find at the supermarket. But that’s because they’re organic, and they taste amazing. We just have to get to them before our chickens do!
This is a comparison of the Granny Smith and Gala apple trees.
Thanks for reading, and I hope you enjoyed it! Did you lose any trees in any of the storms we had this past year or last year?
There are a lot of health advantages to spaying or neutering rabbits. And this includes extending their life expectancy. But what are the other benefits of spaying or neutering your rabbit? Well, I’ll get to that in a minute. Spaying or neutering your pet refers to sterilization. Or making them infertile and incapable of reproduction. Terms like ‘having your pet fixed’ or ‘altered’ are the same as having them spayed or neutered. Males get neutered while females get spayed.
In addition, we’re all aware that veterinarians recommend getting our cats and dogs spayed or neutered. However you may not know that having your rabbit fixed is just as vital as having your dog or cat fixed.
Removes the potential for ovarian and uterine cancers. Additionally other uterine problems like pyometra are reduced as well. Pyometra is an infection of the reproductive tract.
The threat of uterine cancers escalates as rabbits mature. So it’s best to spay females before they reach 2 years old to minimize the risk.
Reduces the possibility of them getting mammary gland cancer and mastitis.
Just as in uterine cancers, age increases the risk of female rabbits getting mammary gland cancer. So an intact older female is more in danger for this type of cancer. Also, females have 8 mammary glands, which further adds to their risk of cancer and mastitis. But spaying greatly removes the likelihood that they’ll get either mammary gland cancer or mastitis.
Pseudopregnancies are false pregnancies. Which means the female rabbit will start showing signs of being pregnant. But without actually having a fetus in her uterus. And false pregnancies can happen even if there is only one intact female rabbit. By herself. While the only other factor is she hasn’t been spayed.
As you can see, there are many health incentives to having a rabbit fixed. And most of them involve the reproductive organs. Because most of the issues rabbits get tend to revolve around those organs.
Also, there are other advantages when spaying or neutering your rabbit. Which can be seen relationally. Furthermore, these benefits are common to both sexes.
Mitigates terrorizing behavior.
Both sexes can be aggressive to the opposite sex. And also to their own sex. Additionally typical hostile behavior includes biting, lunging, and mounting. But once rabbits hit sexual maturity, this behavior can be intractable.
And both males and females can still mount after getting fixed. So in this case, it’s not about procreation; it’s about dominance. But if the rabbits have been spayed or neutered, they’re less likely to get injured.
Spaying or neutering your rabbit will minimize the chances of either one marking their territory.
Both sexes mark their territories, which could include you or other animals, with urine. Although this is more common with male rabbits. And the habits of spraying are difficult to break after they hit maturity.
Makes litter training rabbits easier.
Until rabbits hit maturity, and everything that goes with it, you might have some success with potty training. However after that time, when rabbits are more interested in marking their territory and reproducing, your success will eventually wane. Therefore, spaying and neutering rabbits also helps the process of litter box training. So they don’t go to the bathroom all over your house.
Both sexes become easier to handle.
Prior to sexual maturity, rabbits are pretty easy to manage. But once they hit that magic age, all of that earlier handling disappears. Both males and females can become aggressive, even to their owners. Although spaying and neutering rabbits calms them back down. And makes it possible to bond with them.
Many might think it would be sweet to have kittens (baby bunnies). However the likelihood that you would find homes for them is very small. Starting anywhere from 3-6 months, they’re fertile. And they can have numerous kittens per litter.
When to Spay or Neuter Your Rabbit
You should get your rabbit spayed or neutered before they develop any illnesses. Or problem behaviors. However, with that in mind, most people recommend around 4 to 6 months. But it’s best to establish a relationship with an exotic animal vet and ask them. That way they can see your rabbit and answer any questions you may have.
I hope you enjoyed this post, and that I answered any questions. And thanks for reading my post. As always, if you have any questions or comments, please feel free to ask or comment.
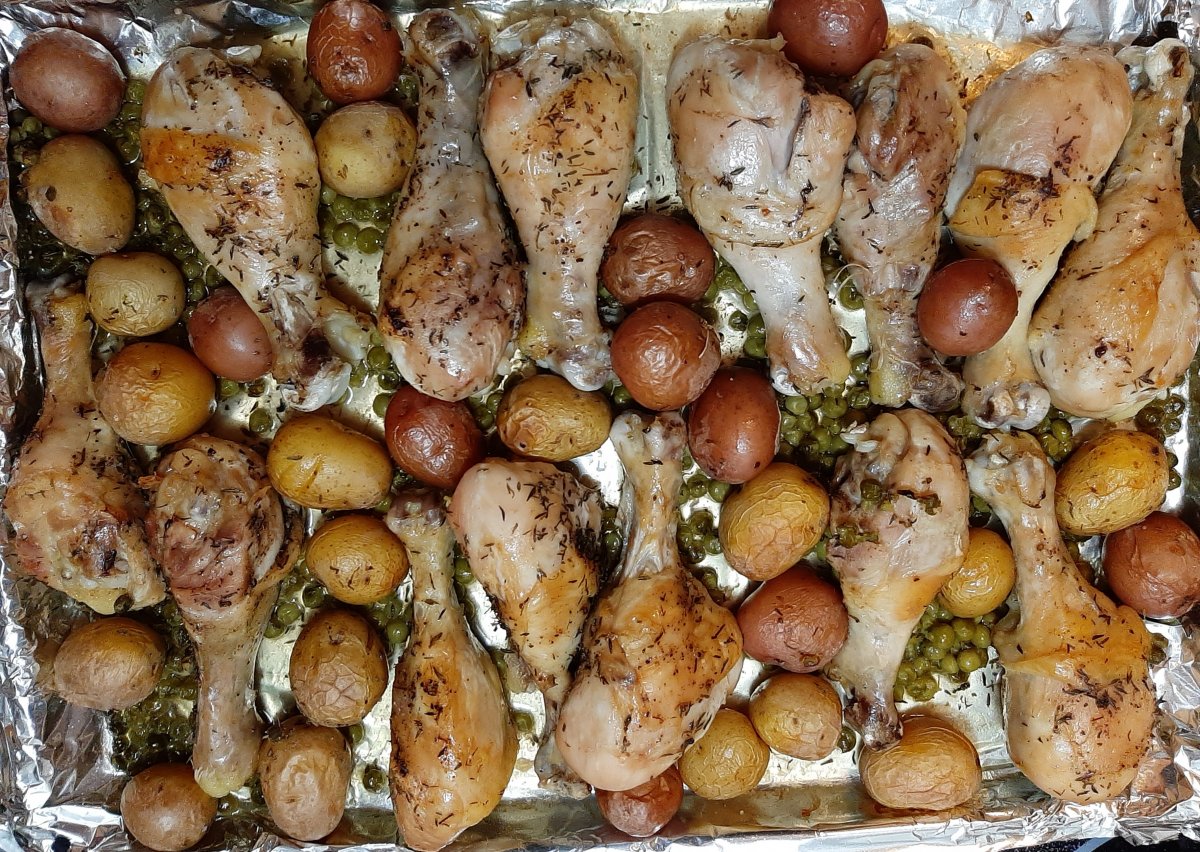
This recipe has been in my family since I was little. In fact, I never knew it, but it’s also a generational recipe that goes back (at least) to my great grandmother on my mom’s side of the family. However, once again, I’ve done some tweaking over the years. Sometimes I add garlic, and other times I don’t. Though you can find a lot of different ways to prepare it. And most of them sound tasty. Also, this is a one-dish meal, which makes clean-up a breeze. Additionally baked chicken legs and potatoes are perfect any time of the year. So just keep reading to get the recipe.
The preparation time for this recipe is about 15-20 minutes. And even though cooking times vary, it took me 1 hour and 20 minutes. So plan on an hour at least, possibly longer. Also, the meal will serve 4 people. But you’ll have leftover drumsticks.
Baked Chicken Legs and Potatoes Ingredients:
~ 6 lbs of chicken drumsticks
2 lbs of Honey Sensation and Ruby Gold bite size potatoes (but if you don’t have those or would prefer a different kind, then get what you like)
1 can of peas
~ 2 tsps of salt
1/2 tsp black pepper
1 tsp thyme
This is what your chicken, potatoes, and peas will look like prior to putting it into the oven.
Baked Chicken Legs and Potatoes Instructions:
Preheat oven to 425 degrees.
Line a large jellyroll pan with foil. And then spray the foil with non-stick cooking spray.
Next, arrange the drumsticks onto the pan.
With ~ 3/4 – 1 tsp of the salt, 1/4 tsp of pepper, and 1/2 tsp of thyme, season one side of the chicken legs.
Then flip the legs over, and add the potatoes and peas.
And season everything evenly with the remainder of the spices.
Then put the pan into the oven, and cook for 45 minutes. Flip the legs over and cook until the internal temperature of the chicken reaches 165 degrees. And make sure the juices run clear.
Since baked chicken legs and potatoes are a one pan meal, you don’t need to come up with any sides. Unless you want to. And if you make this recipe, you’ll notice that there doesn’t appear to be many peas. I think it’s because they shrivel from cooking so long. Although they taste amazing from basting in the chicken juices all that time. But, if you want, you can add the peas during the last 15 minutes of cooking time.