Providing helpful information regarding our feathered, feline, and canine friends while also sharing fun stories. And locally we provide pet sitting services.
My parents were both realtors when I was growing up in Dallas. And each year the Collin County Association of Realtors had a chili cook-off in the spring, which my parents participated in. But most of the entries, if not all of them, were classic chili. However, now that I cook, I know there are so many more choices out there. Although, the first time I made this easy white chicken chili was just a couple of years ago.
I think the main difference with this and classic chili is obviously one is white, while the other is red. But the other main difference is in this recipe, the meat, or chicken, has to be pre-cooked. And you can cook it pretty much any way you want to; including buying a roasted chicken and shredding the meat.
Ingredients for Easy White Chicken Chili:
1 tbsp extra virgin olive oil
1 tbsp minced garlic
6 cups chicken broth
1 chopped onion
1 tbsp dried cilantro
2 tbsp lime juice
1 tsp ground cumin
1/2 tsp dried oregano
1/4 tsp each red pepper sauce and salt
11 oz white shoepeg or whole kernel corn, drained
1 can each (15 or 16oz) great northern beans and butter or lima beans, drained
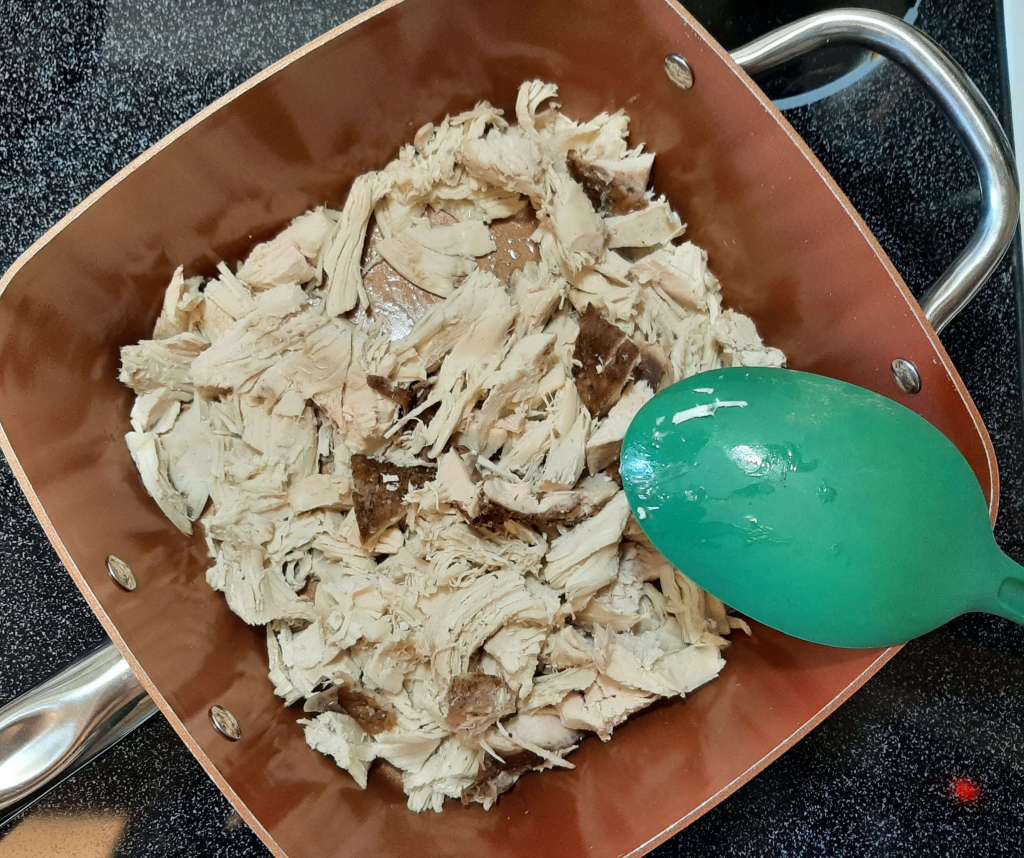
2 cups shredded cooked chicken breasts
crushed tortilla chips
1 fresh diced tomato
chopped green onion
shredded Mexican blend cheese
sour cream or Greek non-fat plain yogurt
Instructions for White Chili:
First, heat olive oil in 4 quart Dutch oven over medium heat. Then cook onion and garlic in oil. And stir intermittently, until onions are cooked through.
Next, add the rest of the ingredients, aside from the chicken. Stir and heat to boiling.
Then reduce heat, and simmer uncovered ~ 20 minutes.
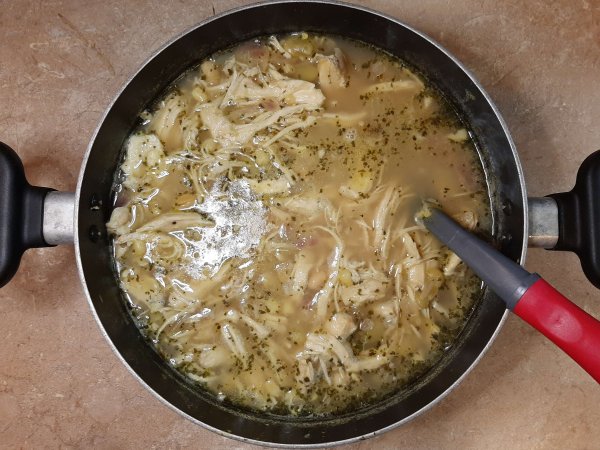
After that, stir in the chicken, still simmering until hot.
At this point the white chicken chili is finished. However, no chili is complete without toppings. Thus, add some shredded cheese, crushed tortilla chips, chopped green onions, fresh diced tomatoes, and sour cream.
Similarly with my Cincinnati-style chili, I found this originally in Betty Crocker’s Cookbook, 9th edition, which was printed in 2000. And again there isn’t a link online, but if you’re interested, you could probably find it at Etsy, Ebay, or something similar.
Thanks for stopping by! If you enjoyed this post, please like, comment, share, and please don’t forget to follow!
It’s been cold and windy the past few days. Perfect weather for Cincinnati-style chili. Although, chili is great to eat in summer too, due to the availability of garden fresh vegetables.
And there are so many ways to make it. White, crockpot, BBQ, and classic are just a few of the options. But there are even Paleo and vegetarian versions. Furthermore, each recipe varies in the length of time to cook, from 30 minutes to several hours.
Which brings me to the different methods of cooking chili: Instant Pot, pressure cooker, stove-top, and slow cooker. Though, there are possibly even ways to cook it in the oven.
Although, most of my cooking history, I’ve made chili on the stove. Until recently. You see, our neighbors gifted us with an electric pressure cooker. But my husband was the only one to try it out, and he loved it immensely. So, after watching and tasting his results, I made this Cincinnati-style chili in the electric pressure cooker to save time.
Ingredients for Cincinnati-Style Chili:
1 lb ground beef
1 onion, chopped
2 (14.5 oz) cans whole tomatoes, pulsed
1 (14.5 oz) cans tomato sauce
2 tbsp chili powder
1 tbsp fresh garlic minced
2 (15 or 16 oz) cans of kidney beans, rinsed and drained
1 1/2 tsp ground cumin
1/4 tsp each of salt and pepper
1 tbsp extra virgin olive oil
~ 10 oz angel hair pasta
1 (15.25 oz) can of whole kernel corn, drained
2 fresh tomatoes, diced and seeded
1 cup sour cream or plain Greek yogurt
shredded Mexican blend cheese
Putting it All Together:
Put the olive oil in the pressure cooker; then add the garlic, onion, and beef, and turn the pressure cooker on saute and beef, cooking until beef is brown; stirring occasionally.
Next, stir in the rest of the ingredients, except the pasta. And cover and lock the pressure cooker, pushing button for pressure, still on beef; and it will cook for ~30 mins.
When the chili is finished, cook the angel hair pasta according to the package instructions; drain when cooked to al dente.
And spoon ~ 3/4 cup chili over ~ 1 cup noodles. Top with shredded Mexican blend cheese, chopped onion, sour cream, fresh chopped tomatoes, etc.
Cooking this in the electric pressure cooker cut my cooking time in half. So, if you’re short on time, that’s a definite plus. Also, originally I got this recipe from Betty Crocker’s Cookbook the 9th edition, printed in 2000. But I couldn’t find a link to it online.
Thanks for stopping by! If you enjoyed this post, please like, comment, share, and please don’t forget to follow!
I was living in Dallas when I first tasted gyros; this was a long time ago, so I don’t remember where. Likely the place is no longer there anyway. But when my daughter, Hannah, worked for a pizza place a few years ago, that also served gyros, I tried my hand at them. Scroll down to find the homemade gyros recipe that I continue to use today.
Some people mispronounce the word, making the hard ‘g’ sound. Rather the g is silent, more like a ‘yu’. ‘Yeeroh’ is really how it’s pronounced. And gyros originate in Greece. Gyro in Thessaloniki means to turn. While in Athens the generic word is ‘souvlaki’, and ‘souvla’ is a skewer. So both terms are correct, because a gyro is shaved meat on a rotating skewer, served in a pita.
Ingredients for Homemade Gyros:
2 tbsp butter or olive oil
one onion, peeled and sliced thinly
1 lb each of ground mild Italian sausage and ground beef
one green bell pepper, seeded and sliced thinly
1 1/2 tbsp minced garlic, divided
one tomato, seeded and diced
2 tsp each of dried oregano, ground cumin, dried marjoram, dried thyme, and ground dried rosemary, divided
salt and pepper to taste
12 pita bread rounds or 12 naan flatbreads
tzatziki sauce
Instructions for Homemade Gyros:
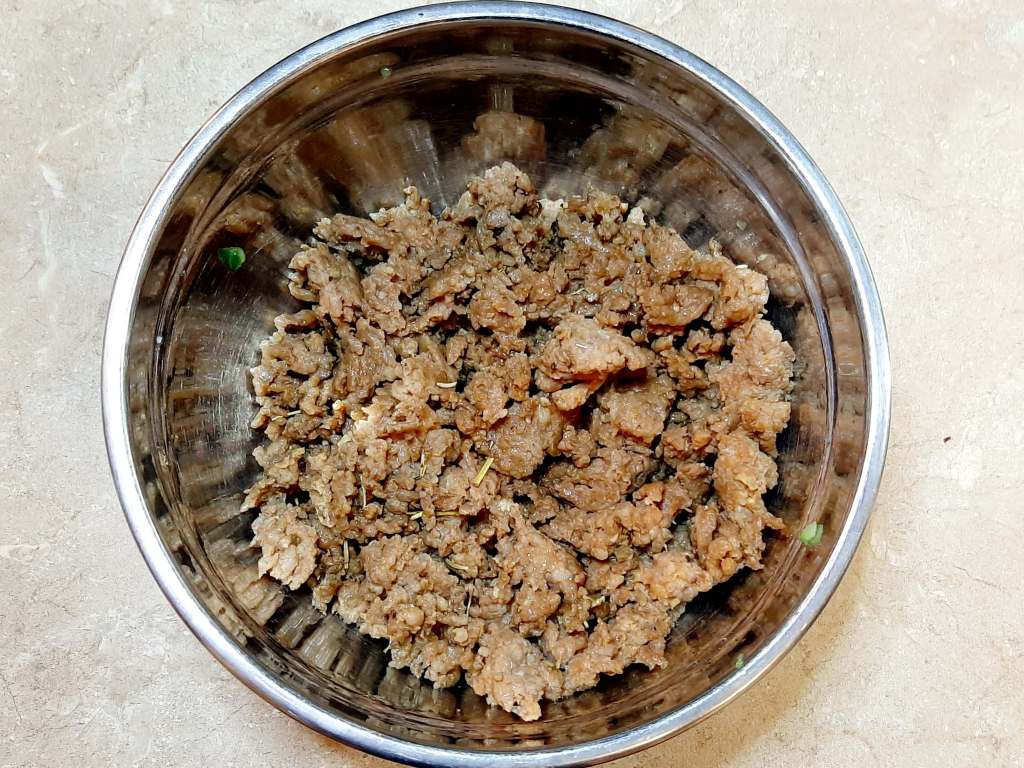
Heat butter or oil in large non-stick pan on medium heat. Add ground Italian sausage and ground beef. With a spoon, break apart the meat into smaller pieces.
While the meat is cooking, add 1 tbsp of minced garlic and 1 tsp each of the dried spices and herbs. And continue breaking up the pieces of meat till there is no pink remaining. Add salt and pepper to taste.
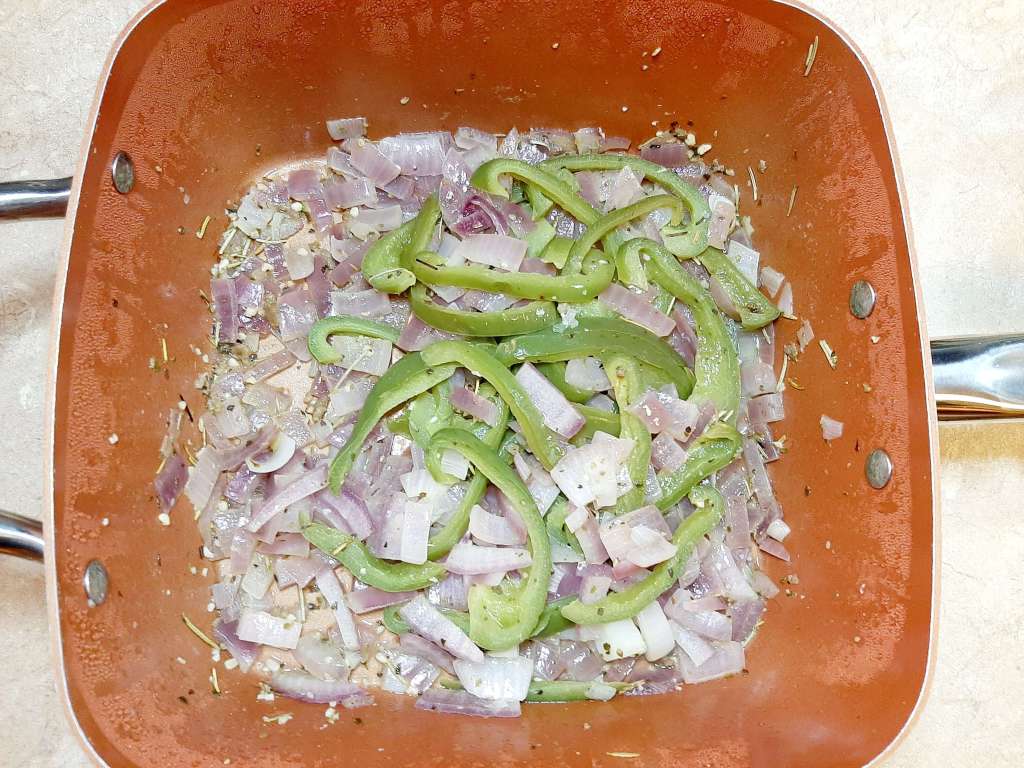
Transfer the meat to a bowl; cover and set aside. In the same pan, add a little more butter or oil for your vegetables. And keep the heat on medium.
Then add onion, bell pepper, remaining garlic, and the rest of 1 tsp of dried spices and herbs. Stir till well combined. Next, cover until the vegetables soften.
Toast the pita rounds or naan flatbread in the oven for ~ 2-3 mins on each side.
And spread tzatziki sauce on the bread, fill with the meat and vegetables; and top with diced tomatoes.
This is not a traditional gyro recipe. Because traditional gyro recipes sort of congeal the ground meats together before cooking them on a rotating skewer. And then the cooked, congealed meat is sliced. Also, there are instructions out there for that kind of recipe, if you’re interested. However, it takes some time to get the meat to congeal. And I don’t have that kind of patience. Sometimes I do, but it wasn’t important for me to have the congealed, and then, sliced meat.
Most meats, like beef, pork, chicken, and lamb go into gyros. Additionally, the spices and herbs I listed for this recipe seem to be common. Though, other recipes might have added or left off one item. So when I started making homemade gyros, I kept the meat ground up, just added the spices, and everything else. Then served them in flatbread. And this is definitely a family favorite. Although, the gyro isn’t complete without the tzatziki sauce.
Ingredients for Tzatziki Sauce:
1/2 European cucumber, finely grated
salt
1 c Greek plain yogurt
1/2 tbsp minced garlic, mashed with 1/8 tsp salt
1/2 tbsp dried mint
freshly ground pepper
1 tbsp extra virgin olive oil
Instructions for Tzatziki Sauce:
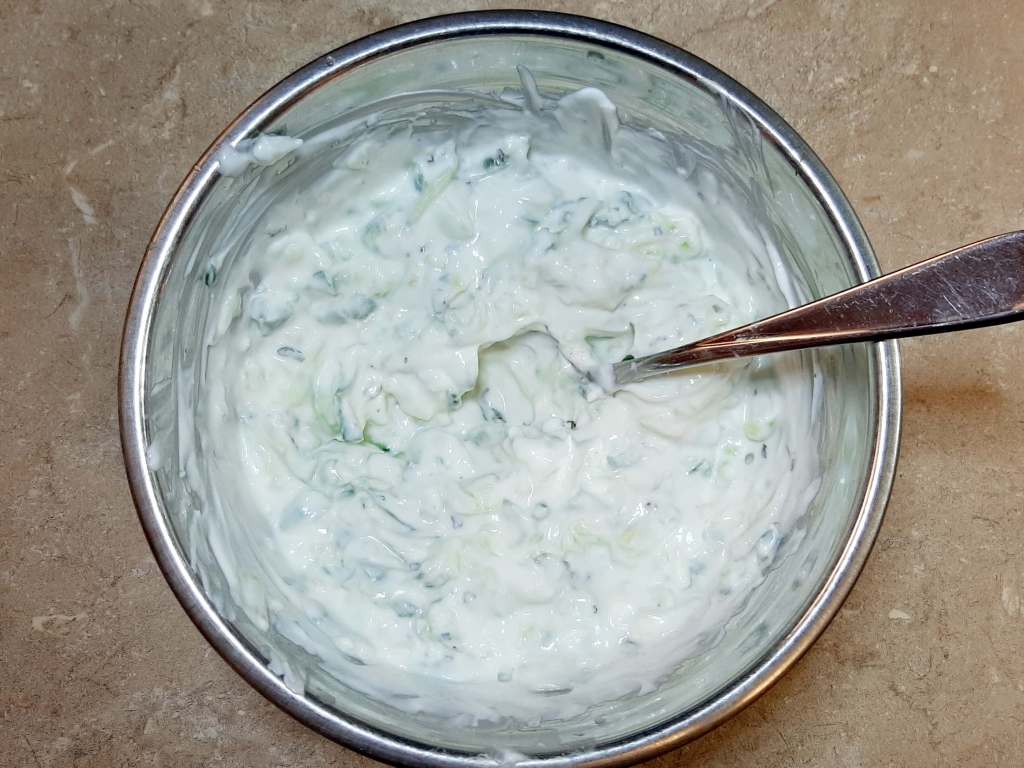
Toss the finely grated cucumber with a generous amount of salt. Next, leave in a colander in the sink to wilt for ~ 15-20 minutes. Then rinse and drain on paper towels.
With a whisk, mix together the yogurt, garlic, mint, salt and pepper to taste, and olive oil. Then stir in the cucumbers. And adjust the seasonings if needed, and serve.
Here’s a link to the original sauce recipe. You’ll notice I’ve cut the recipe in half, because it makes too much sauce. But even with it cut in half, there still remains a lot of sauce leftover.
Thanks for stopping by! If you enjoyed this post, please like, comment, share, and please don’t forget to follow!
Maybe you’ve watched cooking shows or seen recipes that specifically called for duck eggs. Or perhaps you’ve seen them in your grocery store or at a specialty market. And if you live on acreage, no doubt you’ve heard ducks quacking in your neighborhood. Furthermore, if you’ve ever been given these prized objects, you might already be familiar with cooking with duck eggs.
However, if you’ve never tried duck or duck eggs, you don’t know what you’re missing. The meat is delicious, and so are the eggs. Though there’s more to it than that. There are a lot of benefits to cooking with duck eggs, primarily for baking.
Due to the first three items on the list, duck eggs are usually sought after by chefs. The protein in duck eggs, particularly in the whites, tends to make fluffier and creamier custards and cream fillings. But also breads, cakes, and quick breads are better as well.
duck yolks are bigger than chicken egg yolks
ducks continue to lay even during hot and cold temperatures
This is our Mallard, Aizawa, hidden in her nest.
This is important because chickens will have a down time during their molt. But they also won’t lay if the temperatures are on either extreme, too hot or too cold.
and the last benefit is that some people have discovered that if they’re allergic to chicken eggs, they can eat duck eggs just fine
But if you just want to have eggs, you can do that too. Boil them, fry them, or scramble them, you can cook duck eggs the same as chicken eggs. However, if you’re baking with them and the sizes are different than chicken eggs, figure 2 duck eggs for 3 chicken eggs.
Thanks for stopping by! If you enjoyed this post, please like, comment, share, and please don’t forget to follow!
A week ago we were either cooking our Christmas meals, or traveling to visit family and friends. Or maybe even a combination of the two. And now that it’s New Year’s, we’re back in the kitchen for one last big meal of the year. Perhaps you need some ideas on what to eat on New Year’s Eve or Day? If so, keep reading, and I’ll go over some regional and global ideas. But I’ll also cover the reasons why we eat the food we eat on New Year’s.
Most, if not all, of us know that it’s traditional to eat black-eyed peas for New Year’s Eve or Day. That is if you live in the South. But are you familiar with the reason why? First, eating black-eyed peas can be dated back to 6th Century Jews celebrating Rosh Hashanah, their new year, for prosperity. Second, it is thought that Sephardic Jews moved to the Southern U.S. during the 18th Century, and they probably had slaves. Particularly black cooks who learned their cooking traditions.
However, eating black-eyed peas with rice is African in origin. And they continue to be a staple in Africa today. In addition, there are legends claiming that eating black-eyed peas dates to the Civil War. But as to the truth of why we started eating them on New Year’s? We’ll probably never really know. Some say it began with the Emancipation Proclamation, which commenced January 1, 1863.
What to Eat on New Year’s Eve
What to Eat on New Year’s Eve in the Southern United States:
A typical southern New Year’s Eve meal includes some kind of greens: collard greens, mustard greens, or turnip greens, which represents paper money. And cornbread is served to symbolize gold. Black-eyed peas are said to represent pennies by some. And then there is the pork; hog jowls is served like bacon to ensure health, prosperity, and progress. So you have health, wealth, and prosperity.
What to Eat on New Year’s Eve in the Northern United States:
While the Southern United States prefers Hoppin’ John, the Northern United States eats Gwumpkies, cabbage, and/or sauerkraut balls. The cabbage and variety also represents paper money and has ties to Eastern Europe. Additionally, Americans in the north eat herring, probably at the stroke of midnight like people in Poland, to ensure prosperity and bounty. Furthermore, the Northern U.S. serves roast pork to bring good luck; since it comes from the idea of the pig moving his snout around in a forward motion, not backwards.
According to CNN, Spain rings in the New Year with twelve grapes. At the stroke of midnight, people living in Spain eat one grape for each toll on the clock, signifiying one month each of good luck for the year.
Tamales are served, sold, and eaten in Mexico for New Year’s. Even though they’re usually important at most festive occasions, New Year’s is even more special for this food. And though there is no mystical or good luck associated with tamales, they tend to represent family and tradition.
On New Year’s Eve the Netherlands has powdered sugar, doughnut-like balls with currants or raisins. And they look similar to doughnut holes, including being fried like doughnuts. These were first eaten by Germanic tribes, and thought to be used as an offering to appease the Germanic goddess Perchta and her evil spirits.
Both Austria and Germany celebrate New Year’s Eve with spiced red wine punch, suckling pig, and marzipan pigs that are translated as good luck pigs. Bakers will be familiar with marzipan; it’s made out of almonds and sugar, so it’s a confection of sorts, much like candy.
Soba noodles are consumed at midnight on New Year’s Eve in Japan, to ring in the new year. The noodles represent longevity and prosperity. But another tradition involves family and friends spending the day before New Year’s making mochi rice cakes. The guests take turns making small buns that are later eaten as dessert.
What to Eat on New Year’s Eve in Italy:
Lentils are served in Italy for New Year’s, because they are round like coins, symbolizing fortune. However, there are other foods to eat, like raisins, representing good luck, and grapes, which symbolize wisdom and frugality.
What to Eat on New Year’s in Turkey:
Pomegranates are eaten on New Year’s traditionally in Turkey for 2 reasons. One, because the seeds are round, which once again represent coins, and therefore, wealth. And two, the color red symbolizes fertility.
Obviously this isn’t an exhaustive list, but as you can see, a lot of the themes are repeated. Pork, grapes, raisins, cabbage, peas, greens, and round bread. You get the idea. So what are you going to make this year? I hope I gave you some ideas. And that you were entertained as well. Have a fun and safe New Year’s Eve, whatever you do.
Thanks for stopping by! If you enjoyed this post, please like, comment, share it, and don’t forget to follow!
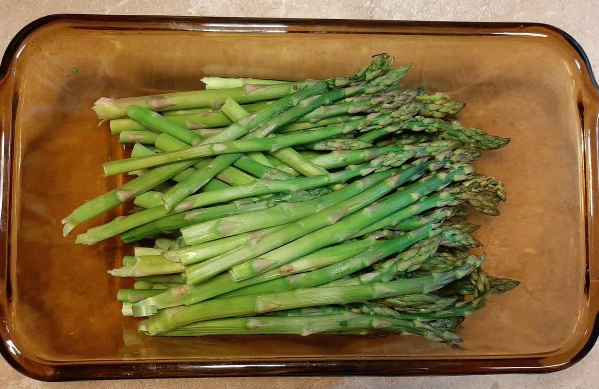
Asparagus is great to eat any time, really. But sometimes it just makes a meal special. And it complements so many dishes. However, just thinking about it, some people might think it’s difficult to cook. Especially if you’ve never tried to. But I want to share an easy way to cook asparagus, that tastes like you worked all day in the kitchen for it.
The first thing you want to do is have some asparagus. Choose smooth, round, tender, medium size green spears with closed tips. Then when you’re ready to cook them, break off the tough ends as far down as the stalks snap easily. Even if you buy a package that claims the ends have already been snapped, nevertheless snap the ends. Trust me, this will make them more palatable. When that’s done, wash the asparagus. If necessary, use a vegetable brush to remove debris. Below you’ll find the rest of the recipe.
Ingredients for an easy way to cook asparagus:
1 1/2 lbs asparagus, cleaned and with ends snapped off
2 tbsp water
1/4 c butter
1 clove minced garlic
1/4- 1/2 tsp garlic salt
Salt and pepper to taste
Instructions for easy asparagus:
Put asparagus spears in 8×4 microwavable loaf pan with 2 tbsp of water. Cover with vented plastic wrap, and microwave 4-6 minutes or until crisp tender. Drain the water.
In a non-stick pan, start melting the butter on medium heat. Then add the asparagus and remaining ingredients. Stir and cover with a lid. Cook for ~ 5-10 minutes or until fork tender.
Lastly, serve with steak or chicken breasts.
I hope you enjoyed this post. And as always, thank you for stopping by. Do you have a favorite asparagus recipe? How do you prepare it? Please share, and if you don’t already follow me, you can do so now.
Making Sicilian dishes on Christmas Eve is a family tradition on my mom’s side of the family: Pizzas, cannolis, cream puffs, cookies. You name it, we had it. But what my mom is used to making is not the same thing that I make. Her cannoli recipe is a little more complicated and involves the stove. That’s because my great grandma didn’t like the easy cannoli recipe that’s out there. However, below is what I typically make for my own family.
Ingredients for Easy Cannoli Recipe:
30 oz ricotta cheese
1/4 c Truvia or 1/2 c regular sugar; adjust if needed
1 tsp vanilla
4 oz of miniature chocolate chips
1 tsp lemon zest
~ 15-18 cannoli shells
Instructions for Easy Cannolis:
Drain the ricotta.
Then, by hand, mix with sugar, vanilla, and lemon zest.
Next, fold in chocolate chips.
And fill the cannoli shells.
Put your remaining mini chocolate chips in a shallow bowl and dip the ends of your cannolis into the bowl of chocolate chips.
This fills ~ 15-18 cannolis. Also, you can make your own cannoli shells. But I don’t; I never have. Though, at some point I may have to, because finding shells was an issue. Consequently I ordered them for $49. Although I did get 70 of them. Thus, I can make them again.
Furthermore, I never found a recipe similar to my mom’s when searching the web. The only thing that came close was one on the box of cannoli shells I ordered. And I would’ve included the one from my mom’s if she could’ve found hers. It tastes more liken a custard than the ricotta cheese filling in most cannolis. Very similar to cream puffs.
Thanks for stopping by! If you liked this post, please like, post a comment, share, and don’t forget to follow!
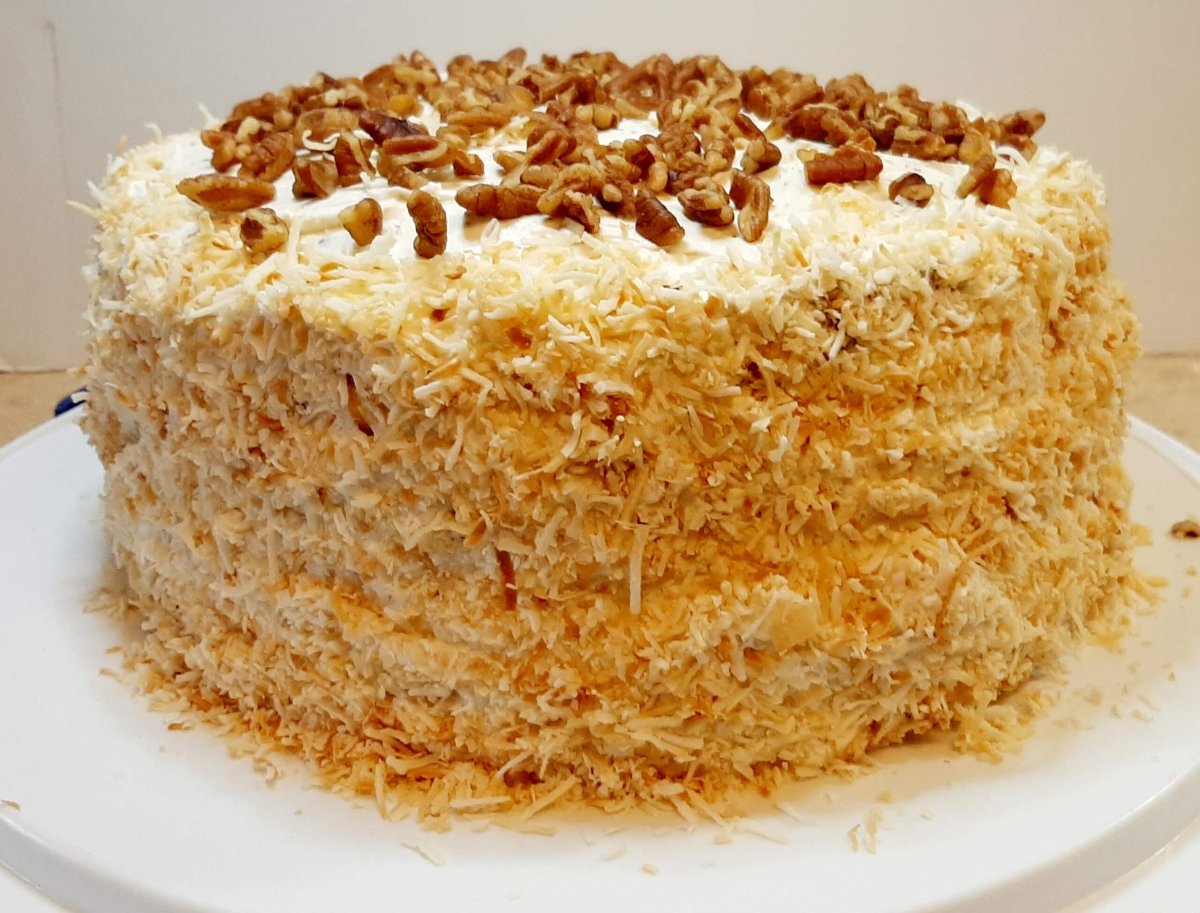
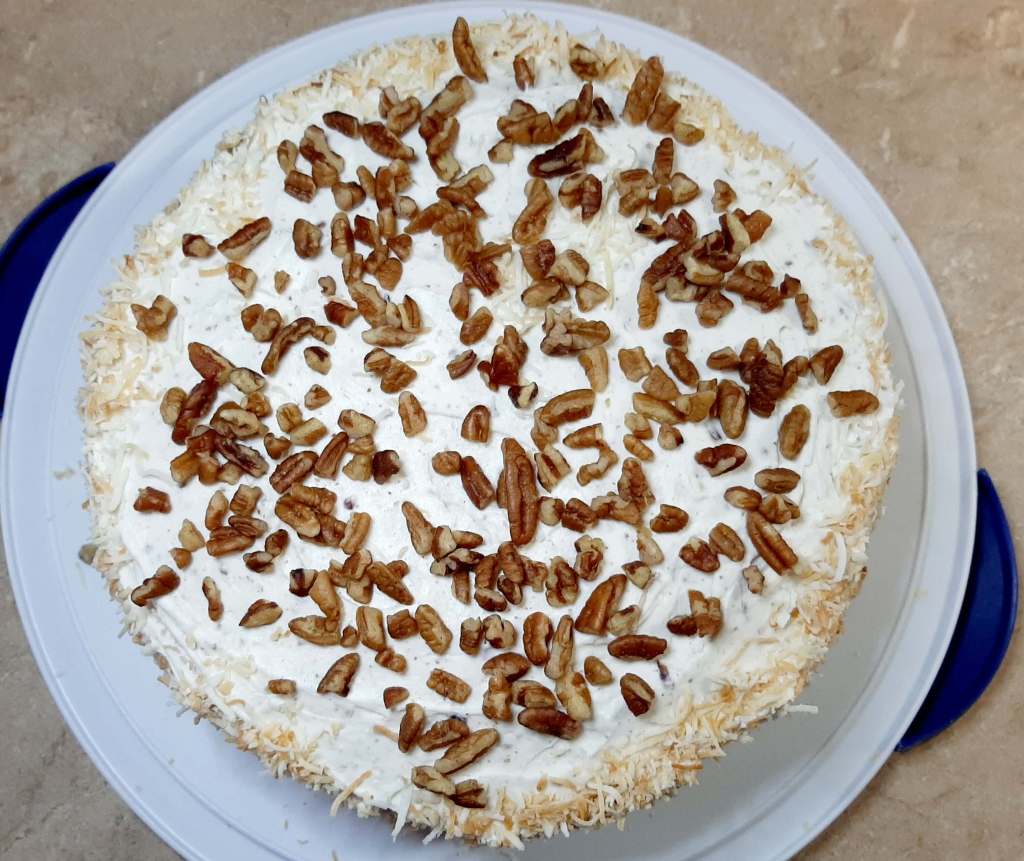
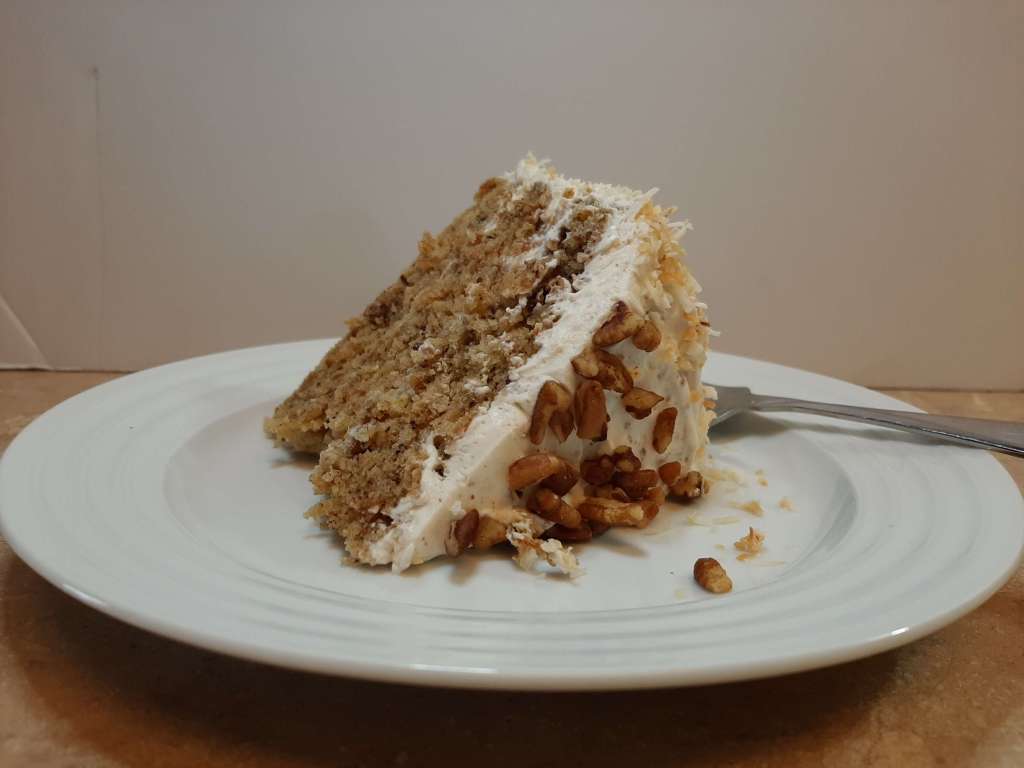
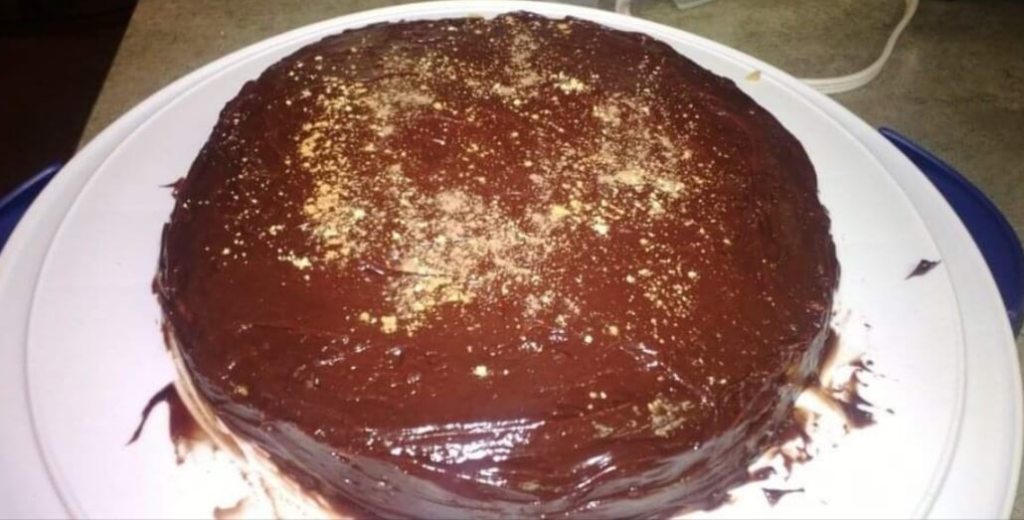
‘Tis the season for baking. At least for me, and I think in general. It’s a great way to celebrate the holidays, spend time together, and of course, eat yummy treats. I try to plan my holiday bake-off when I have several days off. But alas, that won’t happen till after Christmas. However, I decided to make something small, one of my favorite desserts. And it’s based on an Italian Cream Cake recipe I found on the web.
Italian Cream Cake and Italian Wedding Cake are used interchangeably as well, because they are one and the same. But are they Italian desserts? No one knows for sure, except they are typically made in the southern United States. Furthermore, the most popular time to bake them is during the holidays. Additionally, you can try making this with a box cake mix. Though, I made this one from scratch.
Ingredients for Italian Cream Cake
2 c all purpose flour
1 tsp baking soda
1/2 tsp baking powder
2 sticks of butter softened
3/4 c Truvia
1/2 c brown sugar
2 tsp vanilla extract
1/2 tsp almond extract
5 eggs
1 c buttermilk
14 oz of flaked coconut toasted and divided
1 1/2 c chopped pecans toasted and divided
The frosting for Italian Cream Cake is usually either cream cheese, whipping cream, or cream cheese with whipping cream. Although, I’ve also seen a recipe with buttercream frosting.
However, instead of using the recipe from the internet, or any varieties of it, I just made cream cheese with whipping cream, sans the butter. Yet I added other key ingredients to make it more Italian Cream Cakey.
8 oz cream cheese softened
2 c whipping cream
1/4 c Truvia
1 tsp vanilla extract
1/4 tsp almond extract
remaining toasted coconut
1/2 c remaining toasted chopped pecans
Instructions for Italian Cream Cake
Preheat oven to 350.
Liberally spray 3 9-inch cake pans with non-stick cooking spray and set aside.
Stir flour, baking soda and baking powder together.
Then in a large bowl, using a hand mixer, cream together the softened butter, Truvia, brown sugar, vanilla and almond extracts. And beat until creamy.
Add the eggs one at a time, beating well after each one.
Next, mix the dry ingredients by turns with the buttermilk. And once all of it has been incorporated, mix on high until completely blended.
Add in 1/2 of the toasted coconut and 1 c of toasted chopped pecans by hand. The mixture will be thick.
Then divide the batter evenly between all 3 pans; it comes to almost 2 c apiece. And bake 22-28 mins or until a toothpick inserted comes out clean. Cool completely on cooling racks.
For the cream cheese/whipping cream frosting:
Beat the cream cheese until creamy.
Next, add the whipping cream, a cup at a time. Beat thoroughly after each cup.
Then add the Truvia, vanilla and almond extracts, and remaining pecans. And mix well.
After you’ve turned your first cake out onto a platter, line the plate with wax paper strips. (This will hopefully make clean-up easier.) Frost the cake between the layers. Likewise top with the final layer, frosting the top and sides. In addition, press the remaining toasted coconut on the sides of the cake. And voila, you’re done.
After Thanksgiving many of us are tired of turkey and stuffing, especially if we’ve had it for a few days. I know when I was younger there was little variation with Thanksgiving leftovers. However, as I got older, and started having holidays at my own home, I didn’t want to waste the food. So I experimented. Below will be a recipe for easy turkey pot pie with Thanksgiving leftovers.
Maybe you had a big turkey this year too. Perhaps every Thanksgiving you get a big turkey. But I try to plan accordingly, so I don’t end up with a lot of leftovers, because I don’t like the waste. Sometimes I feel like I was raised during the Great Depression. Between my dad and my maternal grandparents, being frugal is ingrained in me.
I know I could give what’s left to my chickens, (before it’s spoiled) though, that still seems wasteful. And this year when we bought our bird, we had to go to 3 different stores. Not by choice, by necessity, unfortunately. But we couldn’t find anything smaller than 19 lbs, which means a lot of leftovers.
Anyway, this really is an easy recipe. Mostly because the turkey is already cooked. I based it off of chicken pot pie, but I just substituted turkey for chicken and added mashed potatoes.
Ingredients for Turkey Pot Pie using Thanksgiving leftovers:
3 c shredded or cubed cooked leftover Thanksgiving turkey
3 c leftover Thanksgiving mashed potatoes or fresh mashed potatoes
1 1/2 c cooked green beans or mixed vegetables
10.5 oz can cream of mushroom soup
10.5 oz can cream of chicken soup
2 refrigerated pie crusts
Instructions for easy Turkey Pot Pie with Thanksgiving leftovers:
Preheat oven to 425 and grease 13″x9″ pan with non-stick cooking spray.
Then melt some butter in a dutch oven or 4 1/2 quarts size pan before adding the turkey. Stir and add the potatoes, veggie, and condensed soups.
Also, you can add salt and pepper to taste at this point, if you want. But I feel like it already has enough, since it’s leftovers, and plus the condensed soups. However, it’s up to you.
Next, pour or spoon the mixture into your prepared pan.
And unroll the refrigerated pie crusts, one at a time, and cover the mixture.
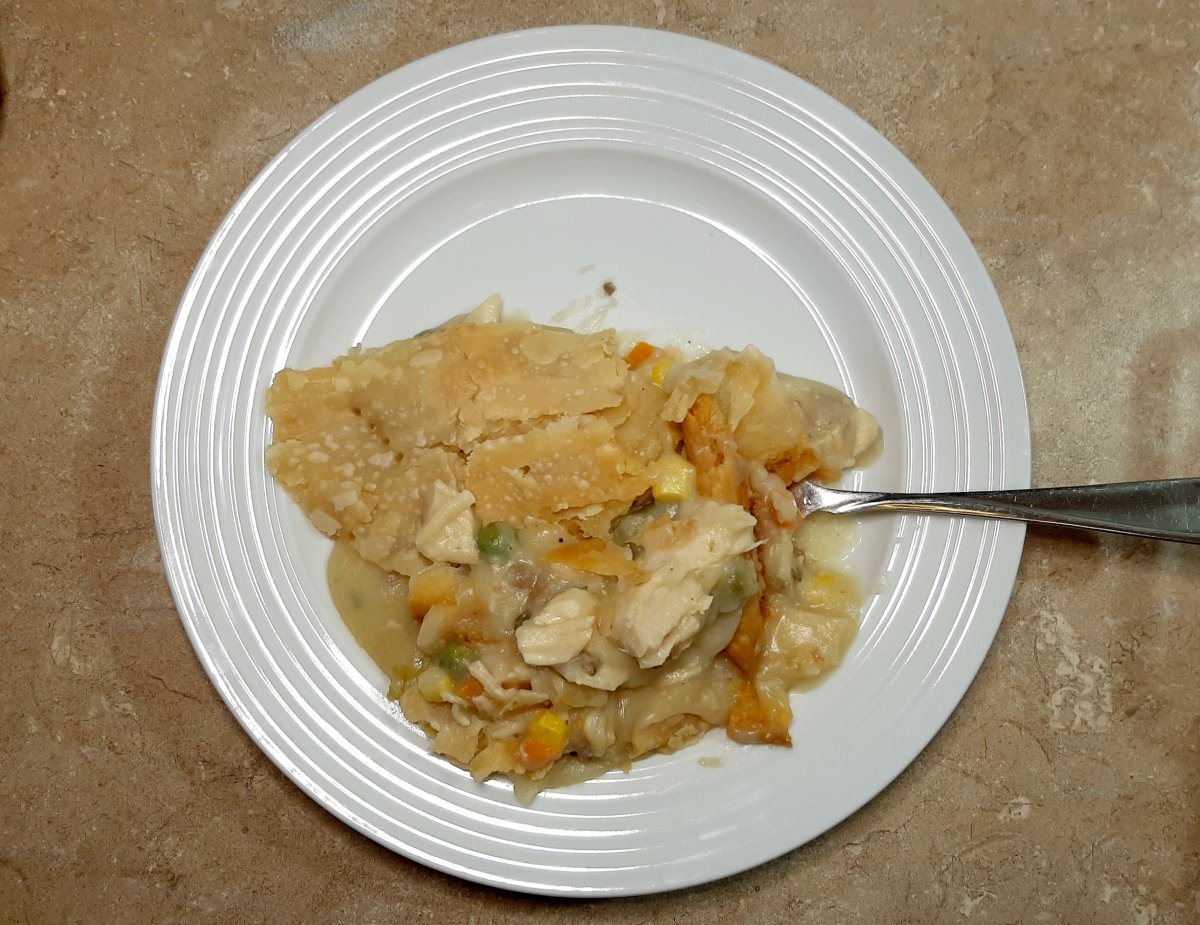
One crust will cover ~ half of the pan; the other will cover the other half. Though, it won’t look perfect. But if you want it to be perfect, you can make a crust.
One of my refrigerated pie crusts wasn’t cooperating at first, as you can see in the center.
Using a fork, prick the pie crusts thoroughly to allow steam to escape, and put the pot pie into the oven.
Bake at 425 for 15 mins; then lower the temperature to 350 for ~40 mins.
Add foil to the edges of the crust when it gets golden brown to prevent it from burning. The pot pie is done when the top is golden brown and the filling is bubbling around the edges.
There are other ways to make new meals out of your Thanksgiving leftovers. I still had plenty of turkey even after making the pot pie. So I bagged up the rest and put it in the freezer. And one of these days I’ll make soup. Or maybe chili. Check this out for more ideas.
And thanks for stopping by! Please like, post a comment, and share if you enjoyed this post.
As soon as October arrives, it seems to me as if we’re in a race to get to January, because everything starts speeding along. First there’s several birthdays, and then it’s one holiday after another. Not to mention we lose daylight, so the days seem shorter. But don’t get me wrong, this is my favorite time of year. However, the thing I enjoy most is the taste of fall.
TASTE OF FALL
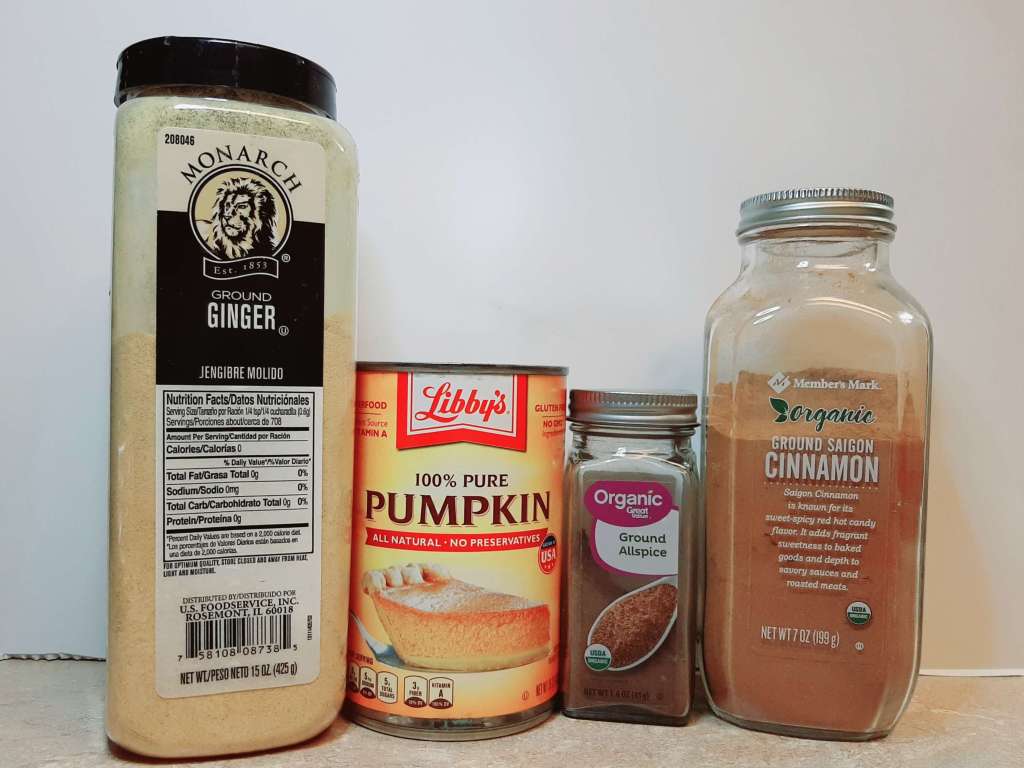
Well, what does that mean, you might ask. To me the taste of fall is pumpkin, allspice, ginger and cinnamon. And the smells and flavors can bring back memories of childhood holidays. Maybe individually. Or perhaps a blend of them. After all, some of my favorite recipes contain these very ingredients. So I want to share them with you.
Pumpkin Muffins
This is not my own recipe, and I’ve had it for 10+ years. Although I can’t tell you whose recipe it was originally, because I got it out of a library book and failed to get that relevant info. However, this is great to make and eat when warm, right out of the oven. And rather than raisins, you could substitute chocolate chips, if you’d prefer.
Ingredients for Pumpkin Muffins:
2 c flour
1 tsp baking soda
1/4 tsp baking powder
1/2 tsp salt
1 1/3 c sugar
3/4 c raisins
1/2 tbsp each of cinnamon, nutmeg, and cloves
2 eggs, beaten
1 1/4 c can of pumpkin
1/2 c vegetable oil
1/2 c water
The recipe doesn’t call for it, but I also added ~ 1/4 c of shredded coconut.
Instructions for Pumpkin Muffins:
Preheat oven to 375; and then line and grease 2 muffin pans with cupcake liners and non-stick cooking spray.
Combine the first 9 ingredients into a large bowl and make a well in the center of the mixture.
Next, beat the eggs and remaining 3 ingredients together.
Then add the egg mixture into the dry ingredients, stirring until moistened.
Spoon the batter into the prepared muffin pans, filling 2/3 full.
And bake for 20 minutes or until a toothpick inserted comes out clean.
Finally, remove from the pans immediately.
You can either eat the muffins as is, with nothing on them. However, I usually melt some butter and dip the tops of the muffins into the melted butter and then in some sugar. Another option is to make a glaze, using some milk and powdered sugar until you have the desired consistency, drizzling the glaze onto the muffins.
Pumpkin Sandwich Cake
This is another one of my all-time favorite taste of fall recipes, and consequently I make it almost every Thanksgiving. And just like the recipe above, I’ve had it over 10+ years, however I have no idea where it came from. Possibly a magazine. Furthermore, this is a rich dessert, with the ganache frosting and cheesecake type filling. Though it isn’t very sweet, just rich.
Ingredients for Pumpkin Sandwich Cake:
3/4 c flour
1 1/2 tsp pumpkin pie spice
1 tsp baking powder
3 eggs
1/4 tsp salt
1 c granulated sugar
3/4 c canned pumpkin
1 c whipping cream, divided
1/2 c powdered sugar
4 oz of cream cheese
1 c semisweet chocolate chips
Instructions for Pumpkin Sandwich Cake:
Preheat oven to 375 and spray 2 round standard cake pans with non-stick cooking spray.
Then line the bottoms of the pans with wax paper and lightly flour them.
In a bowl, combine flour, pumpkin pie spice, baking powder, and salt; and then set aside.
In a second bowl, beat the eggs and granulated sugar until thick, ~5 mins.
Next, beat in pumpkin, and add the flour mixture, and beat until combined.
Then spread the batter into the pans, and bake 16-18 mins. (They will be thin, and this is normal.)
Cool ~ 10 mins.
Filling: in a chilled mixing bowl, beat 1/2 c whipping cream till soft peaks form; set aside.
And in another bowl, beat cream cheese till smooth. Then beat in the powdered sugar, and fold in the whipped cream.
Next, turn out one cake onto a platter, and spread the cream cheese filling on top of that layer.
Then turn out the second layer on top of the cream cheese layer. The cakes will sort of resemble large pancakes.
Now it’s time for the ganachefrosting.
In a small saucepan bring the remaining whipping cream just to boiling over medium-hi heat. Then remove from heat, and pour over the chocolate chips in a medium bowl. DO NOT STIR. Just let it stand for 5 minutes.
After 5 mins, stir until it’s smooth, and then cool for 15 minutes. If the frosting is too thin, chill for 30 minutes; if it’s too thick, add some milk.
And finally, spread over the tops and sides of the cake and sprinkle with pumpkin pie spice. Chill 1 hour before serving and store in the refrigerator.
I started making pumpkin cheesecakes, alternately for Thanksgiving and Christmas, in the late 1990s when I first had a slice at a cafe outside of Nordstrom’s in the Galleria Mall in Dallas. It was divine, a combination of one of my favorite flavors and that distinct taste of fall. Also, I’ve gotten different recipes out of magazines and cookbooks, but I never made the same recipe twice until a couple of years ago. It was a Southern Living recipe, was pretty easy to make, and it tasted wonderful.
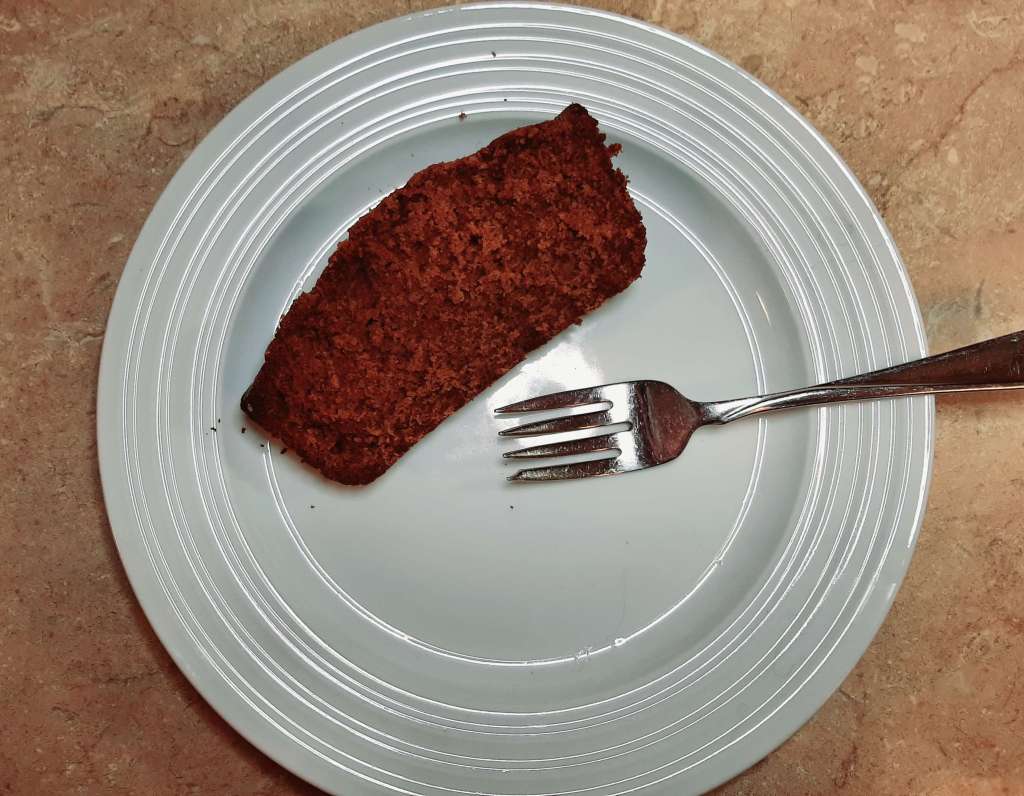
Gingerbread Loaf
My fourth taste of fall has the right blend of ginger, molasses, and sugar. Plus, it can be served for breakfast or as a dessert to complement a meal. And it reminds me of gingerbread cookies, which I love, because they’re not too sweet.
The recipe comes from Betty Crocker’s Best Christmas cookbook, 1st edition, published in 1999. Also, the recipe is originally intended as muffins, however I make it into a loaf. See below for instructions on how to cook as muffins. Moreover, if you choose to do that, you can melt butter, dip the tops of the muffins into the butter and then into sugar. Or make a glaze and drizzle over the muffins.
Ingredients for Gingerbread Loaf:
1/4 c packed brown sugar
1/2 c molasses
1/3 c each of milk and vegetable oil
1 egg
2 c all purpose flour
1 tsp each of baking powder and ground ginger
1/2 tsp each of salt, baking soda, and cinnamon
1/4 tsp allspice
Instructions for Gingerbread Loaf:
Heat oven to 350, and grease 1 standard loaf pan with non-stick cooking spray.
Beat brown sugar, molasses, milk, oil, and egg in a large bowl, using a spoon. Then stir in the remaining ingredients just until the flour is moistened.
Next, pour the batter into the prepared loaf pan, and bake 45-55 mins or until toothpick inserted in the center comes out clean.
Then cool for ~ 10 minutes before turning out. And you can serve warm if you want.
**If you make muffins, raise the oven temperature to 400 and only cook the muffins for 18-20 mins or until a toothpick inserted in the middle of a muffin comes out clean.
This is my final best-liked, taste of fall recipe, and it too includes ginger and cinnamon. But I started making this a couple of years ago when I subscribed to receive Taste of Home magazines. It’s their Vanilla-Glazed Gingerbread Scones recipe from their October/November 2019 issue. And, even though I haven’t had it long, I still have made this particular recipe several times.
Ingredients for Gingerbread Scones:
2 c all purpose flour
1/4 c packed light brown sugar
2 1/2 tsp baking powder
1 1/2 tsp ground cinnamon
1 tsp ground ginger
1/4 tsp salt
6 tbsp cold butter
3/4 c heavy whipping cream
1 large egg, room temperature
1/4 c molasses
1 tbsp maple syrup
Glaze:
1 c confectioners’ sugar
1/4 c heavy whipping cream
1 tsp vanilla extract
dash of salt
1/4 c of minced crystallized ginger
Instructions for Gingerbread Scones:
Preheat oven to 400. In a large bowl, whisk the first 6 ingredients. Then cut the butter into the mixture until it resembles coarse crumbs. In another bowl, whisk cream, egg, molasses, and syrup until blended; stir into crumb mixture just until moistened.
Drop dough by 1/4 cupfuls onto a parchment-lined baking sheet, and bake until golden brown, 12-15 mins.
Glaze: In a small bowl, combine confectioners’ sugar, cream, vanilla and salt; stir until smooth. Then drizzle over scones and sprinkle with ginger. Serve warm.
What is your taste of fall? Are there recipes that you make over every year, because they remind you of the season? Or because your family just loves them so much? I’d love to hear about them.
Thanks for stopping by! And if you liked this post, please like, post a comment, and share.