Categories
Extras recipes

Shrimp and Linguini Recipe

Rather than using heavy cream for linguini Alfredo, my mom used to make it with milk. She didn’t like the sauce being too thick. Thus, I grew up with this preference for a thinner sauce as well. Alternatively, now that I’m an adult, generally I use half-n-half when cooking white sauces. To me, it’s the best of both worlds. Although, the following shrimp and linguini recipe can’t technically be called linguini Alfredo, since I’ve made entirely too many adjustments to it.

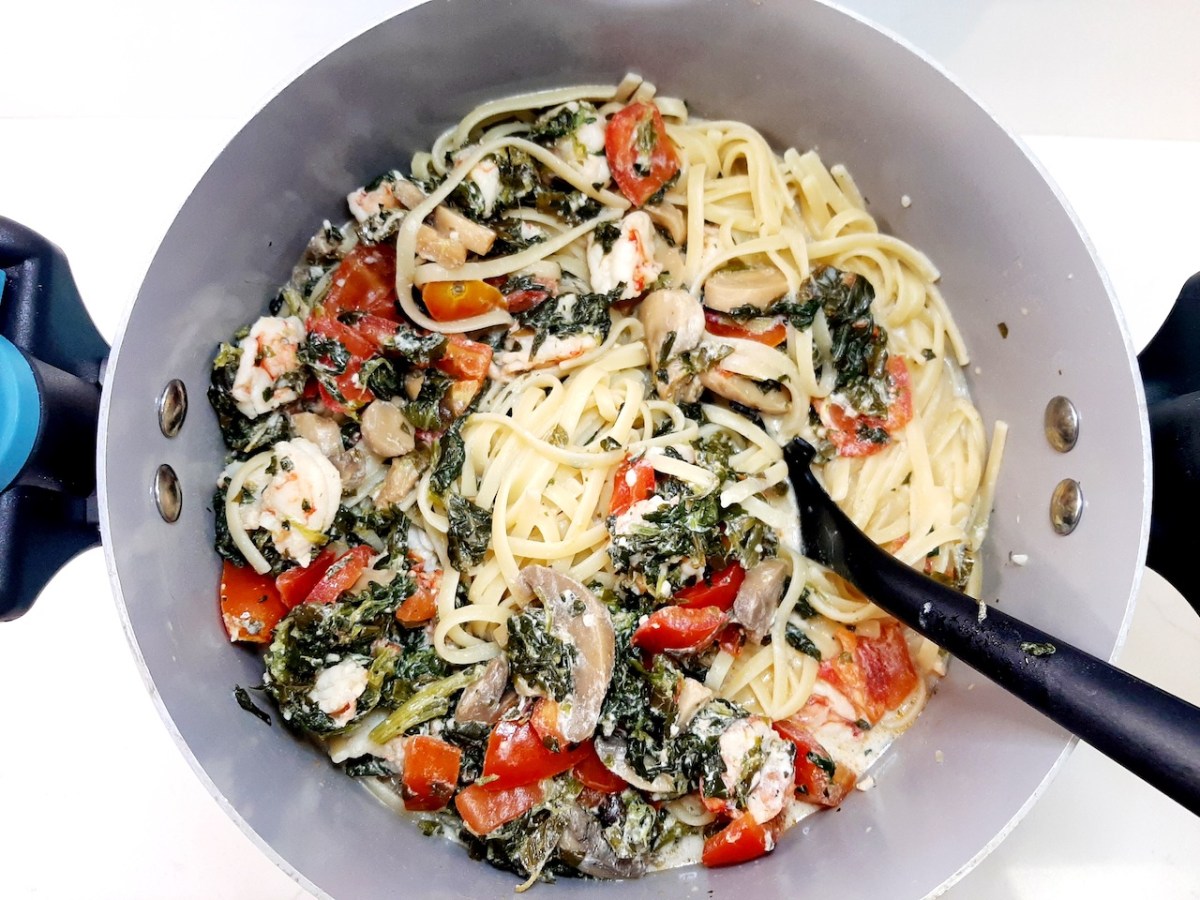
While my mom adds scallops and shrimp to her recipe, I only add shrimp. Besides shrimp, seasonings, and cream, for a long time I never tried adding anything else to my recipe. But, eventually, I started to change things up, like tossing in fresh tomatoes. Then I tried spinach. However, kale would work just as well. With the recipe below, I added canned mushrooms and some cooking wine. And my family loved it. Therefore, after many such alterations, this is an entirely new recipe for us.

Additionally, most of the time, I cut up the shrimp. However, you don’t have to. Mixing 3 kids and seafood always prompted them to compete for the most amount of shrimp between them. And count how many each had, to be sure they received a fair amount. Consequently, I had to improvise. Even though my oldest no longer lives at home, for some reason, I kept the habit of cutting up the shrimp. Please enjoy the recipe.

Ingredients for shrimp and linguini recipe

  • 1 lb uncooked red Argentine shrimp
  • 4 tbsp butter
  • 1 tbsp minced fresh garlic
  • 1 1/4 c half n half
  • 1/3 c each white cooking wine and water
  • 4 fresh Roma tomatoes, cut up and deseeded
  • 1/2 tsp salt
  • 1/4 tsp black pepper
  • 4 sprigs each fresh oregano and basil (I used purple basil), chopped
  • 1 (4oz) can sliced mushrooms
  • 6 oz spinach, fresh or frozen (I used frozen, but heated according to package instructions)
  • and 1 lb linguini

Shrimp and linguini recipe instructions

  • First, melt butter in a medium saucepan over medium heat. Add garlic and shrimp, and cook until shrimp is cooked through. With Argentine shrimp, it starts out more translucent, like most shrimp, and as it cooks, it will get opaque.
  • Next, add the following 2 ingredients at the same time, but in 2 separate measuring cups; stir.
  • Then add the next 6 ingredients, stirring occasionally. Adjust temperature to medium low.
  • Cook linguini according to package instructions.
  • So the shrimp doesn’t over-cook, remove sauce from heat. Then when linguini is finished cooking, drain noodles. Put the noodles back in the pot you cooked them in and pour sauce over pasta. Mix well.
  • Finally, serve and eat immediately.
linguini noodles, shrimp, tomatoes, mushrooms, and spinach on a white plate

Do you prefer a thicker sauce to a thin one with linguini? And do you make your own sauce? Moreover, do you get creative with your sauces?

Thank you for visiting my blog. Please share, and if you don’t follow me already, you can do so now. Also, for my followers who are local to the OKC metroplex, if you have plans to go out of town and need a chicken, duck, or other pet sitter, look no further. I know how it is to be homebound, because you can’t find anyone trustworthy enough, or just plain can’t find anyone who can watch ALL of your pets. If that describes you, go to my about page for more information. Or just go to my contact page to reach me.

Categories
Extras recipes

Easy Flank Steak Stir Fry

There are two ways you can make this easy flank steak stir fry. Obviously the easiest way would be using only one pan. However, when I made this, it was still triple digits out. So, I didn’t want the house to get unbearable if I used the stove. Thus, I used our NuWave infrared oven to cook the steak, which is similar to an air fryer. That way my house wouldn’t get too hot. Then, when it was done, I heated the vegetables for a few minutes before adding the steak to the pan. Consequently, my stove was on for only ~ 5 minutes.

But, weather permitting, you want to save dishes, or your air fryer isn’t big enough for your steak, just cook it (steak) in ~ 2 tbsp of oil in a wok. And the rest of the steps are the same. Otherwise, just follow the recipe below.

Ingredients for Flank Steak Stir Fry

  • 2 lb flank steak
  • 32 oz package of stir fry vegetables (from refrigerated section of grocery store)
  • 4 oz bottled teriyaki sauce (I used PF Chang’s Teriyaki sauce)
  • 1 – 2 tbsp cooking oil
  • 1/2 tsp salt
  • and 4 c cooked rice or noodles

Instructions for Stir Fry

  • First, spray nonstick cooking spray on grill pan.
  • Next, season meat evenly on both sides with salt.
  • Then cut steak in ~ 1 inch slices against the grain; and again, cut those slices into 1 x 3 inch slices.
  • Further, cook according to your air fryer’s instructions based on how well you want your meat done. For instance, for NuWave infrared oven, I cooked our steak 4 minutes per side for medium rare.
  • At halfway mark, flip steak over and cook additional time.
  • Next, add 1 – 2 tbsp oil in a wok or pan large enough for meat and vegetables. Heat to medium high.
  • Then add stir fry vegetables and cook ~ 4 minutes, tossing gently with tongs.
  • Incorporate meat and 4 oz of teriyaki sauce, and toss with tongs.
  • Finally, serve with cooked rice or noodles.
carrots, cabbage, broccoli, snow peas, and cooked beef on white rice in a bowl with chopsticks

We love Asian food at our home. It’s healthy and full of flavor. Even though I enjoy authentic recipes, I appreciate the ease and convenience of modern cooking. Do you have a favorite Asian recipe?

Thank you for stopping by. Please share, and if you don’t follow me already, you can do so now.

Categories
Extras recipes

Baked Salmon with Miso

Baked salmon with miso is a very simple yet delicious recipe that I found in a local health store magazine over 10 years ago. The recipe calls for baking it in the oven, but you can also cook it in an air fryer. Just adjust the temperature to 400° and cook for 10 minutes.

Baked Salmon with Miso Ingredients:

brown sauce or grave with seasoning in a small round casserole dish and a multi colored whisk propped on it
  • 2.5 lbs wild salmon in 4-6 oz portions
  • 2 tbsp each dijon mustard, stone ground mustard, and lemon juice
  • 1/4 c each honey and brown rice miso

An instant read thermometer inserted into the thickest part of the salmon should read 145°. However, if you don’t have a thermometer, the fish should be flaky, and opaque pink like in the pictures below. The first photo is prior to baking while the second is after the fish is cooked.

Instructions for Baked Salmon with Miso:

7 raw salmon fillets in clear glass rectangular casserole dish with covered with a sauce or gravy
  • Preheat oven to 450°.
  • Next, combine remaining ingredients and whisk till smooth. Then place salmon in a baking dish and coat till smooth with sauce.
  • And bake salmon skin-side down for 15-20 minutes uncovered until cooked through and flaky. Glaze should be golden brown on top.
  • Finally, serve with your favorite side dish.

Alternatively, you can get a 1 lb salmon fillet, if you’re serving less people. And then cut the rest of the ingredients in half.

7 cooked fillets of salmon in clear glass rectangular casserole dish covered with sauce or gravy

How do you cook salmon? And how do you prepare it? Please let me know if you made this. Thanks for stopping by. Please share, and if you don’t already follow me, you can do so now.

Categories
Extras recipes

Easy Coconut Poke Cake Recipe

My mother-in-law shared this easy coconut poke cake recipe with me several years ago. And since it was so simple, it’s stuck with me. There are different ways you can prepare this. But I don’t enjoy super sweet treats, so this one is toned down. Though, you can change it if you prefer. The coconut milk is on the baking aisle, and it’s unsweetened. Furthermore, I used less coconut milk than in the past, because my coconut cakes would be soggier than I liked. Also, on my cake, I used half unsweetened coconut flakes and half sweetened. Thus, it was just right for my house. Please enjoy this recipe.

Ingredients for Coconut Poke Cake

  • 1 package of Duncan Hines white cake mix
  • 3 egg whites
  • 1 c water
  • 1/3 c vegetable oil
  • 11.1 oz of coconut milk
  • 1 – 1 1/2 c of whipping cream
  • 3 tsp of Truvia
  • and 1 to 2 cups of shredded coconut

Instructions for Easy Coconut Poke Cake

  • Preheat oven to 350°, and grease bottom and sides of 13×9 inch pan with non-stick cooking spray.
  • Blend cake mix, egg whites, water, and oil in a medium size bowl at low speed for ~ 30 seconds. Then beat for 2 minutes at medium speed.
  • Next, pour into greased pan and bake on center rack for 25 minutes, or until toothpick inserted in the middle comes out clean.
  • With a wooden skewer, poke holes on top of the cake to within an inch of the edge.
  • Then pour the coconut milk evenly over the top of the cake.
  • Allow cake to cool completely. (In my house it took a little over an hour.)
  • With an electric mixer, beat the whipping cream until thick; add the Truvia and mix.
  • Then frost the cake evenly with the whipping cream, and top with the shredded coconut.
  • Refrigerate until ready to serve.
Slice of white cake topped with flake coconut on a white plate

If you made this, what did you think? Do you have a favorite poke cake recipe you want to share? I would love to hear.

Thank you for taking the time to visit. Please share, and if you don’t already follow, you can do so now.

Categories
Extras recipes

Charred Corn Avocado Salad

Over 8 years ago we moved into our current home in Blanchard, Oklahoma. That year was a year of firsts. We first got chickens, albeit the wrong kind in the beginning. But then we course corrected with actual layer chickens. Then, in July of that year, we celebrated Independence Day with our neighbors. Prior to that first Independence Day celebration I fumbled for something to cook. However, eventually I came across this recipe for charred corn avocado salad. It’s actually quite easy, and it tastes delicious. Now I regularly make this every year.

Charred Corn Avocado Salad Ingredients

  • 5 fresh ears of corn on the cob
  • 1/2 red onion, thinly sliced
  • 1/8 c and 1 -2 tsp olive oil, divided
  • salt and pepper
  • 1 avocado, sliced
  • 1/2 c cherry tomatoes, halved
  • 1 tbsp lime juice
  • 1/4 tsp honey
  • 1/2 tsp each dried basil and mint leaves
yellow corn kernels, mixed cherry tomatoes, diced avocado, and seasoning in a metal bowl

Instructions for Charred Corn Avocado Salad

  • First, shuck corn, and cut kernels from cobs into a bowl. Add sliced onion, tossing with 1 – 2 tsp of olive oil and season with salt and pepper. Stir and transfer to a sheet pan.
  • Next, broil corn for 3 to 5 minutes; letting it char in a couple of places.
  • Then make the vinaigrette: whisk together lime juice, honey, herbs, and slowly add remaining olive oil, whisking till mixed.
  • Remove pan from oven, and add tomatoes, mint, basil, and avocado.
  • Transfer corn mix to a bowl and drizzle on vinaigrette. Lastly, serve with your favorite main dish.

You can change out a handful of fresh herbs for dried, if you prefer. And instead of incorporating it with the vinaigrette, toss it with the other ingredients first.

cooked salmon with corn kernels, sliced red onion, cherry tomatoes, and diced avocado on a white plate on white background

This charred corn avocado salad can go with so many meals, including burgers, tacos, fish, and barbecue. Plus, it can even be a garnish. My family loves this so much; it never lasts long at my house. And I guarantee it won’t last long at yours. Me being me, I hacked the original, but not by a lot. The dressing was way too much volume. Though, if you want extra dressing, then go here for the original recipe.

Do you have a tried and true recipe you make every 4th of July? Or, if you made this one, what did you think of it? Your comments are appreciated. Thank you for stopping by. As always, please share. And if you don’t already follow me, you can do so now.

Categories
Extras recipes

Beef Pot Pie Recipe with Pie Crust

Pot pies are some of my favorite foods to cook. They’re versatile, taste good, and just plain goodness. Furthermore, they have an interesting history which includes live birds. But I, for one, am glad we don’t use live animals in pot pies anymore. Below you’ll find a beef pot recipe with pie crust. This is one you’ll want to plan about 3 hours for. However, it is well worth the wait. Additionally, you could just as easily make it ahead, refrigerate, and then bake it when ready.

Beef Pot Pie with Pie Crust Ingredients

  • ~ 3 1/2 lbs beef stew meat, cut into 1-inch pieces
  • 1 lb new potatoes, washed and quartered
  • 4 oz can of mushrooms, drained
  • 1 onion, chopped
  • 1/4 c all purpose flour
  • olive oil
  • 1 1/2 c water
  • 1/2 c red wine vinegar
  • 2 tsp of beef bouillon
  • 2 tbsp Worcestershire
  • 1/4 tsp black pepper
  • and premade refrigerated pie crust
browned beef and potatoes with green salad on a white plate

Beef Pot Pie Instructions

  • First, put the meat and flour in a gallon size baggy; shake baggy to evenly coat the stew meat.
  • Next, in a 5-quart Dutch oven over medium-hi heat, heat ~ 3 tbsp of olive oil; and cook the beef till brown, adding more oil as necessary. Stir frequently.
  • Then remove the beef, reducing heat to medium, and add the onion to drippings. And cook ~ 3 minutes or till almost tender, stirring occasionally.
  • Stir in wine, water, bouillon, Worcestershire, and pepper, stirring to break up the bouillon.
  • Add potatoes, mushrooms, and steak; heat to boiling. Then reduce heat to low. Cover and simmer 2 hours or till meat is fork tender.
  • Spoon mixture into a 2-quart shallow casserole. Preheat oven to 400°F. Prepare the pastry; roll out to fit 1 inch larger than casserole dish.
  • Fit crust loosely over meat mixture; trim back pastry overhang about 1 inch, and make a fluted edge. With point of knife, make slits in crust.
  • Bake pie ~ 40 minutes until brown and bubble. Cover loosely with foil if the crust browns too quickly.
  • Finally, serve immediately.

Do you have a favorite pot pie recipe? Even though it takes some time, I still love this beef pot pie recipe. If you made it, what did you think?

Thank you for stopping by! Please share, and if you don’t already follow, you can do so now.

Categories
Extras recipes

Traditional Stuffed Bell Pepper Recipe

Stuffed peppers have been around for a long time. Since every culture has their own recipe, unfortunately, no one really how they got started. But, one thing is clear, they are delicious. And there are a number of ways to prepare them. The recipe I’ve included has some Polish roots, relevant to how it’s made. Plus, the majority of it was handed down from my mom. Though, she hasn’t cooked stuffed peppers in a while. Thus, I filled in the blanks based off of memory. So, please enjoy this traditional stuffed bell pepper recipe.

Traditional Stuffed Bell Pepper Recipe Ingredients:

  • 6 to 8 bell peppers
  • 2 c cooked rice
  • 1 lb ground beef
  • 1 egg
  • 1/4 c to 1/2 c Italian style breadcrumbs
  • 14 1/2 oz diced tomatoes
  • 1 tsp each of salt, dried granulated garlic, oregano, and basil
  • and 1/4 tsp dried marjoram
rice and tomato sauce in a blue bowl on a white background

Stuffed Bell Pepper Recipe Instructions:

  • First, preheat oven to 400°.
  • Next, clean bell peppers and remove stems and insides. Set aside.
  • Then hand-mix rice with next 6 ingredients. And stuff mixture into peppers.
  • Further, place each pepper into greased baking dish. Also, cover with aluminum foil, and bake for 40 minutes, or until instant read thermometer inserted in middle of stuffed pepper reads 160°.

As you saw, the peppers don’t require any pre-cooking. The meat and peppers are supposed to be raw. Although, the rice should be cooked. Hence, if you have any leftover rice, that would work great. Additionally, you’re basically making meatballs mixed with rice, which then gets stuffed into peppers. It’s one of the easiest meal preps I’ve ever had.

cooked orange stuffed bell pepper on white plate on white background

Besides, you can serve these peppers as an appetizer. Or make them the centerpiece of a meal. And pair with your favorite side dish. Alternatively, you can change out the meat for pork, chicken, or even seafood. Moreover, instead of rice, you can try quinoa, orzo, or barley. Furthermore, if you love veggies, add more variety. Do you have a favorite recipe for stuffed bell peppers that you’re willing to share? I’d love to hear it! Or let me know if you tried this recipe.

Thank you for your time. Please share this with others. And if you don’t already follow, you can do so now.

Categories
Extras recipes

Marinated Rack of Lamb

When I was younger and we had lamb, it was usually prepared with plenty of garlic, mint, and olive oil. But it wasn’t until a few years ago that I realized lamb could taste amazing; just like most other meat. If you know what combinations to use and a marinade or sauce, you can create a masterpiece. Please enjoy the following recipe for marinated rack of lamb.

Marinade Ingredients

  • 2 tbsp olive oil
  • 2 tbsp lemon juice
  • 1/2 tsp thyme
  • 1/4 tsp each cracked black pepper and sea salt
  • 1 tbsp minced fresh garlic

Lamb Ingredients

  • 1 tbsp plus 2 tsp olive oil
  • one 2 1/2 lbs frenched rack of lamb
  • salt and pepper
  • 2 green onions, sliced thinly
  • 1/4 c each white wine and chicken broth
  • 1 tbsp yellow mustard
  • 2 tbsp Dijon mustard
  • 2 tbsp thyme

Instructions for Marinade

  • First, combine olive oil, lemon juice, thyme, pepper, sea salt, and garlic in small bowl; and mix.
  • Next, arrange frenched rack of lamb on platter. Then pour marinade over rack of lamb. Make sure rack of lamb is covered with marinade on all sides.
  • And let the rack of lamb sit at room temperature in marinade for 30 minutes.
sliced Frenched lamb chops on a brown plate

Putting the Marinated Rack of Lamb Together

  • First, preheat oven to 400°.
  • Second, in a medium oven-proof skillet, heat 1 tbsp of olive oil till hot. Then add the rack of lamb to skillet fat side down. And cook over med-hi heat till brown, ~ 3 mins.
  • Next, turn lamb fat side up, and cook 2 mins more. At that point, transfer the skillet to the oven, and roast rack of lamb ~ 20 minutes until thermometer inserted in the center of meat reads 125° for medium rare.
  • After that, transfer lamb to a carving board and let it rest for 10 minutes.
  • Further, discard the fat in the skillet. And add 2 tsps of olive oil, green onions, and cook till softened, ~ 2 minutes.
  • Then add wine and simmer till reduced by half, ~ 2 minutes. Combine broth, bringing to a simmer.
  • Remove skillet from heat. Additionally, stir in mustards and thyme. Moreover, season with salt and pepper.
  • Carve the lamb into chops and arrange onto plates. Finally, spoon the sauce over the lamb and serve with your favorite sides.

So, this recipe is actually a fusion of 2 separate lamb recipes. I took the marinade from this one and some ingredients from this other, and combined them. But just click on those links, if you want to try them in their unadulterated versions.

And thank you again for reading this post. I hope you enjoyed it. Please post a comment, share, and please don’t forget to follow.

Categories
Extras recipes

Best Recipe for Beef Fajitas

My family and I love Mexican and Tex-Mex food. In fact, when I’m the one cooking, either of those are predominantly what I cook. The food is easy to make, yummy, and satisfying. So, one day I was looking for a beef fajita recipe online. Thus, I stumbled upon one via The Pioneer Woman site, circa 10 years ago. However, being me, I’ve made some tweaks. And I’ve been making it my way since. Please enjoy this best recipe for beef fajitas.

Ingredients for Beef Fajitas:

  • 1 1/2 lbs of stew meat, cut up into bite size pieces
  • 1/4 c olive oil
  • 1/6 c lime juice
  • 2 tbsp Worcestershire sauce
  • 1 tbsp minced fresh garlic
  • 1/2 tbsp each, cumin and chili powder
  • 1/4 tsp each, red pepper flakes and black pepper
  • 1/2 tsp salt
  • 2 tsp Truvia or 1/2 tbsp of sugar
  • 1 each of onion, red and yellow bell peppers, sliced
  • warmed flour tortillas
  • crumbled quest for topping
  • and guacamole
cut up beef, bell peppers, and onions marinating in a turquoise bowl

When I first made this, I adhered to most of the original ingredients, except the meat. Rather than stew meat, the foundational ingredient for the beef was flank steak. In addition, I followed the measurement sizes for the ingredient list. Though, I discovered that there was entirely too much liquid, making it almost greasy. Consequently, I halved the majority of the measurements for the ingredients. Here’s the original recipe, if you’re interested.

Recipe for Beef Fajitas Instructions:

  • First, combine the first 10 ingredients in a medium size mixing bowl. And refrigerate for at least 2 hours.
  • Next, after 2 hours, add mixture to a 4 quart stove top cook pan. Then cook on medium heat, stirring occasionally.
  • Put lid on, and lower temperature to medium low, and cook for ~ 17 – 20 minutes.
  • Finally, remove from heat. And with a slotted spoon, serve on warm flour tortillas, and top with cheese and guacamole.

Thank you so much for reading this. Please comment and share. If you don’t follow already, please do so now.

Categories
Extras recipes Uncategorized

Recipe for Sautéed Brussel Sprouts with Garlic

There are many tricks to making Brussel sprouts palatable. But I haven’t tried them all. However, once I tried the one below, it’s been my go-to for difficult flavored veggies. Thus, this recipe for sautéed Brussel sprouts with garlic is a great base for many vegetables. Plus, it’s easy to make. And you could also incorporate it with different additions, if you want. Try it and see if you don’t like it.

Ingredients for Sautéed Brussel Sprouts with Garlic:

  • 2 lb package of pre-washed Brussel sprouts
  • 1 tbsp fresh minced garlic
  • ~ 2 tbsp each avocado oil and salted butter
  • and ~ 1/2 – 1 tsp garlic salt
square copper pan of sautéed Brussel sprouts

Recipe for Sautéed Brussel Sprouts with Garlic Instructions:

  • First, cut the Brussel sprouts in half lengthwise before placing in a microwave safe casserole dish.
  • Next, add 2 tbsp of water to Brussel sprouts, cover with plastic wrap, and steam in microwave for 5 – 6 minutes.
  • Then, before turning stove on medium heat, add avocado oil and butter in the pan. After draining water from Brussel sprouts, place those in pan as well.
  • At that point, sprinkle fresh minced garlic and garlic salt over Brussel sprouts. And stir.
  • Continue stirring occasionally. Further, cook for only 5-10 minutes, depending on how firm or soft you want them to be.
  • Finally, remove from heat, and serve with your favorite meal.

So, you might be wondering where I got this particular recipe. Well, as it happens, a friend Hannah’s (20 year old daughter), made a different vegetable, and seasoned it in this way. Therefore, I thought, why not Brussel sprouts? And the rest is history…

Many thanks for reading this. Please comment and share. And if you don’t already follow me, please do so.