Providing helpful information regarding our feathered, feline, and canine friends while also sharing fun stories. And locally we provide pet sitting services.
Author:KS
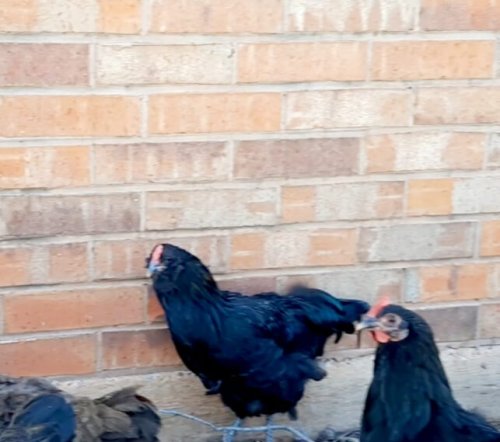
I breed Black Ameraucana chickens and Easter Eggers that are Black Ameraucana mixed with either Cuckoo Maran or Barred Rock. And I donate eggs to people or organizations in need. Further, I've started chicken and other pet sitting in my area. Details are on my About page.
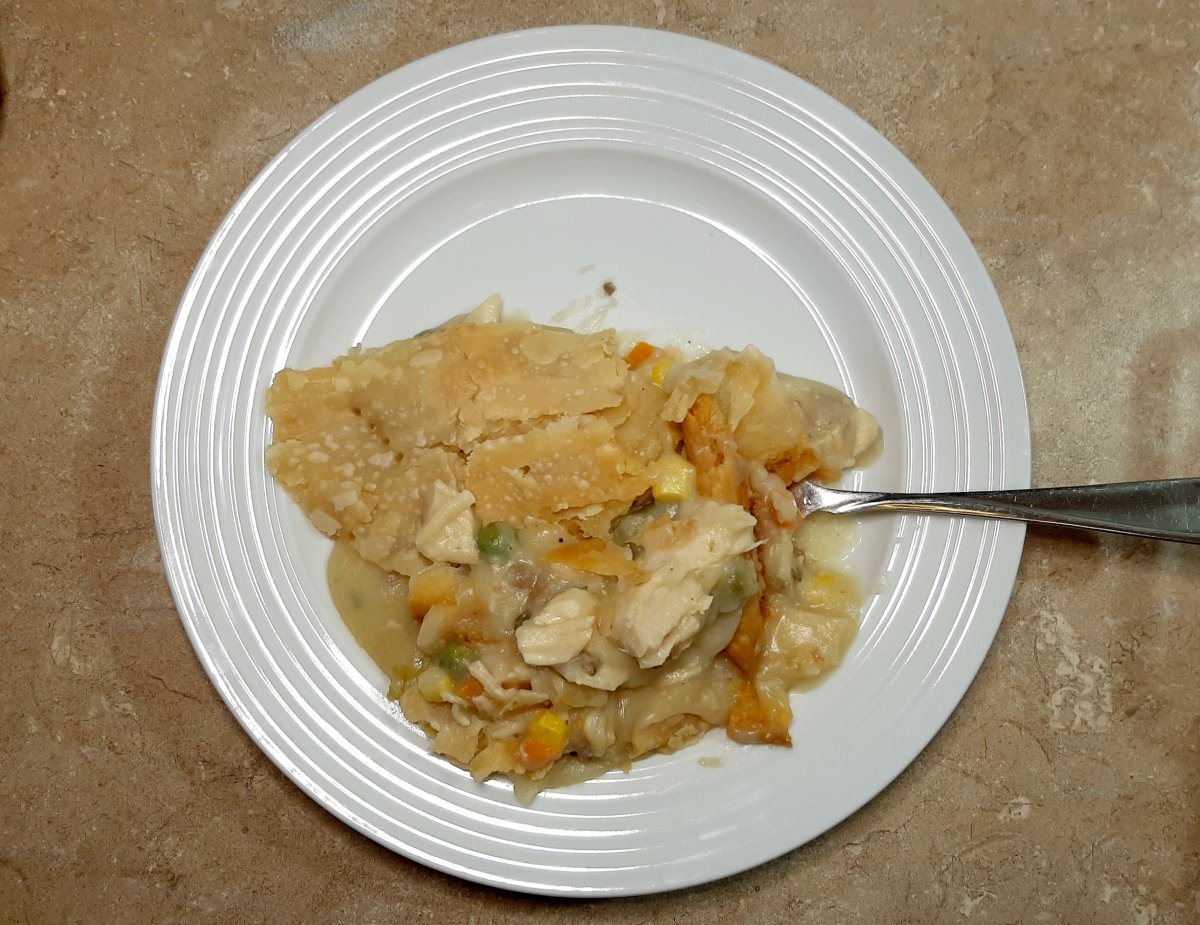
After Thanksgiving many of us are tired of turkey and stuffing, especially if we’ve had it for a few days. I know when I was younger there was little variation with Thanksgiving leftovers. However, as I got older, and started having holidays at my own home, I didn’t want to waste the food. So I experimented. Below will be a recipe for easy turkey pot pie with Thanksgiving leftovers.
Maybe you had a big turkey this year too. Perhaps every Thanksgiving you get a big turkey. But I try to plan accordingly, so I don’t end up with a lot of leftovers, because I don’t like the waste. Sometimes I feel like I was raised during the Great Depression. Between my dad and my maternal grandparents, being frugal is ingrained in me.
I know I could give what’s left to my chickens, (before it’s spoiled) though, that still seems wasteful. And this year when we bought our bird, we had to go to 3 different stores. Not by choice, by necessity, unfortunately. But we couldn’t find anything smaller than 19 lbs, which means a lot of leftovers.
Anyway, this really is an easy recipe. Mostly because the turkey is already cooked. I based it off of chicken pot pie, but I just substituted turkey for chicken and added mashed potatoes.
Ingredients for Turkey Pot Pie using Thanksgiving leftovers:
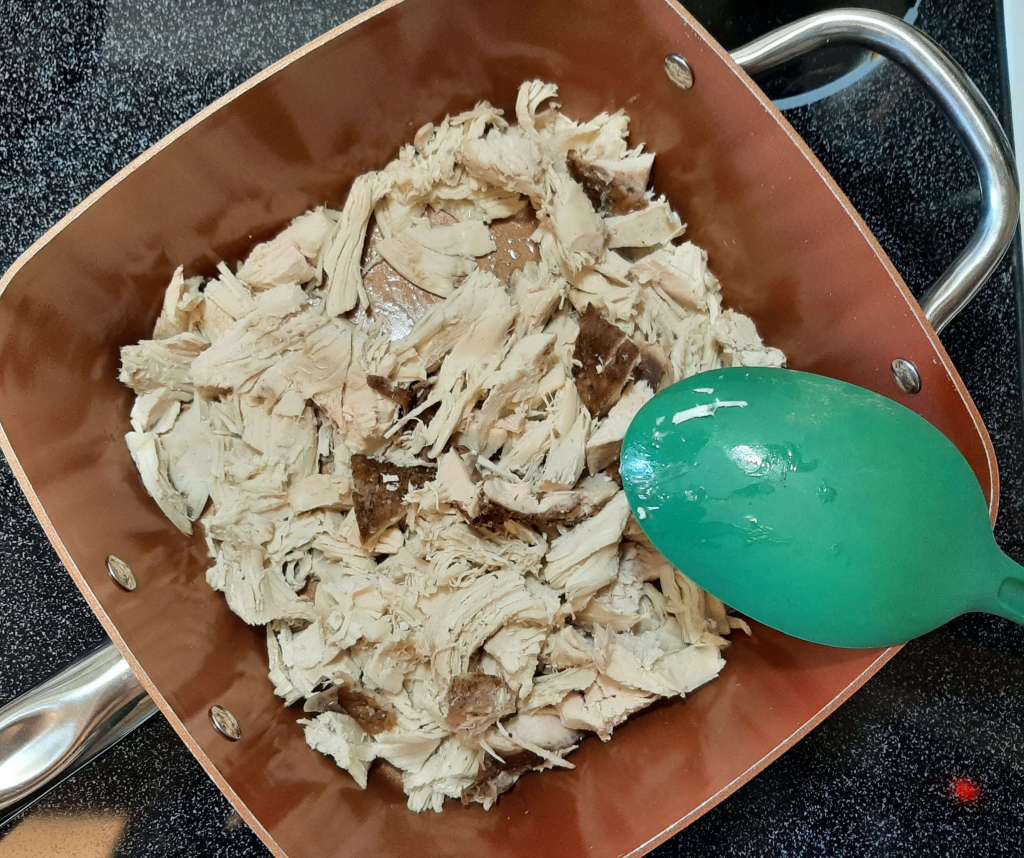
3 c shredded or cubed cooked leftover Thanksgiving turkey
3 c leftover Thanksgiving mashed potatoes or fresh mashed potatoes
1 1/2 c cooked green beans or mixed vegetables
10.5 oz can cream of mushroom soup
10.5 oz can cream of chicken soup
2 refrigerated pie crusts
Instructions for easy Turkey Pot Pie with Thanksgiving leftovers:
Preheat oven to 425 and grease 13″x9″ pan with non-stick cooking spray.
Then melt some butter in a dutch oven or 4 1/2 quarts size pan before adding the turkey. Stir and add the potatoes, veggie, and condensed soups.
Also, you can add salt and pepper to taste at this point, if you want. But I feel like it already has enough, since it’s leftovers, and plus the condensed soups. However, it’s up to you.
Next, pour or spoon the mixture into your prepared pan.
And unroll the refrigerated pie crusts, one at a time, and cover the mixture.
One crust will cover ~ half of the pan; the other will cover the other half. Though, it won’t look perfect. But if you want it to be perfect, you can make a crust.
One of my refrigerated pie crusts wasn’t cooperating at first, as you can see in the center.
Using a fork, prick the pie crusts thoroughly to allow steam to escape, and put the pot pie into the oven.
Bake at 425 for 15 mins; then lower the temperature to 350 for ~40 mins.
Add foil to the edges of the crust when it gets golden brown to prevent it from burning. The pot pie is done when the top is golden brown and the filling is bubbling around the edges.
There are other ways to make new meals out of your Thanksgiving leftovers. I still had plenty of turkey even after making the pot pie. So I bagged up the rest and put it in the freezer. And one of these days I’ll make soup. Or maybe chili. Check this out for more ideas.
And thanks for stopping by! Please like, post a comment, and share if you enjoyed this post.
The weather is colder, leaves litter the ground, and stores are busier as people get their turkeys and the trimmings. All of which indicates Thanksgiving is right around the corner. And whereas it’s a time of feasting with family and friends, you have to consider your pets and Thanksgiving, like what treats, if any, you give them.
Also, some of you will stay home and spend the holiday with family at your own homes. While others will travel. But what about your pets? Do you board them or take them with you? Below are some tips to keep your pets safe and hopefully stress-free this Thanksgiving.
Pets and Thanksgiving Food Risks
First, I’m going to cover foods to avoid giving your pets, like dogs and cats. Although, if you have a bunny, check this out for a list of things to avoid, as well as treats that are safe. So don’t give your pets:
The stuffing could contain raisins or grapes, let alone the other ingredients. And if your fur baby eats any, it can cause kidney failure in cats and dogs.
Also, while we can eat onions and garlic, they’re toxic to your pets.
Don’t let your pet have chocolate or raw eggs from cake or cookie batter. And avoid letting them have desserts which could contain xylitol, an artificial sweetener found in chewing gum, because it’s toxic to your fur babies.
Uncooked yeast ferments the carbohydrates in bread dough, producing carbon dioxide and ethanol. When your pet eats raw dough, it continues this process in their stomach. And your fur baby becomes muddled, bloated, and has impaired coordination, the result of alcohol poisoning.
Poultry bones are small and brittle, making them especially dangerous to your cats and dogs. Whether the bones break or not, they can get stuck in your pets’ GI tracts. Or break a tooth, perforate their intestines, or cause an intestinal blockage. None of which are good, and all would require a vet visit.
If, on the other hand, you have backyard chickens and want to get rid of that turkey carcass, go on ahead and give it to them. It won’t bother them one bit. Actually, any leftovers you have, except dessert, should be fine. They’ll eat it all. See this for more details on what your backyard birds can or can’t have.
Thanksgiving Treats that are Safe for Pets
If you’re disposed to feed a feast to your pet, first there are a couple of requirements. DON’T substitute treats for their regular food. And a good rule of thumb to follow is to give your pet no more than 10% of their daily caloric needs.
For instance, our dog Sophie weighs 30 lbs, and her daily caloric intake is ~600. So we shouldn’t give her treats in excess of 60 calories. Thus, her total treats shouldn’t be more than 60 calories combined.
But for your pets on Thanksgiving, you can either buy them their own special treat, or you can offer them:
You can give your pets fresh, plain cranberries in moderation. Though canned cranberry sauce is too sweet to give to them, while dried cranberries often have added sugar. Although, your fur baby might not eat plain, fresh cranberries, so try cooking them (without sugar) and combine them with pumpkin.
Apples are a great snack for your fur baby, but again, moderation is key. And be sure the pieces aren’t a choking risk, and remove the seeds and core.
pumpkin
Canned pumpkin is better than fresh pumpkin, because it’s cooked and has a higher concentration of fiber. But, if you get canned pumpkin, make certain it’s NOT pumpkin piefilling.
Both cats and dogs can have plain, green beans. However, cats need their veggies cooked since they lack an adequate way to break down plant cell walls.
***If you think your pet has eaten something on the ‘Do Not Eat’ list, call you vet or a local clinic ASAP. Signs of pain/suffering include an immediate change in behavior, lethargy, pain, vomiting, or loose stools.
Even if you have the calmest fur baby in the world, there’s still a lot to look out for and to be aware of when mixing guests and pets. Below are some tips for your pets to have an anxiety-free time.
Guests can stress our pets
When we have company, our cats hide in our bedrooms. And when we had Mabel, our bunny, he would also hide in my room, but under the bed.
Both cats and dogs experience stress when company visits their homes, however it’s for different reasons. Dogs are territorial, while cats don’t like things happening outside of the routine. But, if you’re already aware that your pet is nervous with a crowd, then put them in a separate room, closed off from access to guests, with some toys.
Or you could put your pet in a crate with their favorite toy, if you think someone might disturb them, to protect your guests. If your fur baby is very upset by company, talk to your vet about alternative solutions to this issue.
Just as our pets can get anxious by strangers in their home, our company can get nervous around our pets. Or the types of pets we keep, and exotic pets are no exception. So keep your company and exotic animals firmly away from each other.
With that in mind, if any of your guests are immune-compromised or pregnant, inform them about any and all pets, especially any exotics you may have.
If your pets get on well with company, this is even more important, because in the confusion of people coming and going, your pet can step out the door with no one the wiser.
Be sure that your fur baby has the most up-to-date identification, especially a microchip with current, registered information. That way, in the event they do manage to get out, they’re more likely to be reunited with you. If your pet isn’t microchipped, talk to your vet about it.
Watch your pet around decorations and plants
Don’t leave your pet alone with a burning candle, because accidents happen, and it could lead to a fire. Also, when it comes to decorating with plants, there are many that are harmful to pets. So it’s best to keep all plants and table decorations away from your fur babies.
Traveling with Your Pet at Thanksgiving
Now if you’re traveling with your pet, there are other things you need to take care of, such as:
making sure your fur baby’s vaccinations are up-to-date.
restraining your pet while driving, either in their carrier or a secure harness.
and finally, never leave your pet alone in the car.
If you’re like me, with 20-something backyard birds, 5 or 6 ducks, 3 cats, one that’s still intact and lives in the house, and 1 female dog, who’s also still intact and lives in the house, you might be trapped to your home. And thus, pets, because they all have a lot of different requirements.
But it’s ok, because I love them. However, I’d like to hear about you and your pets around the holidays. What do you do? Do you take your pets with you or do you board them? Or get a neighbor to keep an eye on things?
Thanks for stopping by! If you like this post, please like it, post a comment, and share it!
As soon as October arrives, it seems to me as if we’re in a race to get to January, because everything starts speeding along. First there’s several birthdays, and then it’s one holiday after another. Not to mention we lose daylight, so the days seem shorter. But don’t get me wrong, this is my favorite time of year. However, the thing I enjoy most is the taste of fall.
TASTE OF FALL
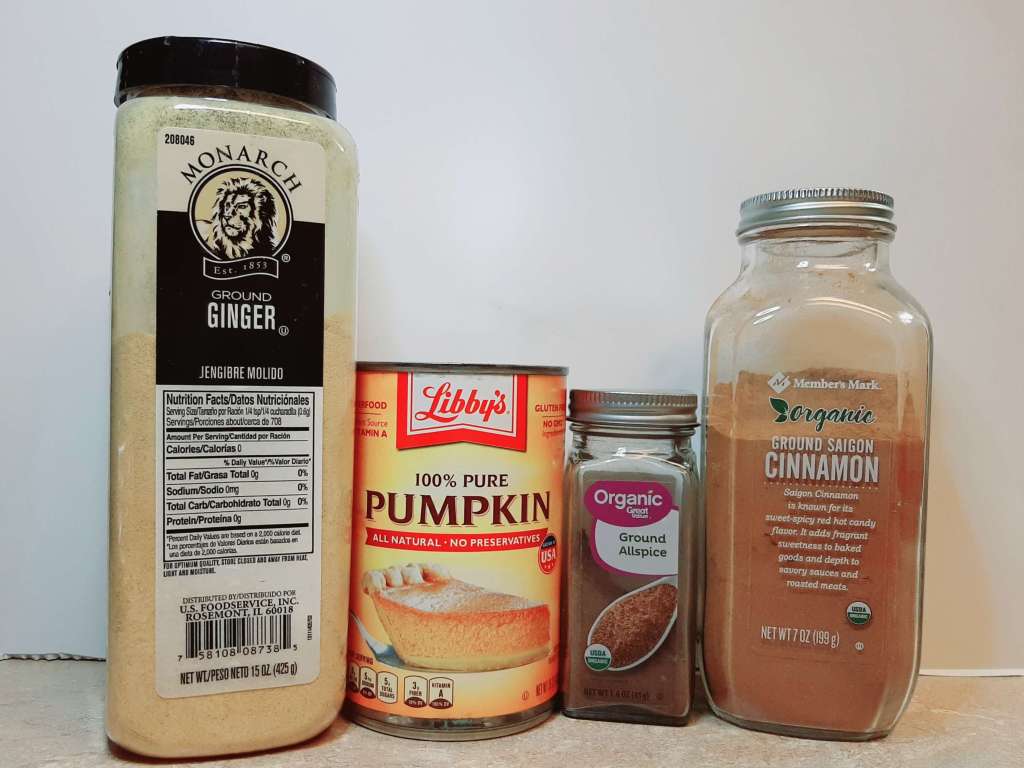
Well, what does that mean, you might ask. To me the taste of fall is pumpkin, allspice, ginger and cinnamon. And the smells and flavors can bring back memories of childhood holidays. Maybe individually. Or perhaps a blend of them. After all, some of my favorite recipes contain these very ingredients. So I want to share them with you.
Pumpkin Muffins
This is not my own recipe, and I’ve had it for 10+ years. Although I can’t tell you whose recipe it was originally, because I got it out of a library book and failed to get that relevant info. However, this is great to make and eat when warm, right out of the oven. And rather than raisins, you could substitute chocolate chips, if you’d prefer.
Ingredients for Pumpkin Muffins:
2 c flour
1 tsp baking soda
1/4 tsp baking powder
1/2 tsp salt
1 1/3 c sugar
3/4 c raisins
1/2 tbsp each of cinnamon, nutmeg, and cloves
2 eggs, beaten
1 1/4 c can of pumpkin
1/2 c vegetable oil
1/2 c water
The recipe doesn’t call for it, but I also added ~ 1/4 c of shredded coconut.
Instructions for Pumpkin Muffins:
Preheat oven to 375; and then line and grease 2 muffin pans with cupcake liners and non-stick cooking spray.
Combine the first 9 ingredients into a large bowl and make a well in the center of the mixture.
Next, beat the eggs and remaining 3 ingredients together.
Then add the egg mixture into the dry ingredients, stirring until moistened.
Spoon the batter into the prepared muffin pans, filling 2/3 full.
And bake for 20 minutes or until a toothpick inserted comes out clean.
Finally, remove from the pans immediately.
You can either eat the muffins as is, with nothing on them. However, I usually melt some butter and dip the tops of the muffins into the melted butter and then in some sugar. Another option is to make a glaze, using some milk and powdered sugar until you have the desired consistency, drizzling the glaze onto the muffins.
Pumpkin Sandwich Cake
This is another one of my all-time favorite taste of fall recipes, and consequently I make it almost every Thanksgiving. And just like the recipe above, I’ve had it over 10+ years, however I have no idea where it came from. Possibly a magazine. Furthermore, this is a rich dessert, with the ganache frosting and cheesecake type filling. Though it isn’t very sweet, just rich.
Ingredients for Pumpkin Sandwich Cake:
3/4 c flour
1 1/2 tsp pumpkin pie spice
1 tsp baking powder
3 eggs
1/4 tsp salt
1 c granulated sugar
3/4 c canned pumpkin
1 c whipping cream, divided
1/2 c powdered sugar
4 oz of cream cheese
1 c semisweet chocolate chips
Instructions for Pumpkin Sandwich Cake:
Preheat oven to 375 and spray 2 round standard cake pans with non-stick cooking spray.
Then line the bottoms of the pans with wax paper and lightly flour them.
In a bowl, combine flour, pumpkin pie spice, baking powder, and salt; and then set aside.
In a second bowl, beat the eggs and granulated sugar until thick, ~5 mins.
Next, beat in pumpkin, and add the flour mixture, and beat until combined.
Then spread the batter into the pans, and bake 16-18 mins. (They will be thin, and this is normal.)
Cool ~ 10 mins.
Filling: in a chilled mixing bowl, beat 1/2 c whipping cream till soft peaks form; set aside.
And in another bowl, beat cream cheese till smooth. Then beat in the powdered sugar, and fold in the whipped cream.
Next, turn out one cake onto a platter, and spread the cream cheese filling on top of that layer.
Then turn out the second layer on top of the cream cheese layer. The cakes will sort of resemble large pancakes.
Now it’s time for the ganachefrosting.
In a small saucepan bring the remaining whipping cream just to boiling over medium-hi heat. Then remove from heat, and pour over the chocolate chips in a medium bowl. DO NOT STIR. Just let it stand for 5 minutes.
After 5 mins, stir until it’s smooth, and then cool for 15 minutes. If the frosting is too thin, chill for 30 minutes; if it’s too thick, add some milk.
And finally, spread over the tops and sides of the cake and sprinkle with pumpkin pie spice. Chill 1 hour before serving and store in the refrigerator.
I started making pumpkin cheesecakes, alternately for Thanksgiving and Christmas, in the late 1990s when I first had a slice at a cafe outside of Nordstrom’s in the Galleria Mall in Dallas. It was divine, a combination of one of my favorite flavors and that distinct taste of fall. Also, I’ve gotten different recipes out of magazines and cookbooks, but I never made the same recipe twice until a couple of years ago. It was a Southern Living recipe, was pretty easy to make, and it tasted wonderful.
Gingerbread Loaf
My fourth taste of fall has the right blend of ginger, molasses, and sugar. Plus, it can be served for breakfast or as a dessert to complement a meal. And it reminds me of gingerbread cookies, which I love, because they’re not too sweet.
The recipe comes from Betty Crocker’s Best Christmas cookbook, 1st edition, published in 1999. Also, the recipe is originally intended as muffins, however I make it into a loaf. See below for instructions on how to cook as muffins. Moreover, if you choose to do that, you can melt butter, dip the tops of the muffins into the butter and then into sugar. Or make a glaze and drizzle over the muffins.
Ingredients for Gingerbread Loaf:
1/4 c packed brown sugar
1/2 c molasses
1/3 c each of milk and vegetable oil
1 egg
2 c all purpose flour
1 tsp each of baking powder and ground ginger
1/2 tsp each of salt, baking soda, and cinnamon
1/4 tsp allspice
Instructions for Gingerbread Loaf:
Heat oven to 350, and grease 1 standard loaf pan with non-stick cooking spray.
Beat brown sugar, molasses, milk, oil, and egg in a large bowl, using a spoon. Then stir in the remaining ingredients just until the flour is moistened.
Next, pour the batter into the prepared loaf pan, and bake 45-55 mins or until toothpick inserted in the center comes out clean.
Then cool for ~ 10 minutes before turning out. And you can serve warm if you want.
**If you make muffins, raise the oven temperature to 400 and only cook the muffins for 18-20 mins or until a toothpick inserted in the middle of a muffin comes out clean.
This is my final best-liked, taste of fall recipe, and it too includes ginger and cinnamon. But I started making this a couple of years ago when I subscribed to receive Taste of Home magazines. It’s their Vanilla-Glazed Gingerbread Scones recipe from their October/November 2019 issue. And, even though I haven’t had it long, I still have made this particular recipe several times.
Ingredients for Gingerbread Scones:
2 c all purpose flour
1/4 c packed light brown sugar
2 1/2 tsp baking powder
1 1/2 tsp ground cinnamon
1 tsp ground ginger
1/4 tsp salt
6 tbsp cold butter
3/4 c heavy whipping cream
1 large egg, room temperature
1/4 c molasses
1 tbsp maple syrup
Glaze:
1 c confectioners’ sugar
1/4 c heavy whipping cream
1 tsp vanilla extract
dash of salt
1/4 c of minced crystallized ginger
Instructions for Gingerbread Scones:
Preheat oven to 400. In a large bowl, whisk the first 6 ingredients. Then cut the butter into the mixture until it resembles coarse crumbs. In another bowl, whisk cream, egg, molasses, and syrup until blended; stir into crumb mixture just until moistened.
Drop dough by 1/4 cupfuls onto a parchment-lined baking sheet, and bake until golden brown, 12-15 mins.
Glaze: In a small bowl, combine confectioners’ sugar, cream, vanilla and salt; stir until smooth. Then drizzle over scones and sprinkle with ginger. Serve warm.
What is your taste of fall? Are there recipes that you make over every year, because they remind you of the season? Or because your family just loves them so much? I’d love to hear about them.
Thanks for stopping by! And if you liked this post, please like, post a comment, and share.
Recently I mentioned ways to make a bakery style cake when making box cake mixes. And usually those tips work great for most, if not all, cake mixes. However I also noted that October is Smith family birthday month, and at the end of the month we celebrated my youngest’s birthday. She wanted a red velvet cake, therefore I needed to know how to make a red velvet cake mix better.
I could have made her cake from scratch, but I’m busier than I think I’ve ever been before. Thus time was and is precious. So as long as the cake tasted good, I was fine with using a box cake. Consequently I did a little research, knowing ahead of time the add-ins and switches I was already planning on making and then discovering a couple of new things. The following is the recipe I used for my daughter’s birthday cake.
Ingredients for a better red velvet cake mix
2 boxes of red velvet cake mix
1 cup of melted butter
6 large eggs
1 c of plain Greek yogurt or sour cream
1 1/2 tbsp apple cider vinegar
2 1/2 c buttermilk
2 egg yolks
1 large package of instant chocolate pudding
1 tsp vanilla extract
handful of lightly floured chocolate chips
Originally, when I was in the planning phase of this birthday cake, I wanted to make it a 2 tier cake like the last cake. However, when I went to the grocery store, there were only 2 red velvet box cakes left. So I bought those and 1 box of Duncan Hines dark chocolate fudge. With this recipe you can either make a standard double layer round cake, a 13 x 9 inch single layer cake, or cupcakes.
Instructions for a better red velvet cake mix
Preheat the oven to 350
Grease your pans with non-stick cooking spray
In a large bowl or stand mixer, blend your first 9 ingredients together, starting on low speed
Increase your speed to medium, scraping the sides of the bowl
And beat on medium speed a minute more, a little bit longer if using a hand mixer
Next, stir the lightly floured chocolate chips into the batter
Then pour 5 1/3 cups each of the batter into your prepared pans
Remember, it’s important to measure the batter of your hacked cake mix, because if you don’t, your cake might overflow!
Bake 30-35 mins or until a toothpick inserted comes out clean
Allow the cake(s) to cool ~10 minutes before turning it out, and a further 2-3 hours or overnight to completely cool before frosting
Furthermore, I made the cream cheese frosting, while Hannah decorated the cake and cupcakes.
It’s interesting to note that a lot of people, when doctoring their red velvet cakes, choose instead to make yellow cakes and add food coloring. There are many tasty ways to hack a box cake. I hope you’ve enjoyed this post.
Thanks for stopping by! And if you like what you read, please like, post a comment, and/or share.
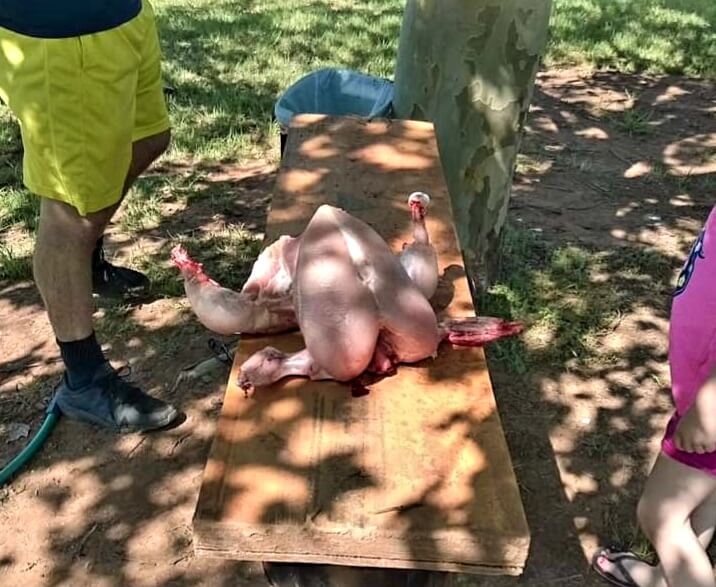
Not long ago, I posted a recipe for marinated duck. You probably guessed that the duck came from our backyard. And if so, you would be correct, because we have Pekin, mallard, and hybrid ducks. But I never covered when to process Pekin ducks. Or even how to cull them. However I get to that in another post.
Processing Pekin ducks is different than chickens, because it isn’t based on the seasons. When I discussed culling roosters, we found out chicken people typically cull and process their birds in the fall. But again, that isn’t the case with ducks.
Due to their large amount of feathers, waterfowl are generally slaughtered at 3 different times during their life cycle. And this is because it’s easier to pluck their plumage when there are no immature or pin feathers. So this is around 7, 12 1/2, or 18 weeks for ducks. Unless there are extenuating circumstances.
Best Times to Process Ducks
Pekin ducks put on weight faster than chickens, so you don’t have to worry about meat. But if you’re planning on plucking the feathers, then the best time to cull them is when there are no pin feathers. Again, that’s when the ducks are 7, 12.5, or 18 weeks old.
However I mentioned that there are other conditions that could come up, prompting a desire for marinated duck. For example, at some point, you might have an excess of drakes compared to ducks. Or you could have an abusive drake, who needs to go. Which is what happened with us in both cases.
Two Pekins and a mallard made up our original ducks that we bought from Atwood’s, during the lockdown, last year in May. Though, after my husband incubated some eggs, we ended up with a surplus of drakes. 2 more to be exact. Kirishima was the most senior drake. But he was also the most aggressive. And we thought that, after mating season, he would calm down, however that didn’t happen.
When to Process Pekin Ducks
You can cull a duck at any time you want or whenever circumstances demand it. Furthermore, duck meat can be eaten at any age (of the bird), but, as expected, it’s more tender the younger the bird is. And just as with processing roosters, we don’t de-feather. Rather we just skin the birds, which is the easiest method. However then you mainly get the breasts. So if you prefer a whole bird that also looks nice, skinning your duck won’t be an option.
Thanks for stopping by! If you enjoyed this post, please comment and share it!
Recently I posted a recipe for making a bakery style cake, but I didn’t include the recipe for the frosting. Most of the time my go-to frosting is made from whipping cream and Truvia. However, when my daughter and I made the baby shower cake, we needed a frosting that was going to hold up to decorating as well as taste good. And buttercream was the best option. So here is an easy homemade buttercream frosting.
Ingredients for Homemade Vanilla Buttercream Frosting
2 cups of softened butter
~ 4 cups of powdered sugar
3 tsps of vanilla
4 – 6 tbsps of heavy cream
Instructions for Homemade Vanilla Buttercream Frosting
First, put the softened butter into a mixing bowl, and with a mixer, beat it until smooth.
Next, mix in the powdered sugar, blending in about 1/2 cup at a time into the butter.
Then add the salt and vanilla until well mixed.
Finally, combine in the heavy cream until the frosting is the perfect consistency.
When I was looking up information on buttercream recipes, most, if not all, of them called for a lot of powdered sugar. But when I made, first the chocolate buttercream and then the vanilla buttercream frosting, I realized I didn’t really need as much as all of the recipes were calling for.
Also, if your frosting is too thin, that’s the primary method of thickening it. But that’s not the only way, if you don’t want a sickly sweet frosting, and your icing needs more weight.
Although, if you don’t mind your cake being very sweet, then by all means, add as much powdered sugar as you want. But be sure your frosting is spreadable.
Thanks for stopping by! And if you enjoyed what you read, please like, post a comment, and share this with others.
In July of this year (2021) we got a new member of our household. She’s an Australian Shepherd Mix. The ‘mix’ is part miniature Aussie. And she’s about 7 1/2 months old. I briefly mentioned her before, however not in any detail. So, without further ado, I want you to meet our newest pet: Sophie!
Not that we didn’t have enough animals to keep us busy. But there was still a hole to be filled for my husband and middle daughter, because our last dog passed away around the beginning of last year (2020).
For the longest time the only kind of animal we had was a dog. And it was usually the same kind of dog for the past 20 years. But obviously not the same dog. And since our Sheltie, Moses, died last year, Paul and Hannah have wanted another one. Even though we have enough animals to go around.
At first Hannah looked through ads or Googled similar animals to Moses. However that soon proved to be cost prohibitive. Think thousands of dollars.
When Paul and I first married, he already had a Sheltie. So we got another one, which was the runt of the litter. But she only cost us ~$350. Then when both of them passed away, (due to old age and an accident), we got Moses. Again he was the last of the litter. And we got him for the swinging deal of $200. That was in 2006.
Fast forward to present day, and we realized quickly that the cost of dogs is definitely not the same. It seemed like every dog we were interested in or called about had AKC papers. Although we could care less about such things. Because we would’ve been interested in another runt without papers. What do breeders do with those dogs?
We toyed with the idea of getting one from a shelter. However we weren’t certain we’d be able to find a dog that would match our home: We have chickens, ducks, 3 cats, and an 11 year old. And we also had a bunny at the time.
Several months and a scam later, one of our neighbor’s connected us to an older couple. They had Sophie originally and very likely realized they couldn’t take care of her or meet her energy requirements. So they asked our neighbor, their friend, if they knew anyone who wanted a dog.
And that’s how we acquired Sophie. The only stipulation her previous owners charged us with was that we kept her name the same. Thus we left her name untouched.
Being an Aussie, she has boundless energy, from 5 am till 9 pm or later. She’s definitely rarin’ to go before the sun rises. And she can outrun any of us. Additionally she’s an exceptional acrobat.
Also, she likes to scare the birds, including my chickens and ducks. But her best friend, other than Hannah, is my kitty, Itty Bitty. They play with each other. And often times they can be seen napping near one another.
Sophie is easily trained when food is at stake. So far she has learned to beg and dance for her dinner. No, just kidding. But seriously, she can walk across the room on 2 paws. All for food. And she’s also house broken.
Though there are other things she picks up on. For example, when my kids play with her: They’ll end up playing hide and seek after they throw her ball or toy. And after a couple of throws, Sophie realizes the kids are disappearing. Which makes her hesitate to run after her toy. Or she tries to keep an eye on them.
She’s certainly a lot of fun to watch. But she has way more energy than I do. Since she’s supposed to be a work animal, I’ve joked that Paul should put her to work. Then she’d be worn out by bedtime. And he said he was going to make a comic out of that. One where she’s mowing the lawn.
Thanks for stopping by! And if you liked this post, please click like or leave a comment and share!
Not only is October full of family birthdays, but then there’s Halloween. And this year I also had the pleasure of baking a baby shower cake for friend at work. I volunteered to do it, and although I planned on a box cake the whole time, I wanted it to taste better than boxed. So I practiced with my ingredients. Thus this is one way how to make a bakery style cake.
My daughter Hannah helped me by decorating the cake. Since we both work during the week, I baked the actual cake and made the frosting. That way she could just decorate and not stress about it.
She wanted to get new pans for the project, so we got 8×3 in and 6×3 in pans for a tiered cake. And while we were getting pans, we bought all of the other items we would need for the cake: fondant, stencil shapes, food coloring, 3 box cakes, etc.
Suggestions for Making a Bakery Style Cake
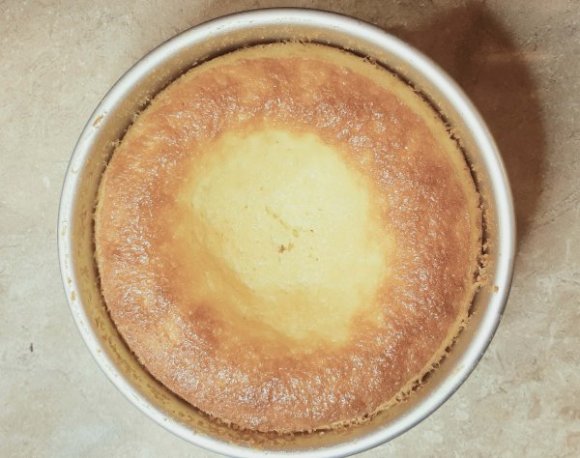
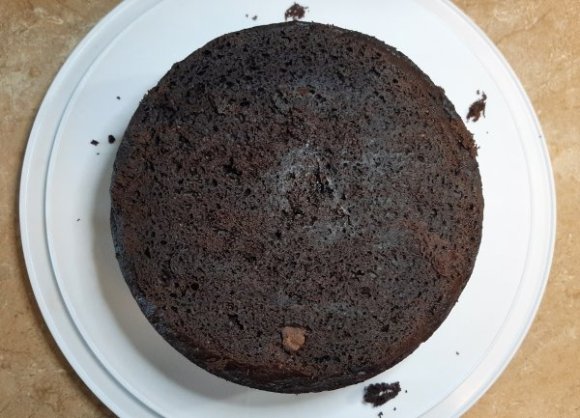
Since the cake I ended up preparing was a baby shower cake, that’s the recipe I’m going to use. But there are a lot of good sources out there on how to make bakery style cakes. Or on what you can add to your cakes. Also, because the cake was two tiered, I made the smaller layer a yellow cake, and the bottom layer was chocolate.
Ingredients for a bakery style yellow cake
1 box of yellow cake mix
3/4 c of water
3 eggs
1 egg yolk
7 tbsp of melted butter
1 small pkg of instant vanilla pudding mix
1 tsp of vanilla extract
1/4 tsp of salt
Instructions for a bakery style yellow cake
Heat oven to 350 degrees.
Spray your pan with non-stick cooking spray.
Mix all of your ingredients together with a mixer until mixed. But don’t overmix.
With a 1-cup measuring cup, pour 3 cups of cake batter into the 6×3 in pan.
And cook 40-45 mins or until a toothpick inserted in the center comes out clean.
Now we’ll move onto the chocolate layer.
Ingredients for a bakery style chocolate cake
2 boxes of chocolate cake mix
2 cups of coffee
6 eggs
1 egg yolk
2/3 c melted butter
1 small pkg of instant chocolate pudding mix
a handful of chocolate chips
Instructions for a bakery style chocolate cake
Your oven should be heated.
Spray your pan with non-stick cooking spray.
Mix all of the ingredients, except for the chocolate chips, with a beater until combined.
Then, when you’re ready, lightly dust the chocolate chips with flour before adding them to your batter.
And measure 5 cups of chocolate cake batter into the 8×3 in pan.
Finally, bake for 55-60 mins or until a toothpick inserted comes out clean.
Let the cakes cool completely before putting them together. And then frost with your favorite buttercream frosting.
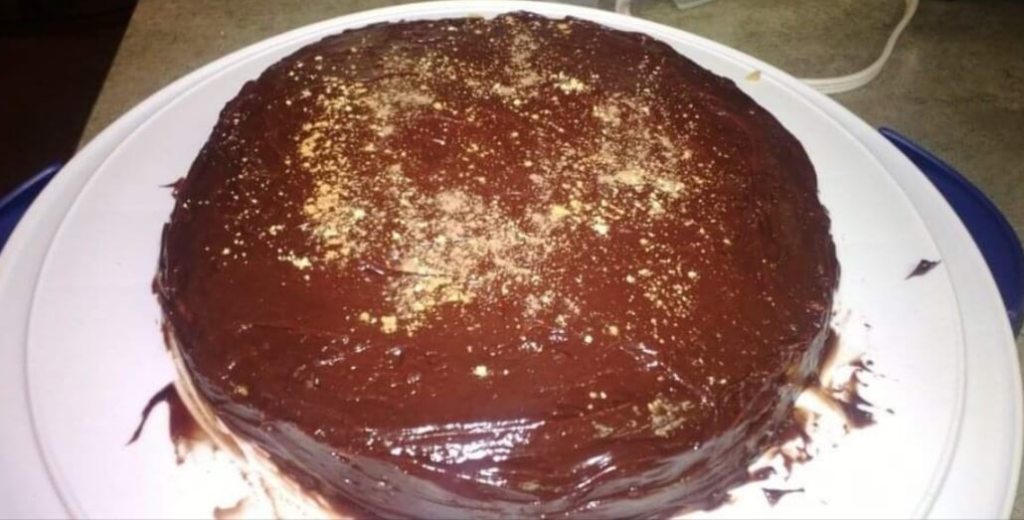
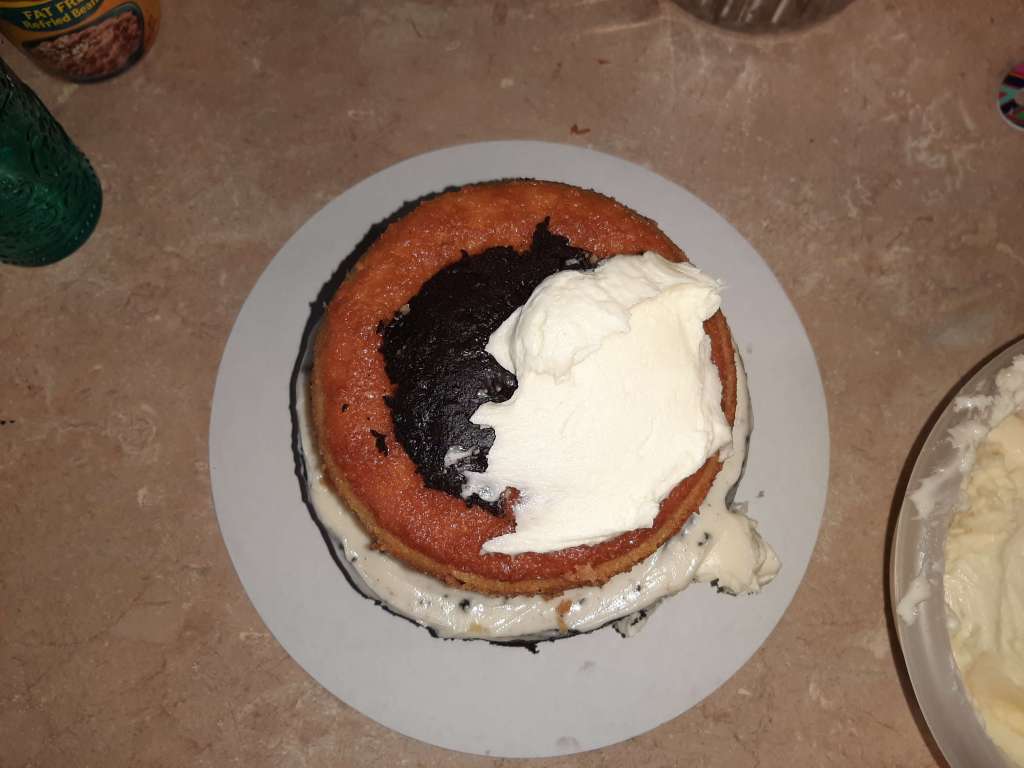
This is the top of the cake when it was finally put together and decorated.
I found a great chart to help if you ever need to know how much batter to add to your cake pans. Normally you have 9×13 or standard round cake pans. And regular box cakes will fill those just fine with no issues. However if you upgrade your cake, you might discover that you have more batter, and thus they’ll overflow if you don’t measure the batter out.
This is the front view of the baby shower cake.
How to Make a Bakery Style Cake Every Time
So I just gave you 2 recipes or suggestions on how to upgrade the box cake. But now I’ll give you more tips so your cake will taste great and be fluffy.
Always switch out melted butter for oil
Add 1 or 2 extra egg yolks
If you have a chocolate cake, use coffee instead of water
If using another brand, other than Duncan Hines, add 1 cup of sour cream
Add a small pkg of instant pudding mix to the batter; the flavor of the pudding to match the cake
And you can also add nuts, coconut, chocolate chips, and even fruit to your batter
But one of the best things you can do, to make your cake taste awesome, is to frost it with homemade frosting
Thanks for stopping by! And if you enjoyed this post, please like, post a comment, and share it with others.
One of my recent posts was on when to cull roosters. But now you might be wondering about the best way to cull a rooster. I’ve read of many ways, from wringing their heads off to shooting them. However, if your birds are your pets, you want something more humane. Or perhaps you just don’t like to see an animal suffer. I’ll cover both the best way to cull and process roosters.
Although this is the best method to cull a rooster, you will likely still feel remorse. Especially if this is your first time. My husband still feels bad every time a roo needs to go. But it can’t be helped, because the hens come first. However we’ve tried many ways to cull our chickens. And none of them were as humane as this one.
Boning knives or fillet knives are great for killing and processing chickens due to their size and sturdiness.
Re-purposed milk jug or a metal cone
If you only cull birds once in a blue moon, then you can just use that milk jug you were about to toss out. But, if instead, you regularly process birds, then you might want something more permanent.
You’ll need plenty of paper towels to clean up as you go. And to clean up afterwards.
Bleach spray
You have to disinfect your work area when you’re finished. So you can use Clorox Clean-up Disinfecting or make your own.
Work bench or table
Having a work bench or table to process the bird, after it’s properly culled, is a must.
Bucket to collect blood
Rather than letting the blood drain onto the ground, and possibly attract predators, the bucket will collect the blood. And you’ll dispose of it later.
2 Stainless steel bowls to collect the meat
One bowl is for collecting the meat as you process the chicken, while the second bowl is for after you’ve cleaned/washed the meat.
Rope or straps to hang bird from tree branch
The rope or straps go around the bird’s legs to suspend him.
and a Rooster
You can’t actually process a rooster without the, ahem, rooster.
Instructions for Culling a Rooster
First, you choose your rooster.
After you have him, do your deed in a private spot where the other birds can’t see. However, they will likely still know when Joe or Frank don’t return.
Next, put your bird upside down, in the metal cone or milk jug.
Then tie the rope or straps around his feet and hang him from the tree.
The blood will rush to his head and make him calmer. Perhaps even a little tired.
And push back his neck feathers, finding the carotid artery by his pulse. Further, using a fillet or boning knife, gently slice a large enough slit to let the blood drain out.
Or you can cut his head off with pruning shears or an axe. Though, if you’re culling several birds, you will need either several sharp knives for the job, because they’ll soon go dull before you finish.
Keep the bird in the cone, because the blood will take 2-5 minutes to drain out. Also, it takes time for the nervous system to calm down, ~ 2-10 minutes.
Best Way to Process a Rooster
Now it’s time to process the meat. If you are so inclined to keep the skin on your chicken, you can visit this site for instructions. But we’ve never processed our birds that way. We’ve never taken the time to de-feather them just to keep the skin. It sounded like way too much work for only a couple of birds.
Rather we de-skinned them, and it was the easiest thing ever. Of course I say that like I had any part in it, other than cheering from the sidelines. Maybe, after all the butchering, Paul was just ready to be done with the whole thing. And so he decided to skin them. But maybe not. Perhaps it was his intention the whole time to skin them. I really don’t know, I never asked.
I did have some friends, who have backyard birds, and they culled some. They tried the boiling method, in order to de-feather them, so they could have skin on their chicken. And they promptly told me that they were never doing that again.
Instructions for Processing Roosters
Leave the bird hanging from the tree
This is in order to process the bird. You don’t want to cut into the intestines or anus, contaminate your knife, and then the rest of the bird. Think of this as surgery.
Skin the legs and body
Using a sharp knife, start skinning from the legs. The skin will start to separate from the meat, but you will need to be careful around the rump, lower back, and where the wings attach to the abdomen.
Separate the parts
Sever the elbow joints, because there isn’t enough meat there anyway. Then cut through the neck. All that’s left is the meat and legs. Dispose of the neck, tail and oil gland, wing tips, and skin with feathers.
Remove the carcass from the tree and cut off the legs. Next, cut open the bottom cavity to pull out the intestines. Then wash the carcass in a bowl of fresh cold water.
If you like chicken giblets, keep the liver, heart, and gizzard.
Clean the bird
This is best done with running water. And be sure to cut away lungs, trachea, testes, and unwanted fat. Also, remove any remaining feathers around the legs and wings.
And cut up the bird
Depending on the bird, you might not get much meat except breasts. In which case, you just put the breast down on the cutting board and cut on both sides of the cartilage. Then you slide your fingers along the breast bone until it peels out.
So now you know how to cull and process a rooster. You don’t have to worry about freezing a whole bird, because it’s perfectly cut up, and will fit nicely into your freezer. And you don’t have to worry about all the feathers, or about how inhumane killing chickens can be. Although, you still might feel bad.
The first time I prepared chicken straight from our backyard, that was of non-broiler breed, I made it in one of the ways I usually do. Which means, in that case, I roasted it. But oh, was that a mistake. And because of that experience, I want to save you the trouble by sharing the best ways to cook a cockerel.
You may be asking, what is a cockerel? Well, a cockerel is basically a young rooster. The main difference between a regular rooster and a young one, being their age difference. But for our purposes, you don’t want to cook a regular old rooster. Or even one that’s a year old. And that’s due to the inherent toughness of roosters and layers in general.
At this point you might be wondering if any of this applies to you. And if so, why would you want to slaughter any of your birds? Well, if you have layers with a mixed flock, there’s a high likelihood that you have a dual purpose breed. And supposing you have more than one rooster, or don’t want the one you have, then you have all of the elements needed to produce some of your own food.
To answer the question why though: because you would know what was going into your food, from the very beginning. There’s no doubt if the rooster was healthy, taken care of, and fed good, quality feed, that whatever meal you made of him would be healthier than the broilers from the grocery store. However you might have to get used to the flavor.
How to Cook a Cockerel
So what are the best ways to cook a young rooster? I already mentioned one way not to prepare it. And now I’ll go over the most preferable ways to prepare a cockerel.
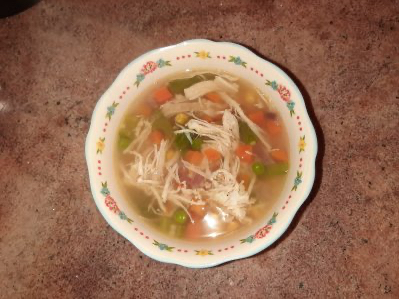
The best ways to cook a cockerel, young rooster, or a laying hen that’s been put out to pasture, so to speak, is in a soup or stew. Or prepare it in something that has a sauce or is full of flavor, like a casserole. For instance
Chicken Soup
My first choice, for cooking your own backyard rooster, is some kind of chicken soup. The second time I prepared one of our own cockerels I made one of my mom’s chicken soup recipes. And it tasted like a typical grocery store chicken. My family and I couldn’t tell the difference at all, except we knew where the bird came from.
Next, my second option is something like Southern Living’s King Ranch Chicken. It too is slow cooked and is full of flavor, which is essential to hide the gamey flavor of backyard bird.
You don’t want to try roasting your backyard birds, unless you have broilers. And that’s because they won’t taste good. You’ll definitely notice the strong taste and tough meat on the bird. Which will dissuade you from ever wanting to try it again.
Have you ever tried eating or cooking backyard chicken? If so, what did you think? Thanks for stopping by, and please don’t hesitate to leave a comment!